Find the right tool in XrmToolBox

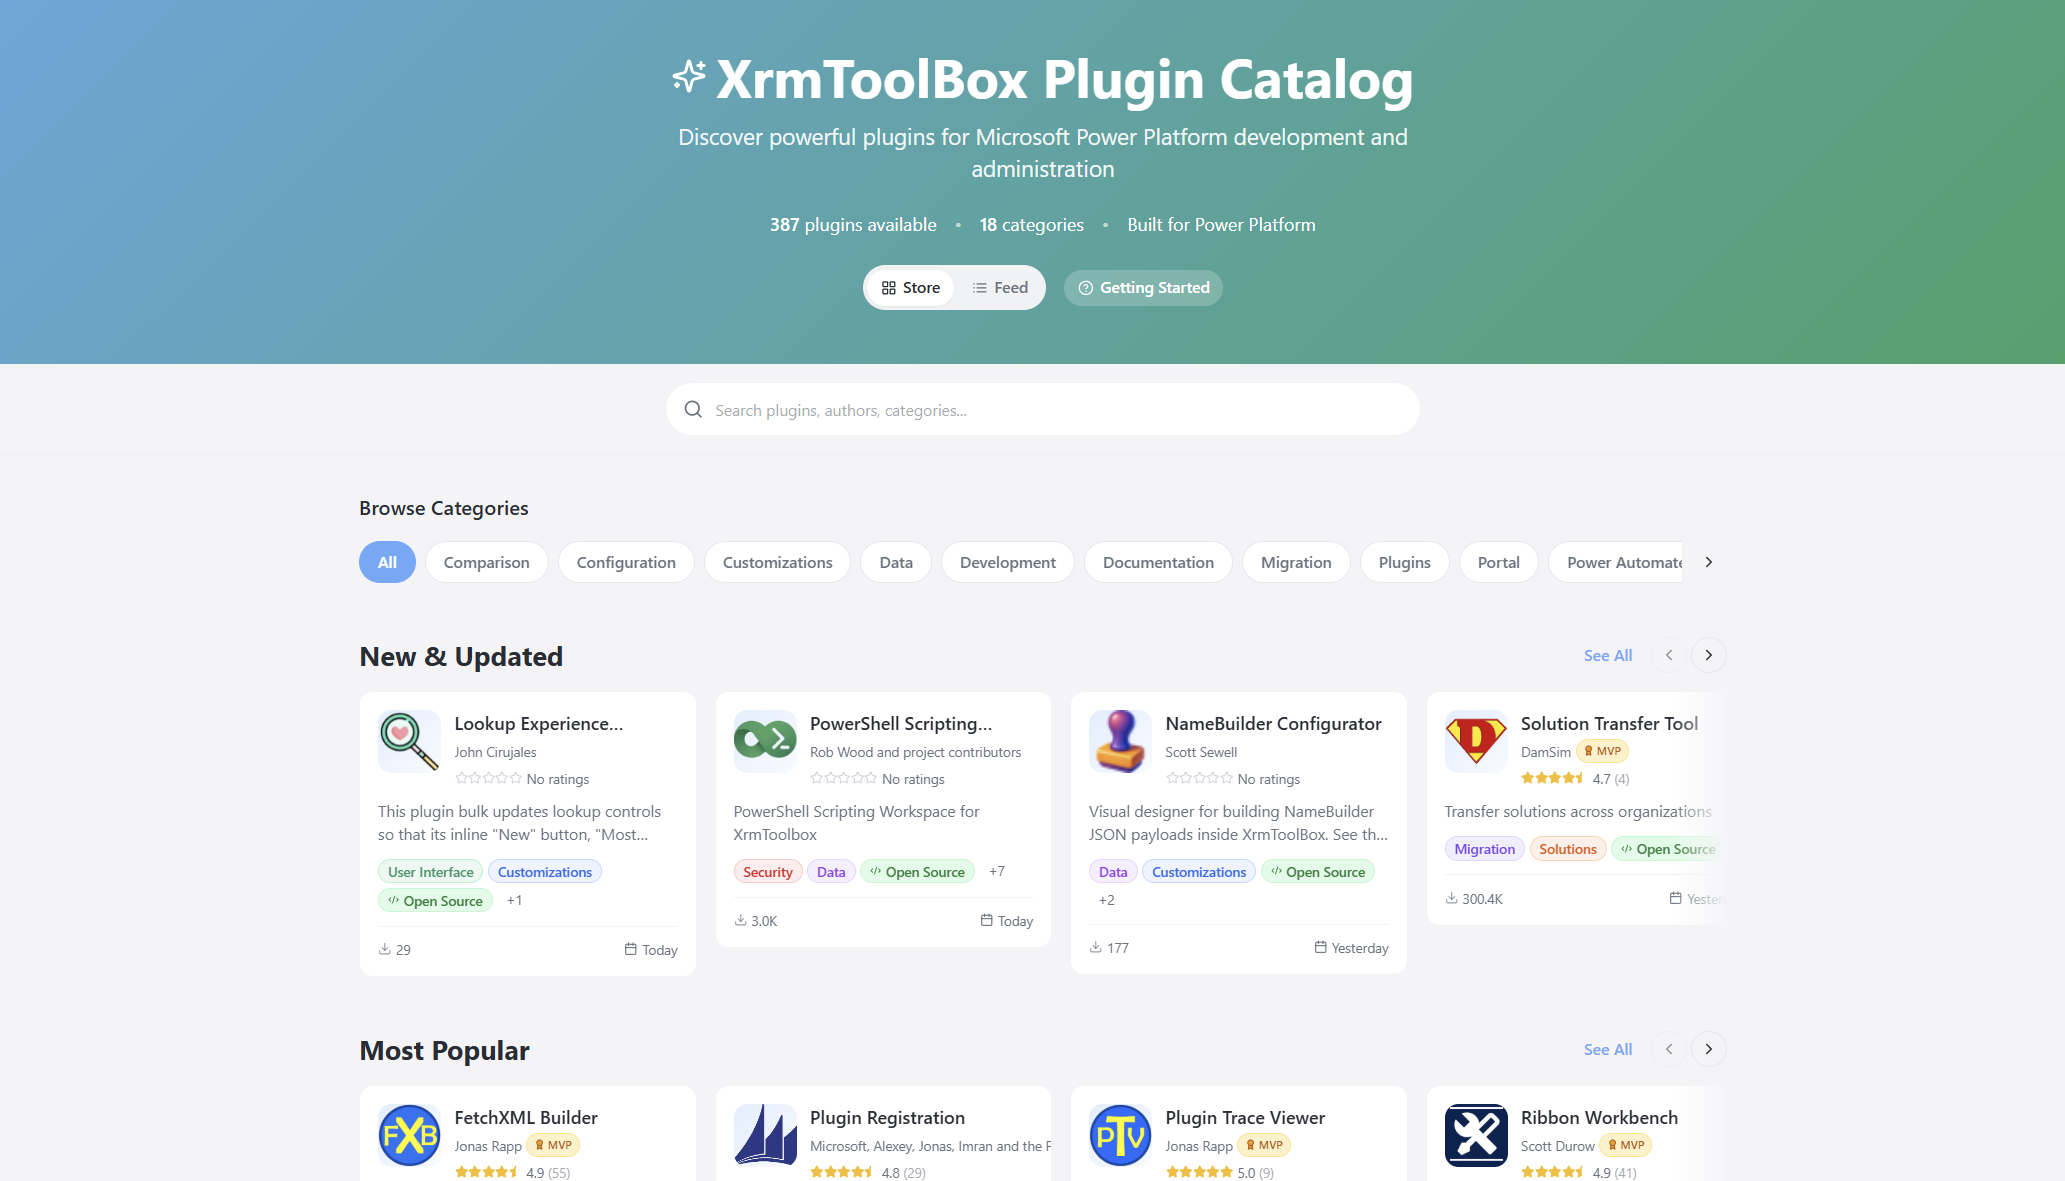
A modern site to browse and discover community tools for the Power Platform and Dynamics 365: XrmToolBox Plugin Catalog.
Continue reading Find the right tool in XrmToolBox at Jukka Niiranen blog.
A modern site to browse and discover community tools for the Power Platform and Dynamics 365: XrmToolBox Plugin Catalog.
Continue reading Find the right tool in XrmToolBox at Jukka Niiranen blog.
![]()
My dedicated website for all things Microsoft licensing (Power Platform, Dynamics 365, Copilot) has now been launched. Introducing: The Licensing Guide.
Continue reading The spirit of the licensing.guide at Jukka Niiranen blog.
Dynamics 365 Customer Insights – Journeys is one of the most preferred modules offered by Microsoft, which provides a flexible platform that enables organizations to engage their audience across every stage of the customer journey.
It empowers businesses to create personalized, timely, and meaningful interactions based on customer behavior and preferences. As we all know, understanding your customers is not a one-time activity; it is a continuous journey that evolves with every interaction. Targeting the right audience to perform any marketing activity is the key to success.
When running marketing activities in Customer Insights – Journeys, the most important question to answer is:
“Who exactly should receive this message or journey?”
This is where Segments play a key role.
Segments in Customer Insights – Journeys allow you to group Contacts or Leads based on a defined set of attributes or behaviors. These segments act as the foundation for targeting audiences in real-time journeys, emails, and other marketing engagements.
Using segments, you can:
Segments help transform generic marketing campaigns into highly targeted and strategic journeys.
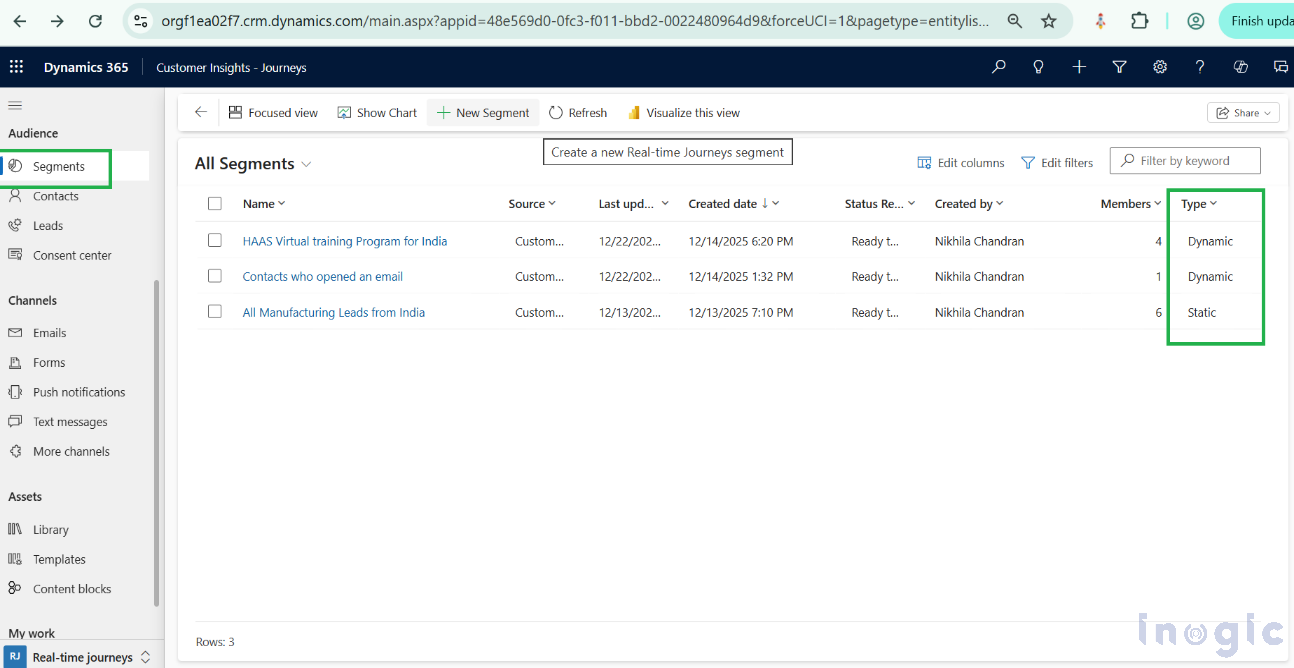
There are two types of segments available in Customer Insights – Journeys:
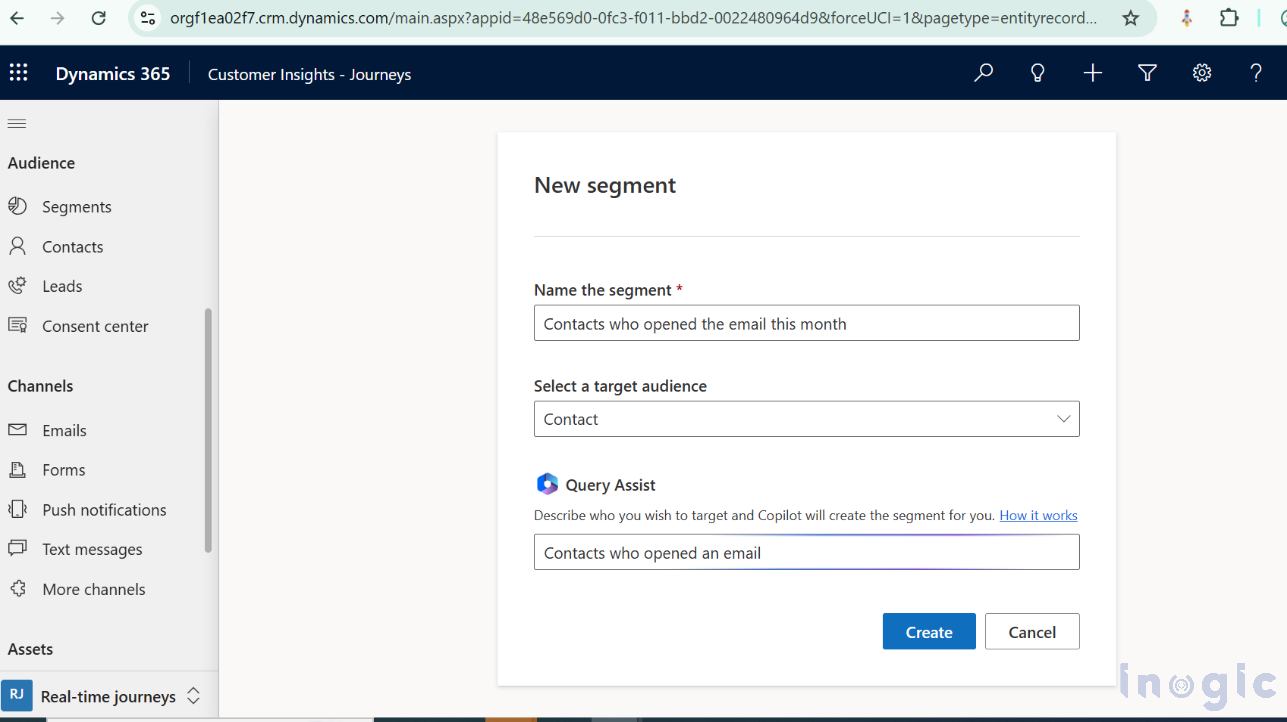
In earlier versions of the Marketing app, users could choose the segment type directly while clicking the New Segment button. In the current Real-time Journeys experience, this behavior has changed.
Now, you must:
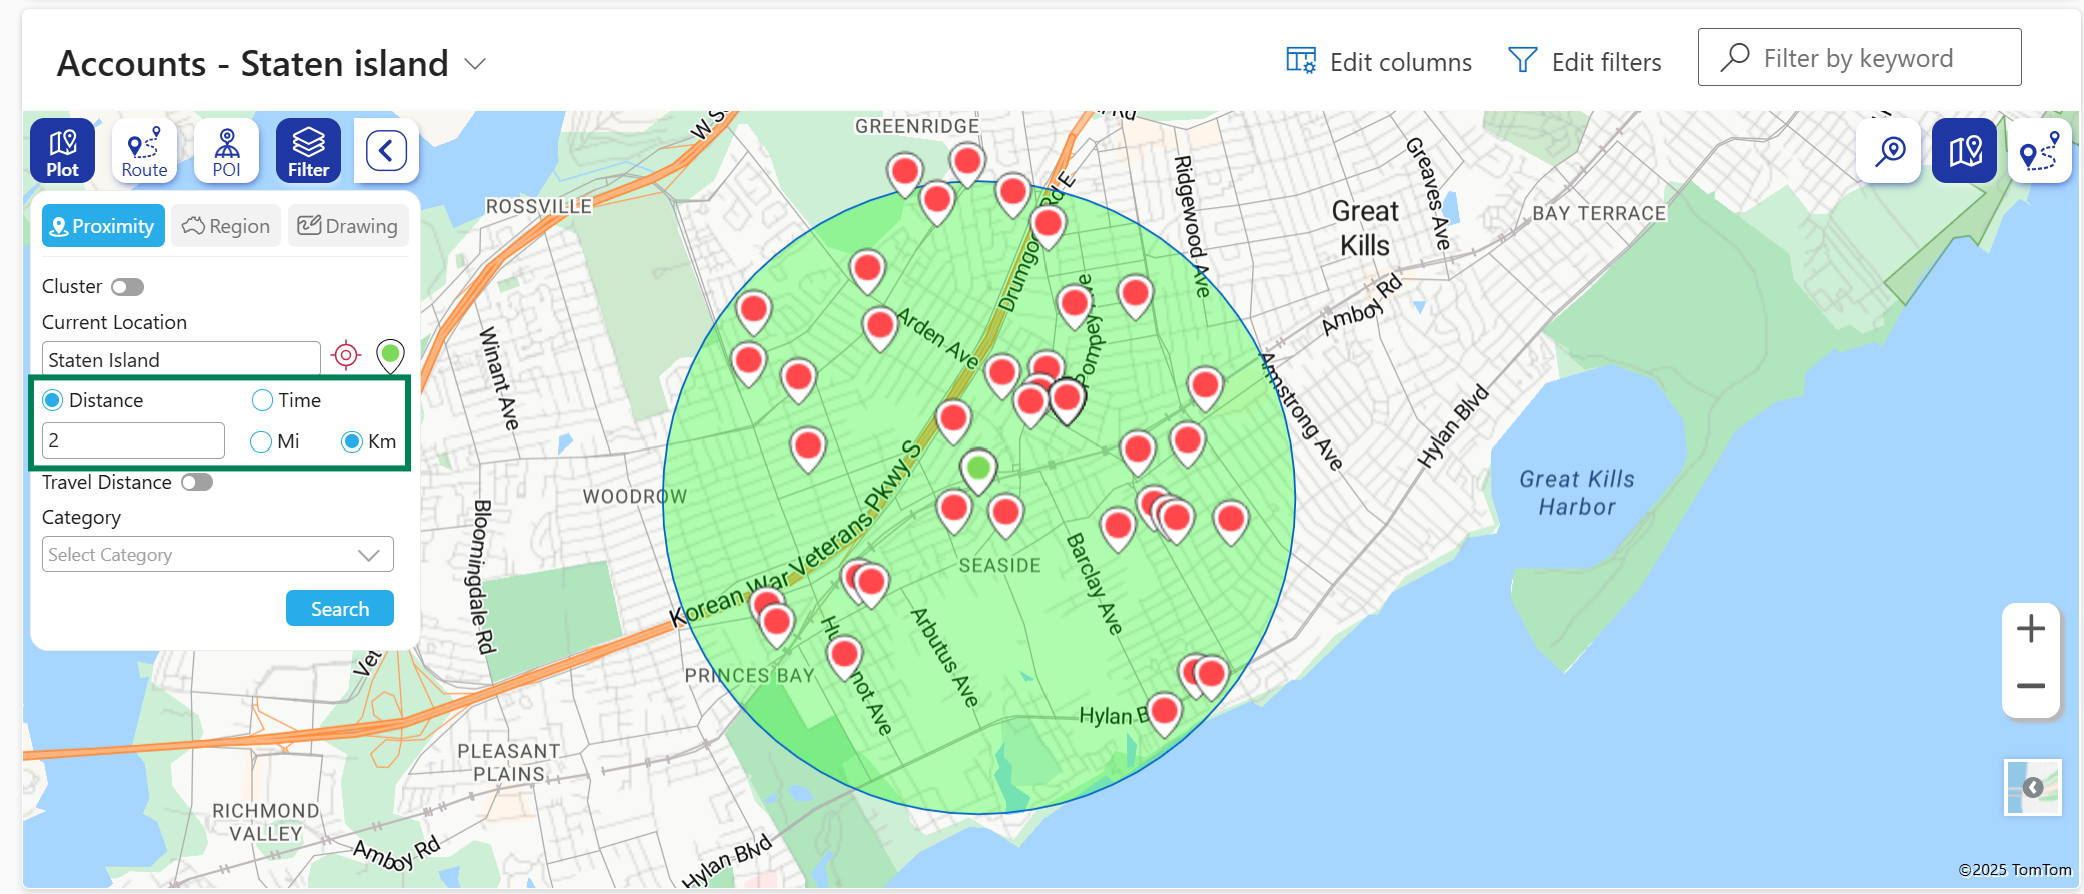
To access segments:
At the segment record level, you will notice a Type field that indicates whether the segment is configured as a Static Snapshot or an Automatic Refresh.
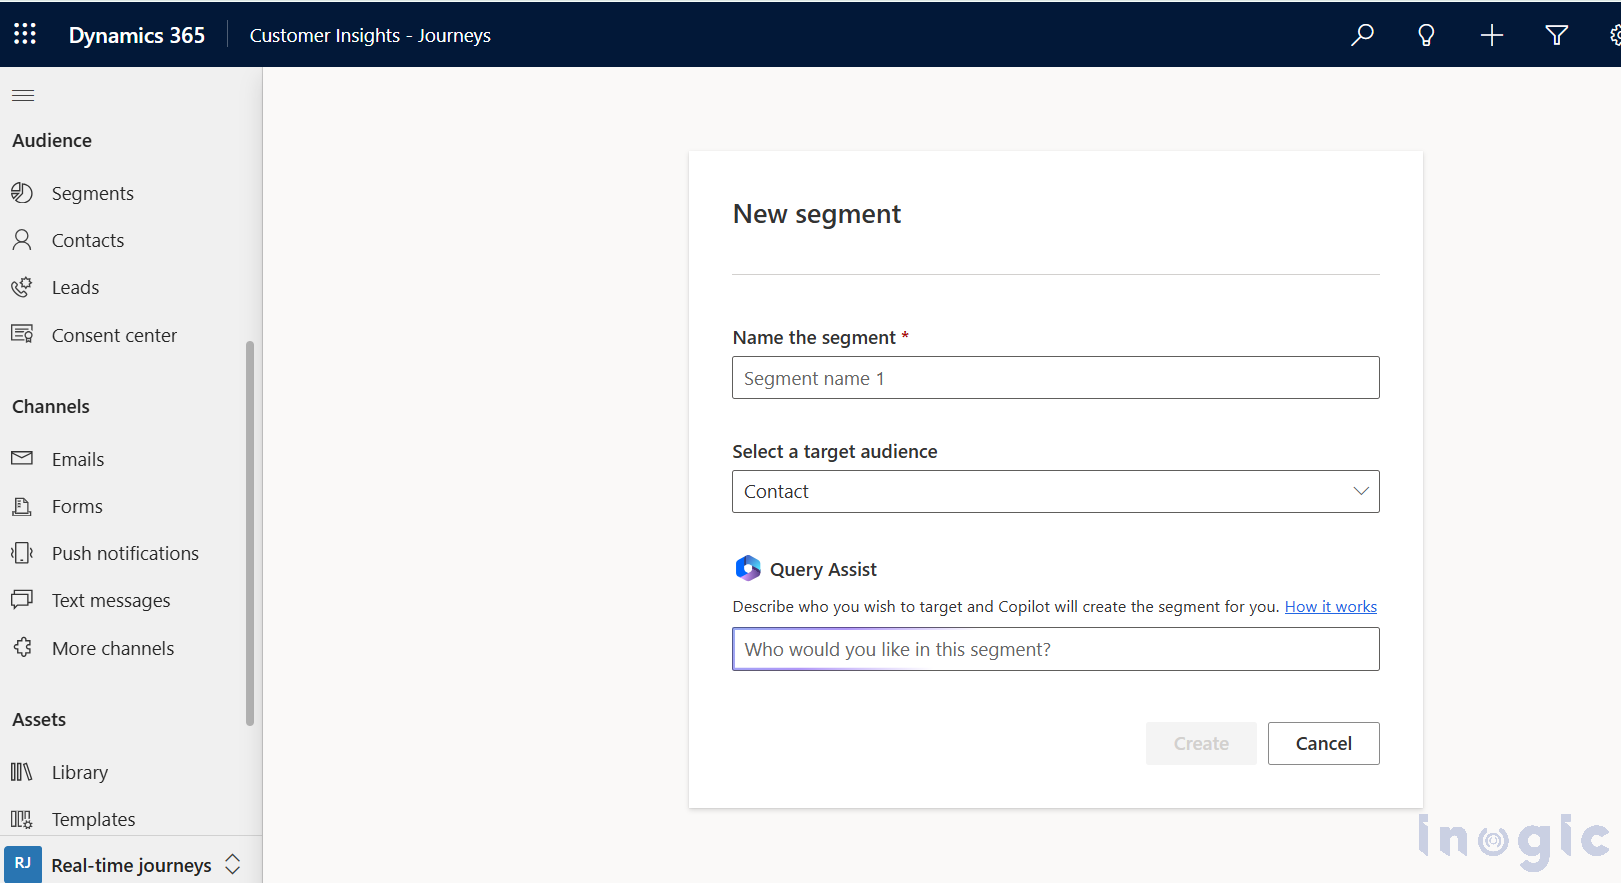
When you click New Segment, you are no longer prompted to choose between Static or Dynamic upfront. Instead, the segment is created first, and its behavior is defined later.
During creation, you have two options:
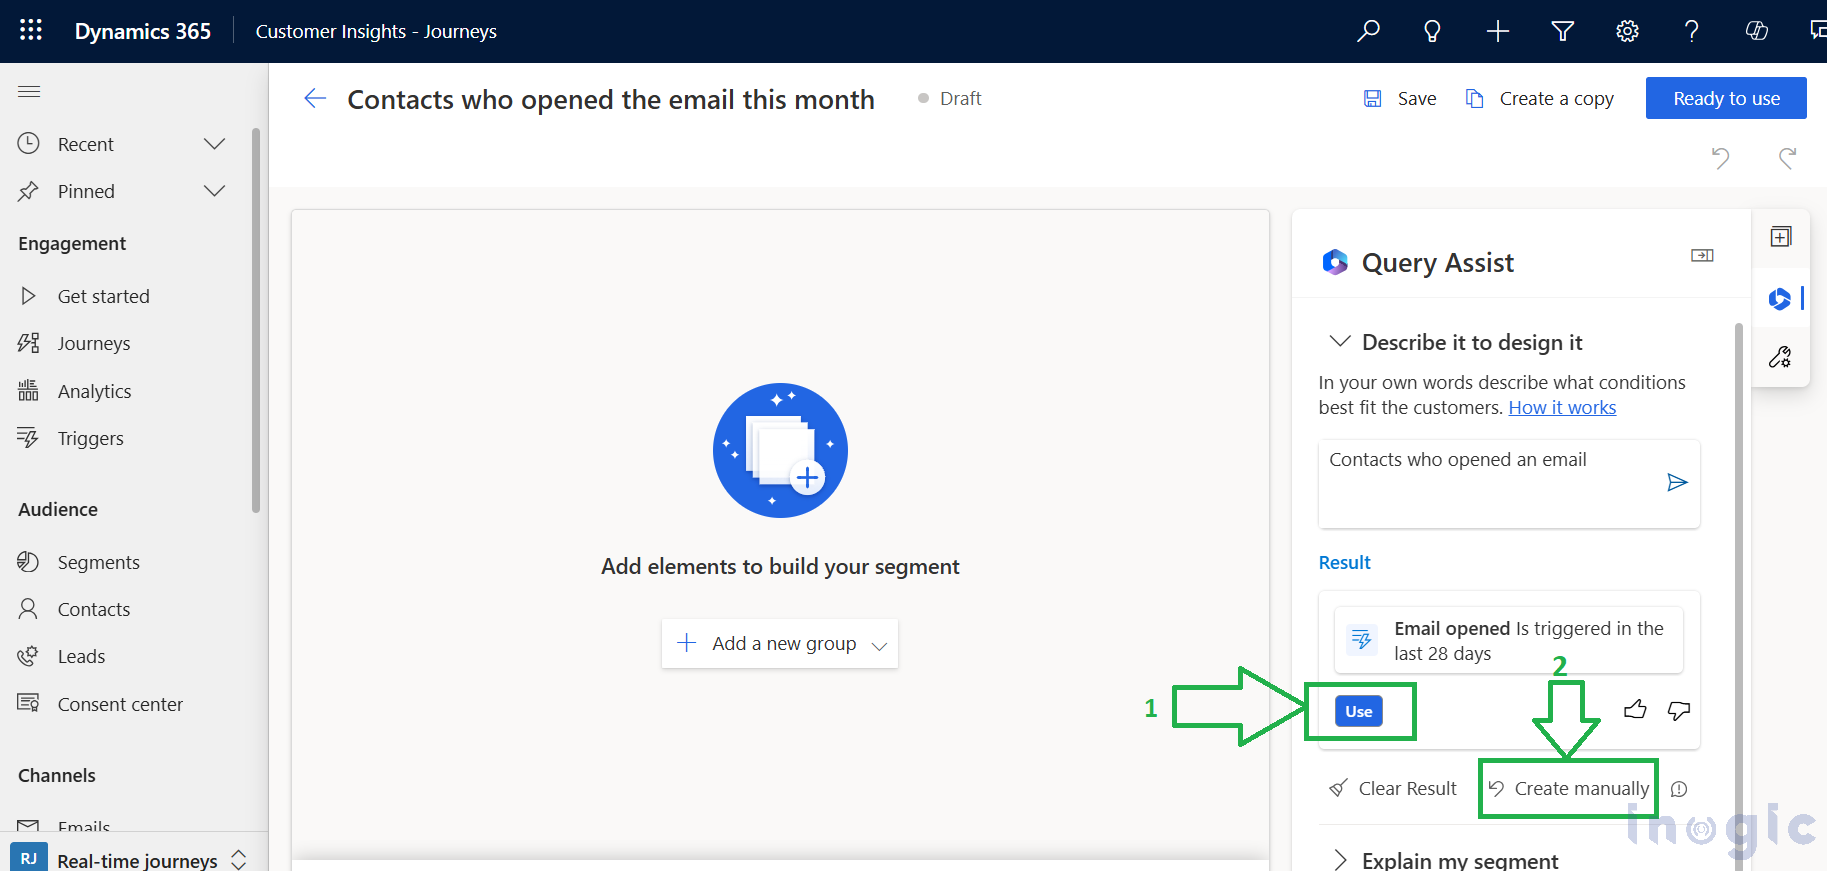
Query Assist allows Copilot AI to help generate segment logic.
You can either:
Once selected, Copilot helps build the initial query structure based on the chosen prompt.
During creation, you have two options:
Query Assist allows Copilot AI to help generate segment logic.
You can either:
Once selected, Copilot helps build the initial query structure based on the chosen prompt.
You can find more details in this doc for understanding the building segment with “Query Assist”.
If you prefer full control:
This opens the Segment Builder, where you can define your logic from scratch.
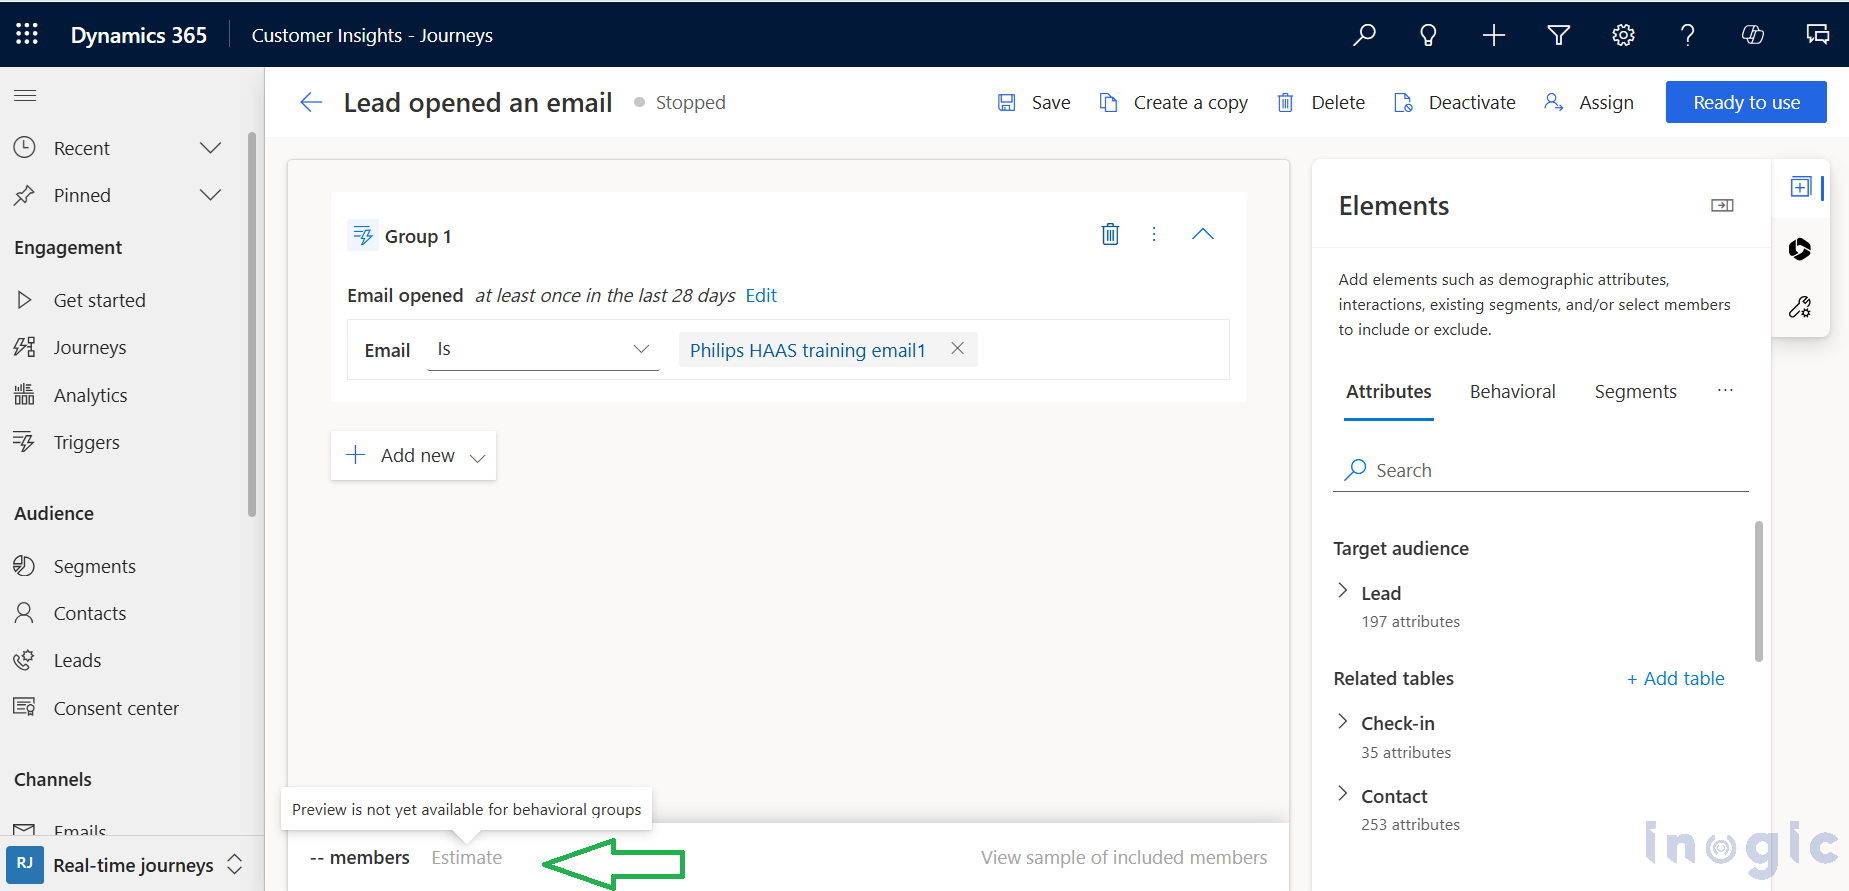
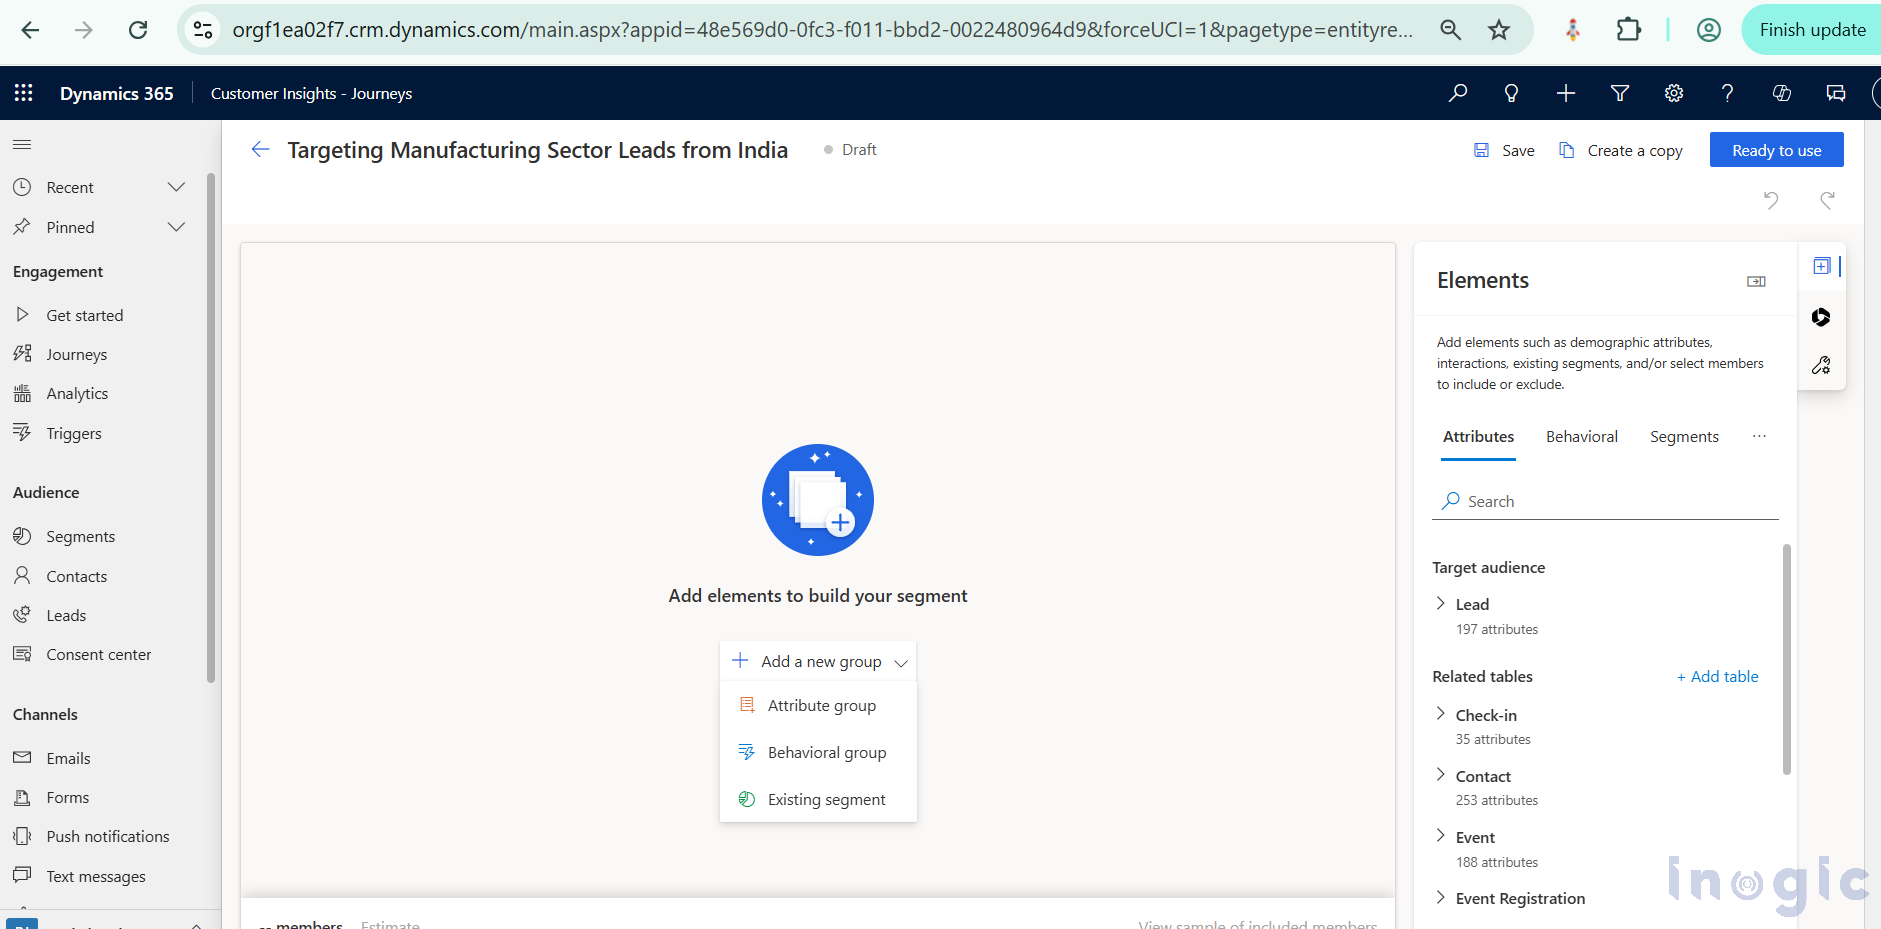
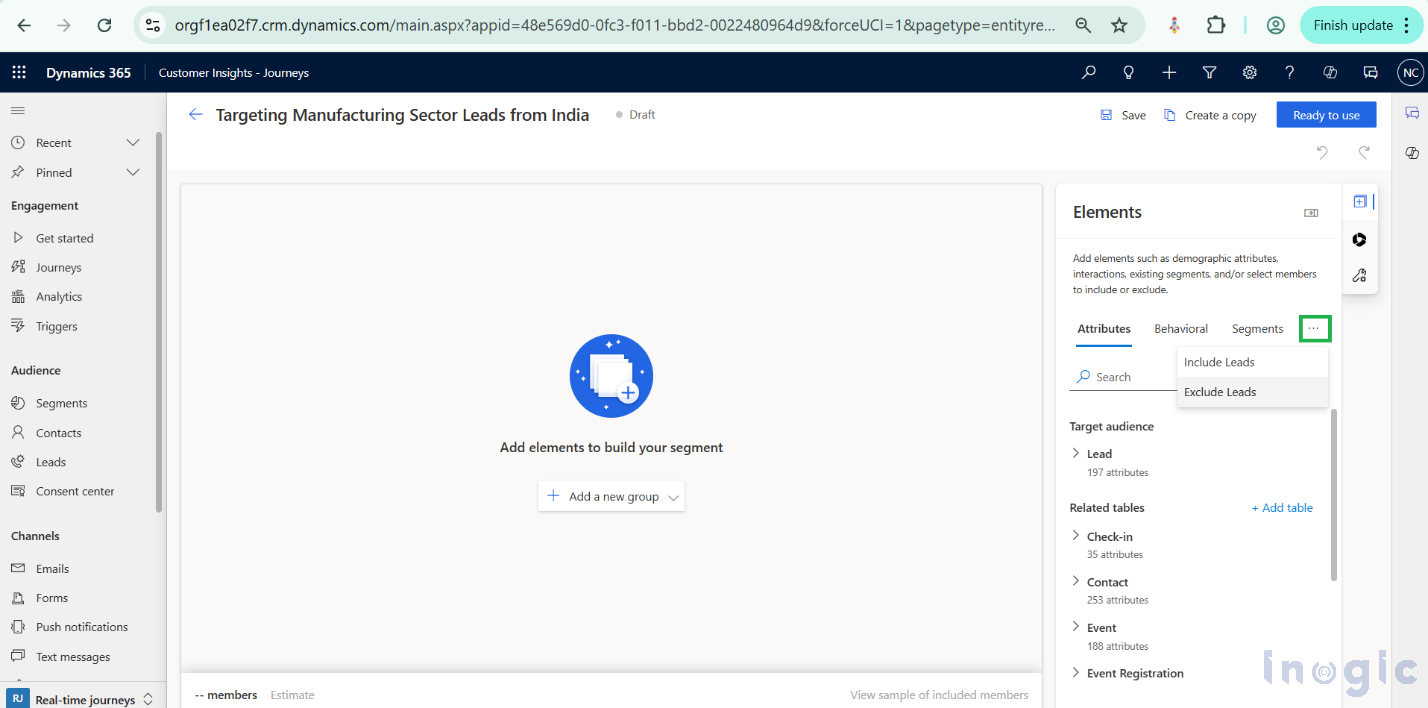
Inside the Segment Builder, you can define segment criteria using:
You can explicitly include or exclude records. Even if a record does not meet the defined conditions, it will always be included or excluded if specified manually.
If you include or exclude any lead explicitly, then even if it has not met the pre-defined condition, it will always be filtered and will be included or excluded from the segment member list.
When you open Segment Builder, you can start creating a new group by clicking on the desired options (either Attribute or Behavioral). if required, you can Include or Exclude a particular audience as well.
Refer screenshots below:
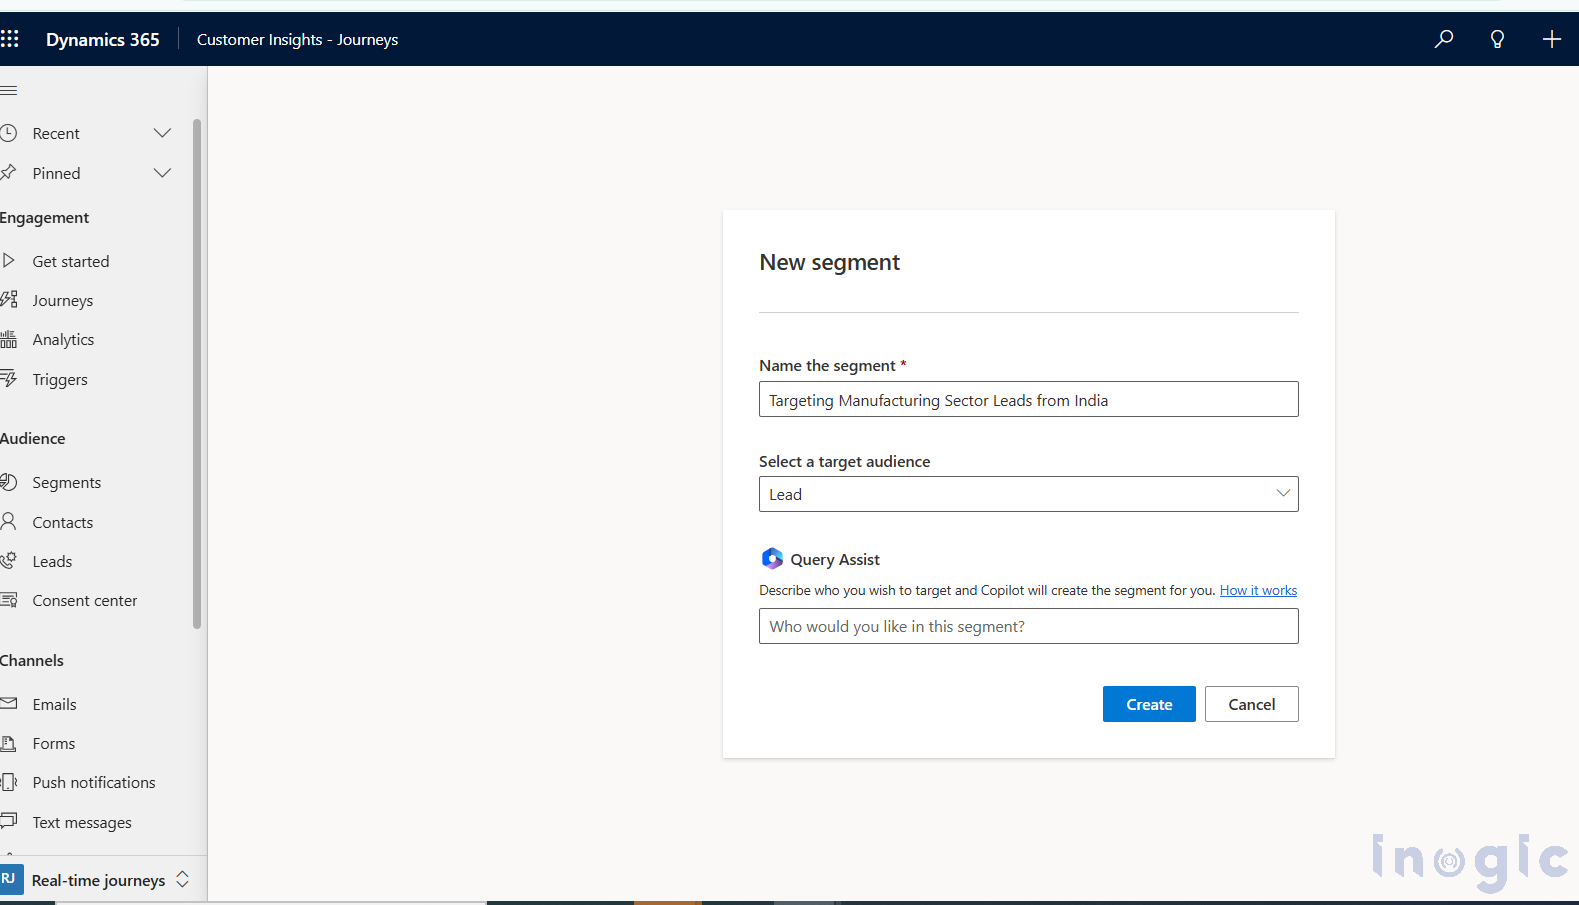
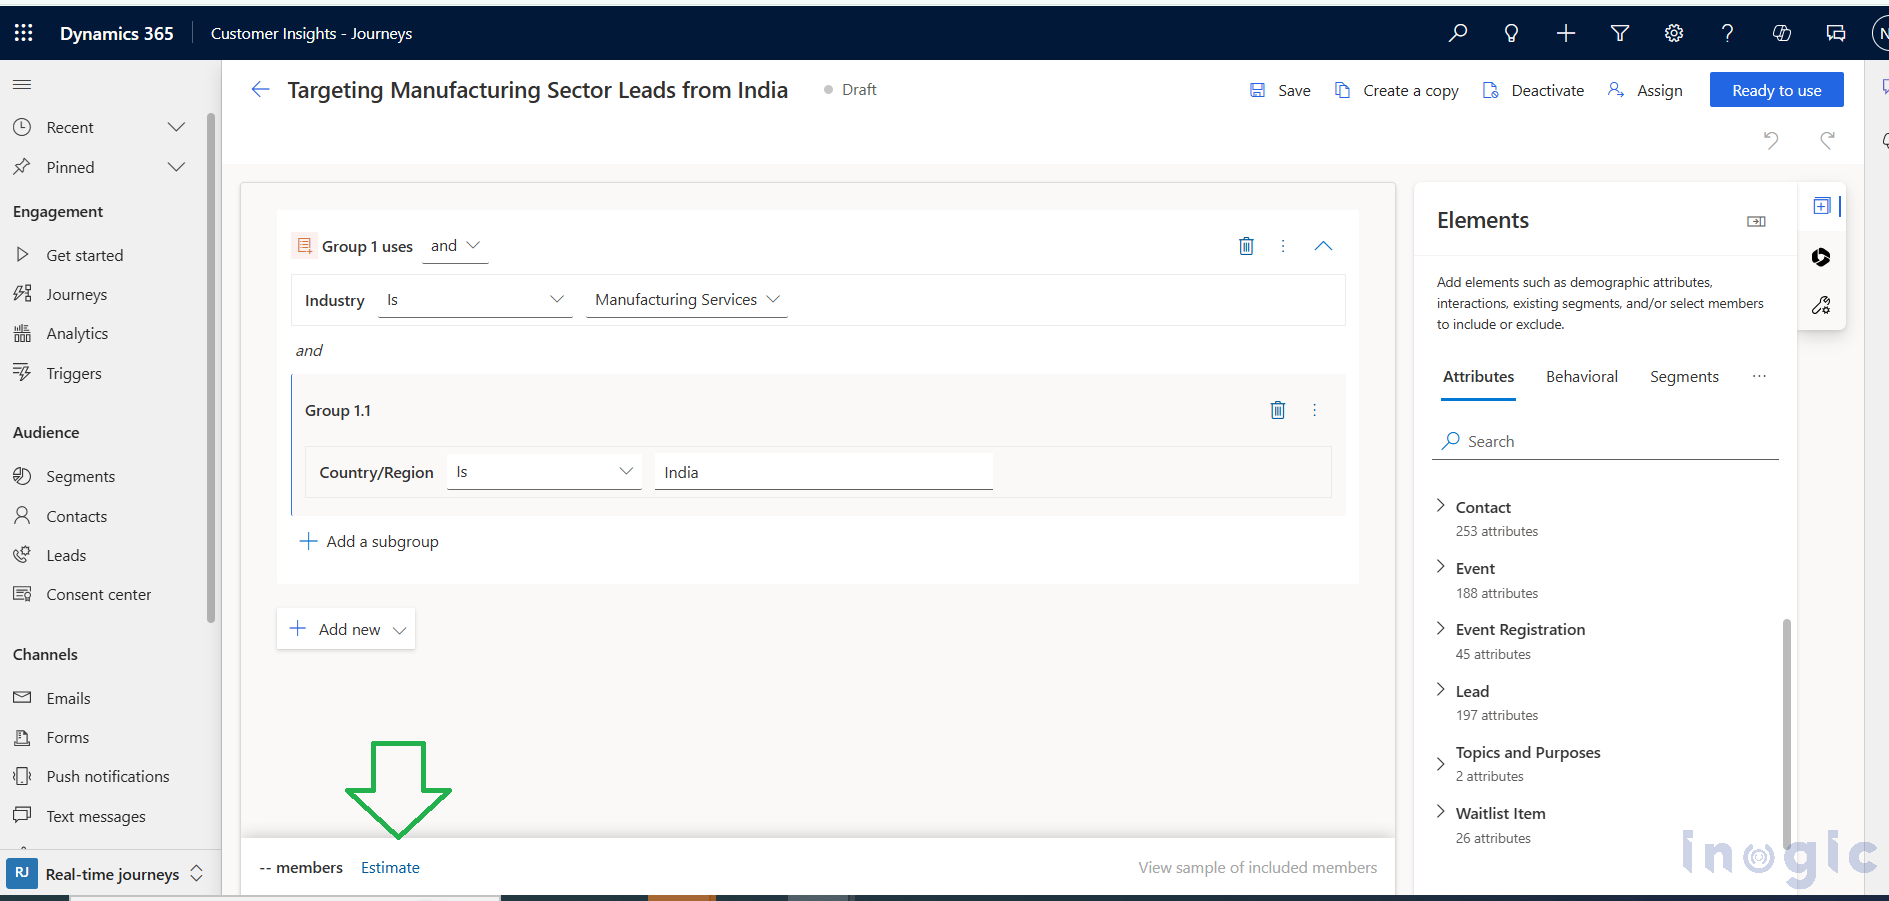
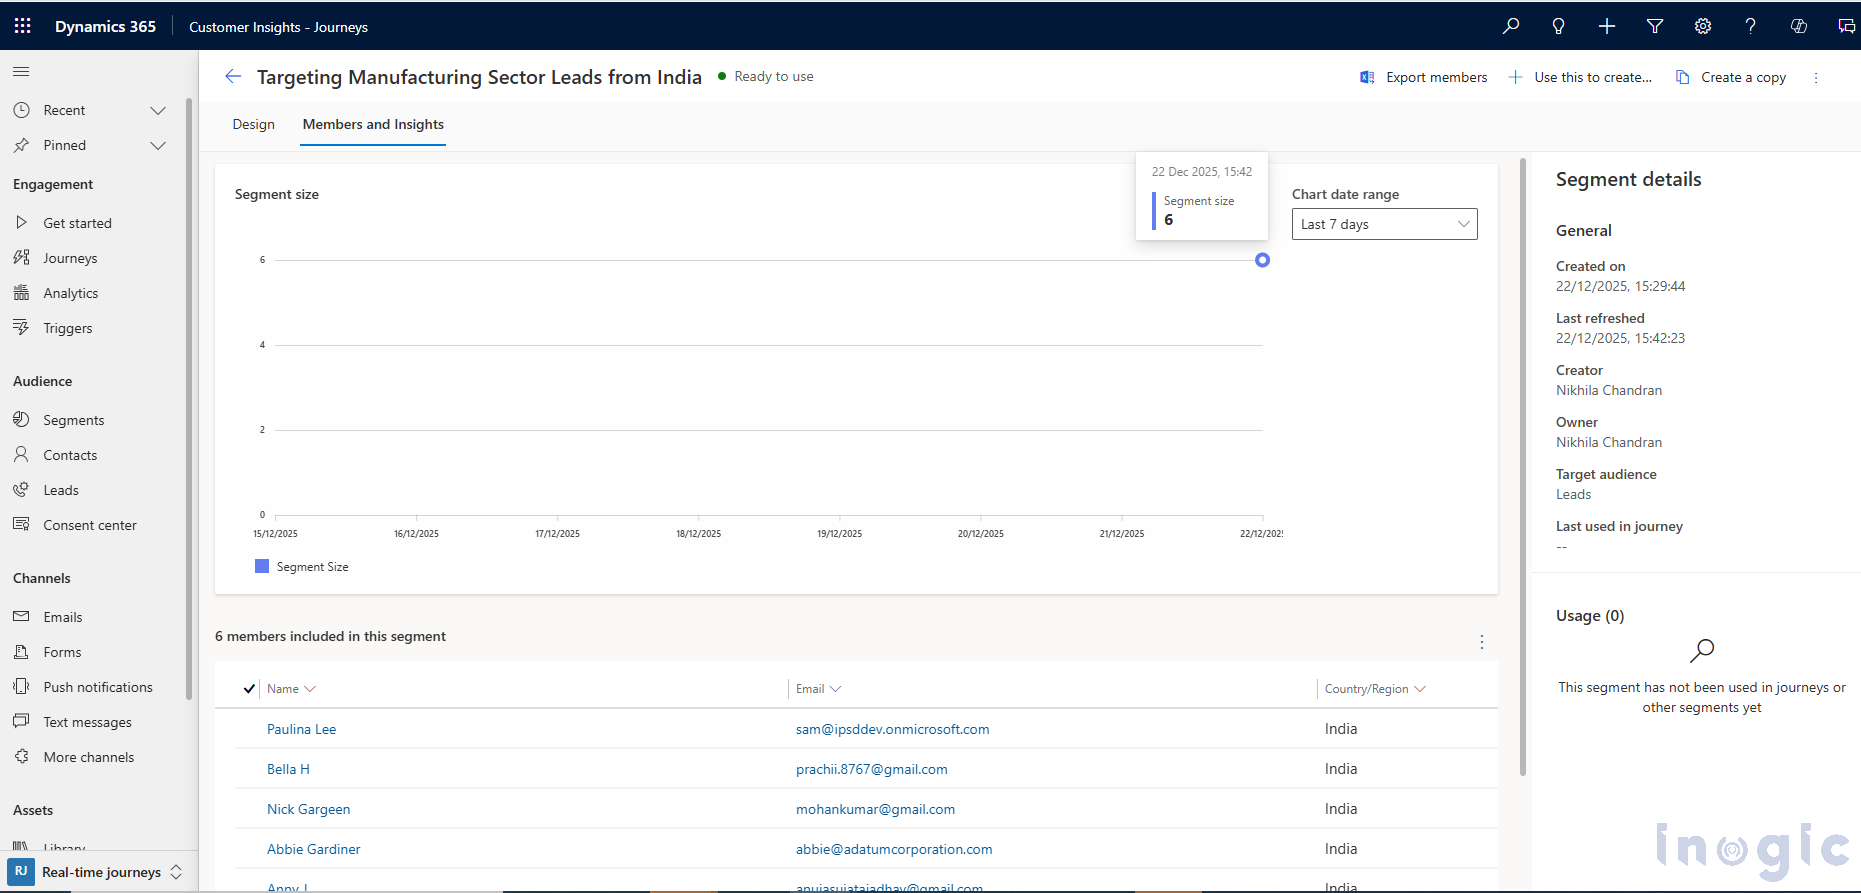
Let’s consider a practical example.
Use case:
Target Leads from the Manufacturing sector located in India.
Segment conditions:
You can create an Attribute group and define these conditions accordingly. Once the logic is complete, save the segment.
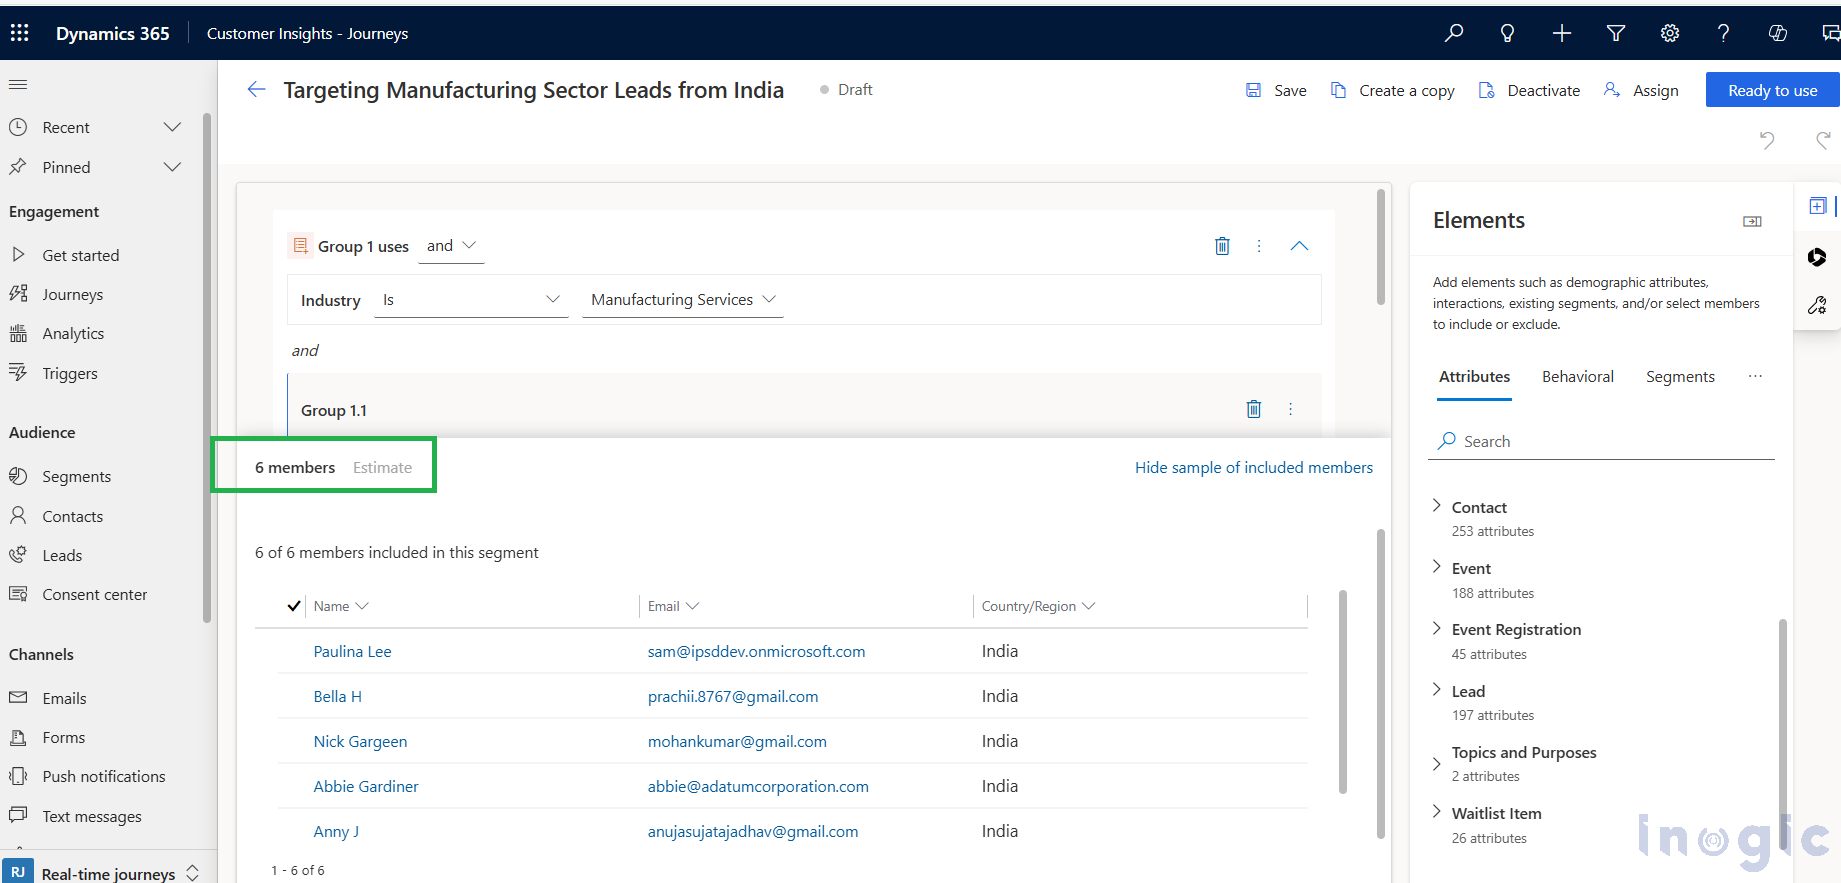
Before activating it, you can preview the audience size.
Estimating Segment Size Before Activation
Before marking a segment as Ready to use, you can:
This helps ensure your targeting criteria are accurate before using the segment in a journey.
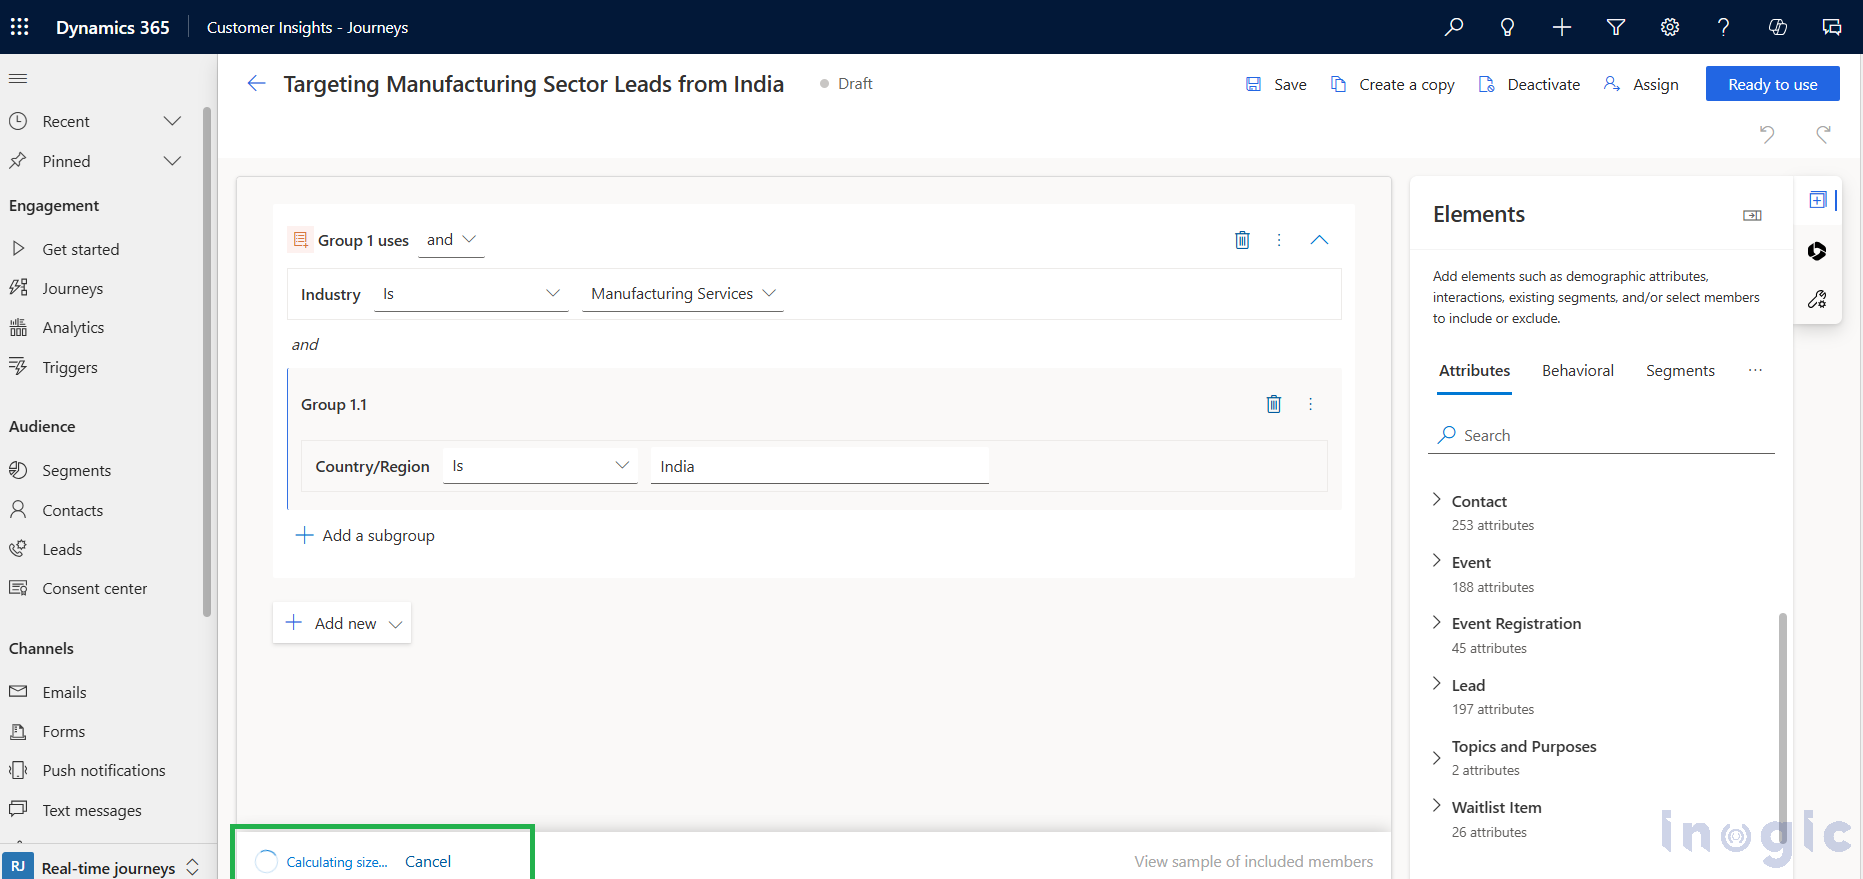
The members count can be previewed from here:
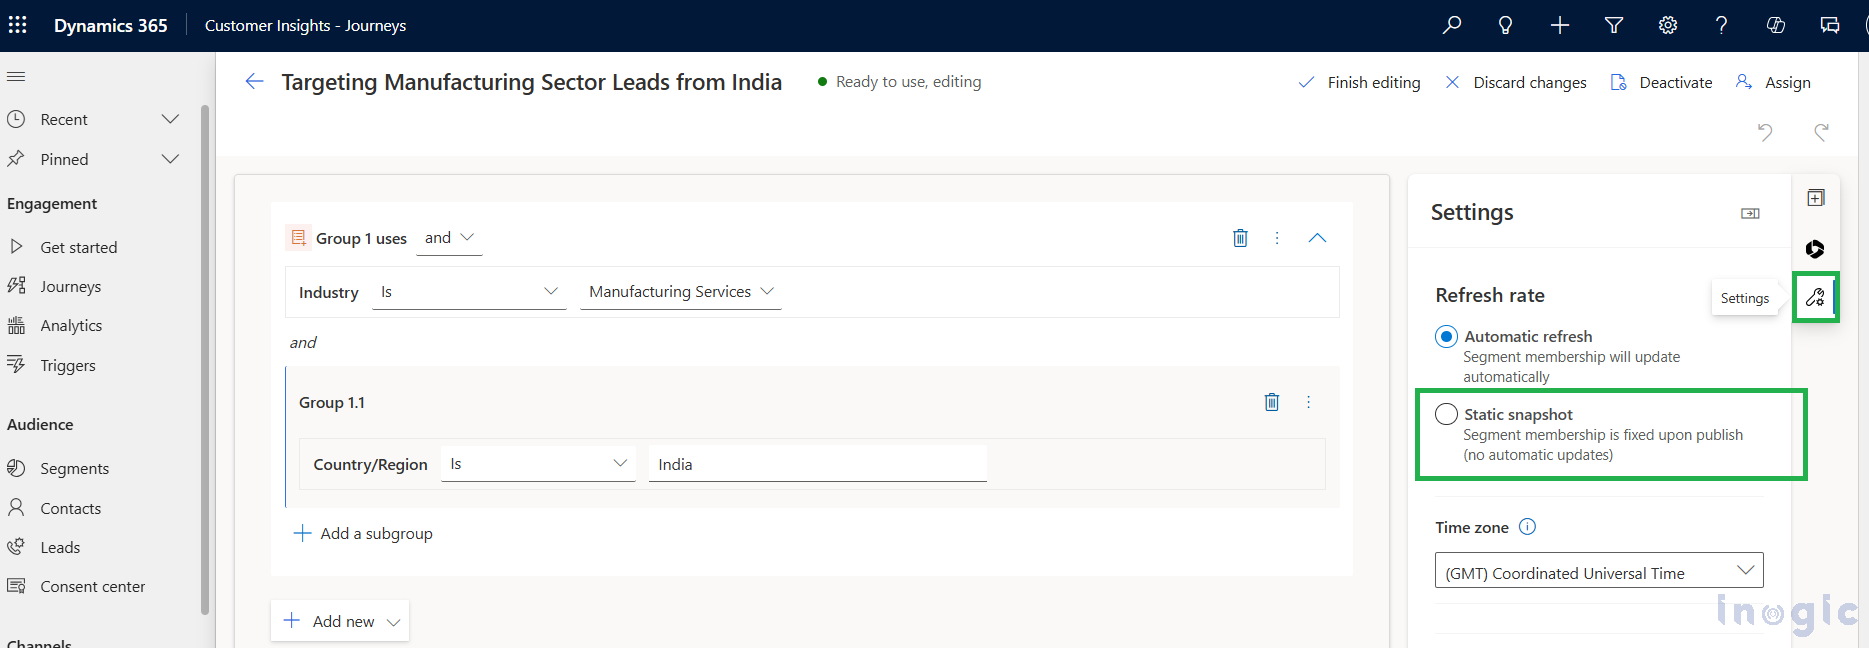
The Settings panel is where the segment type is defined.
By default, all newly created segments are set to Automatic Refresh.
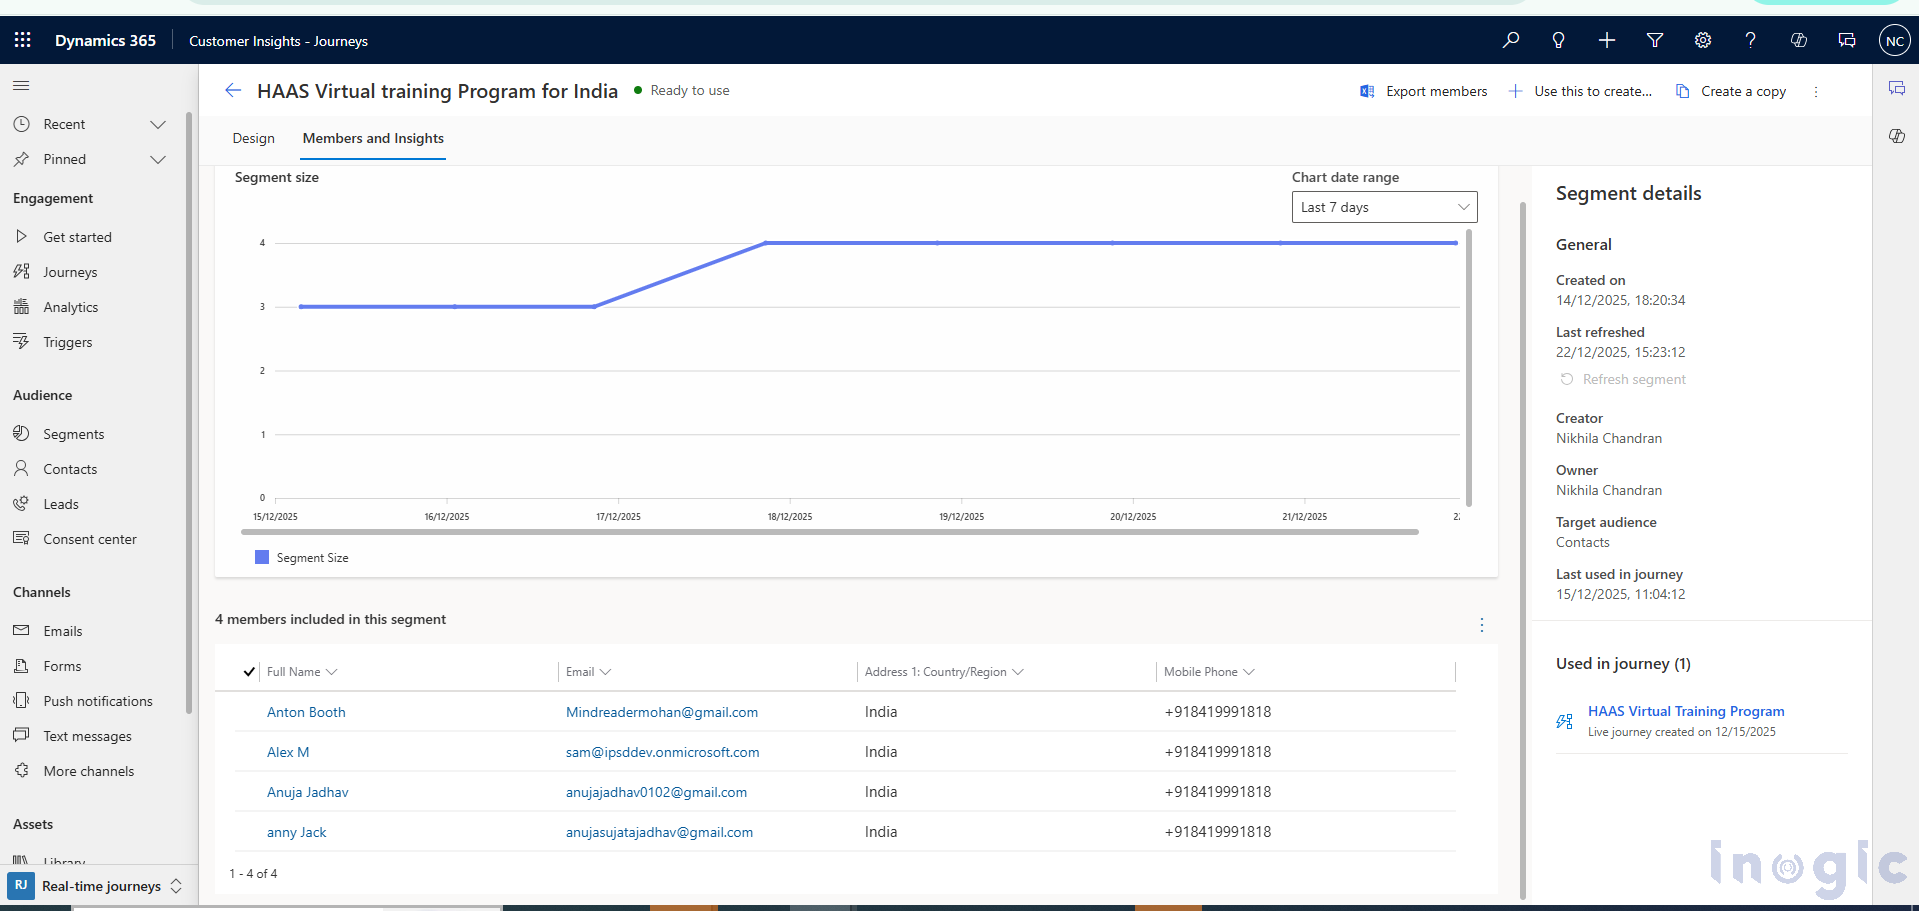
Let us consider one of the Dynamic Segment graphs. As you can see in the graph below, the segment size has been updated (increased) over the duration.
If there is a use case where you want to create the Segment as Static, then explicitly you have to set it as “Static Snapshot” option as shown below:
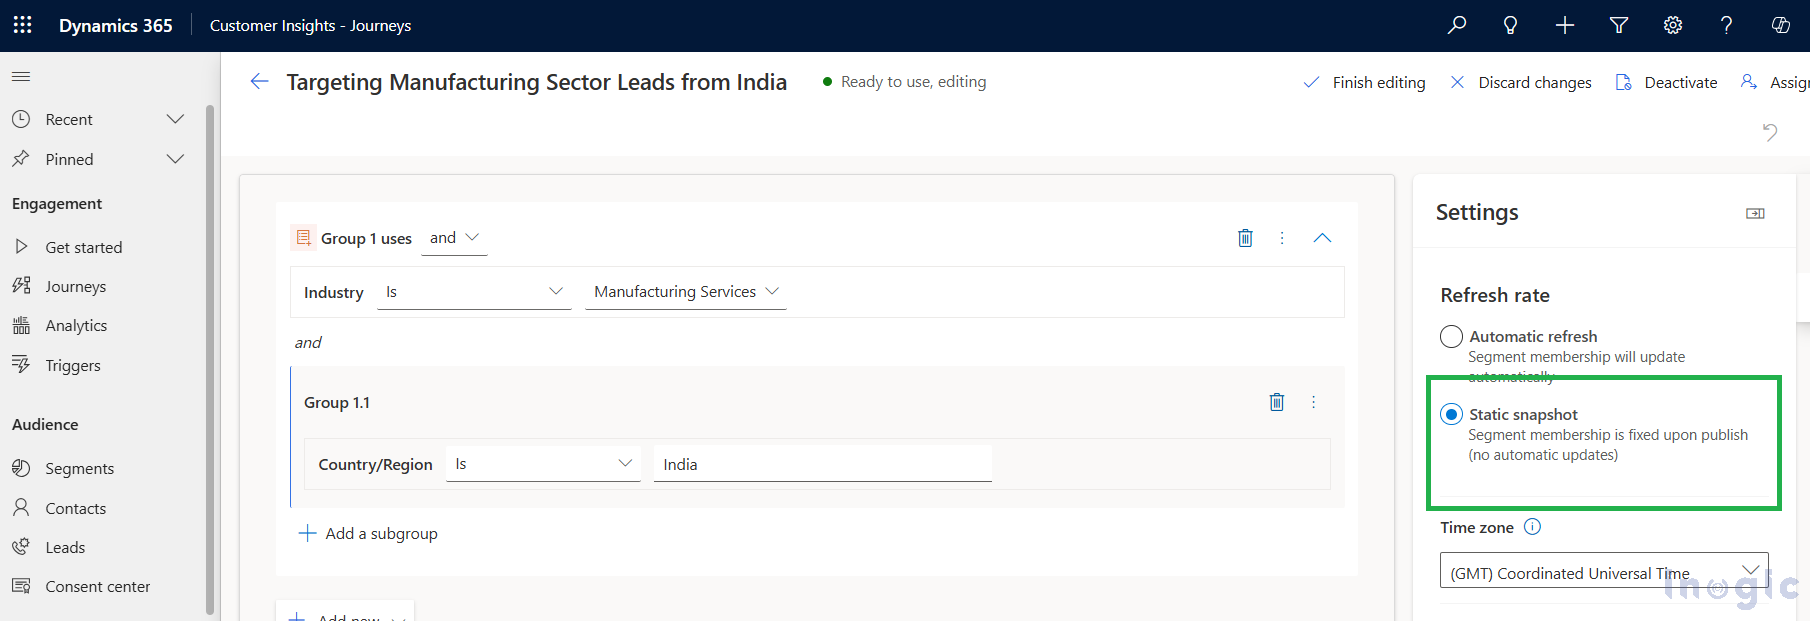
In “Static Snapshot,” the simple segment size will not be updated dynamically, and it is of one-time use.
Let us consider one of the Static Segment graphs, as you can see in the graph below, the segment size has remained standstill over the duration, as it was a one-time activity.
| Feature | Static Snapshot | Automatic Refresh |
| Membership updates | No | Yes |
| Audience type | Fixed | Dynamic |
| Best suited for | One-time campaigns | Ongoing journeys |
| Data refresh | One-time | Continuous |
| Real-time targeting | Not supported | Supported |
What Is Automatic Refresh (Dynamic Segment)?
In Automatic Refresh, the segment membership updates dynamically.
This means:
Dynamic segments are ideal for:
You can observe these changes visually through segment growth graphs, where the member count increases or decreases over time.
What Is Static Snapshot (Static Segment)?
In Static Snapshot, the segment captures audience members at a specific point in time.
This means:
Static Snapshot segments are best suited for:
Segment graphs for Static Snapshot segments show a flat line, indicating no change in membership over time.
When Should You Use Each Segment Type?
Choosing the right segment type ensures accurate targeting and optimal journey performance.
Conclusion
Segments play a critical role in successfully targeting audiences within Customer Insights – Journeys. Whether you are grouping customers based on demographic attributes or behavioral interactions, segments allow you to make your marketing more strategic and data-driven.
Automatic Refresh segments are ideal for real-time, evolving journeys, while Static Snapshot segments are best suited for one-time or fixed audience scenarios. Understanding the difference between these two options helps you design more effective journeys and deliver the right message to the right audience at the right time.
The post Static or Dynamic Segments? A Complete Guide for Customer Insights – Journeys first appeared on Microsoft Dynamics 365 CRM Tips and Tricks.
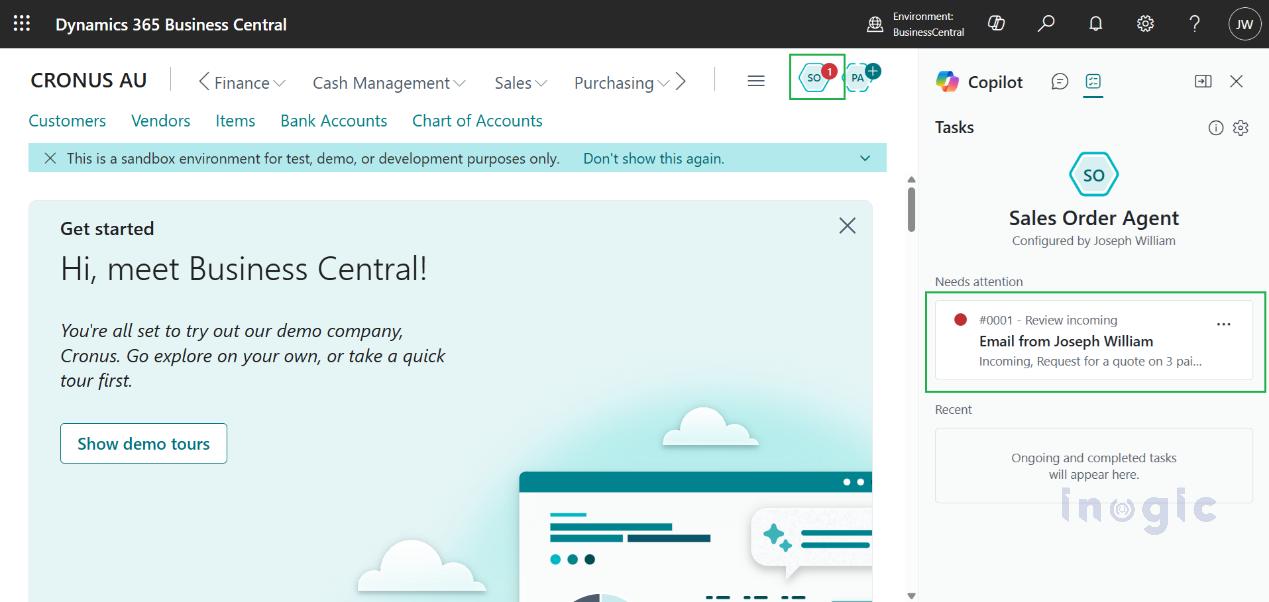
Imagine you run a business that gets dozens or hundreds of order requests via email every day from new clients or repeat customers. Normally, each request follows a long manual sequence – first reading the email, then validating customer details, checking item availability in inventory, preparing a quote, sending it to the customer, waiting for confirmation, and finally creating the sales order.
This step-by-step process is time-consuming, prone to errors, and consumes a significant amount of your team’s time.
That’s where the Sales Order Agent in Dynamics 365 Business Central comes in. This AI-powered helper reads incoming customer emails, extracts order details automatically, checks inventory, drafts quotes or orders and much of it happens without manual data entry.
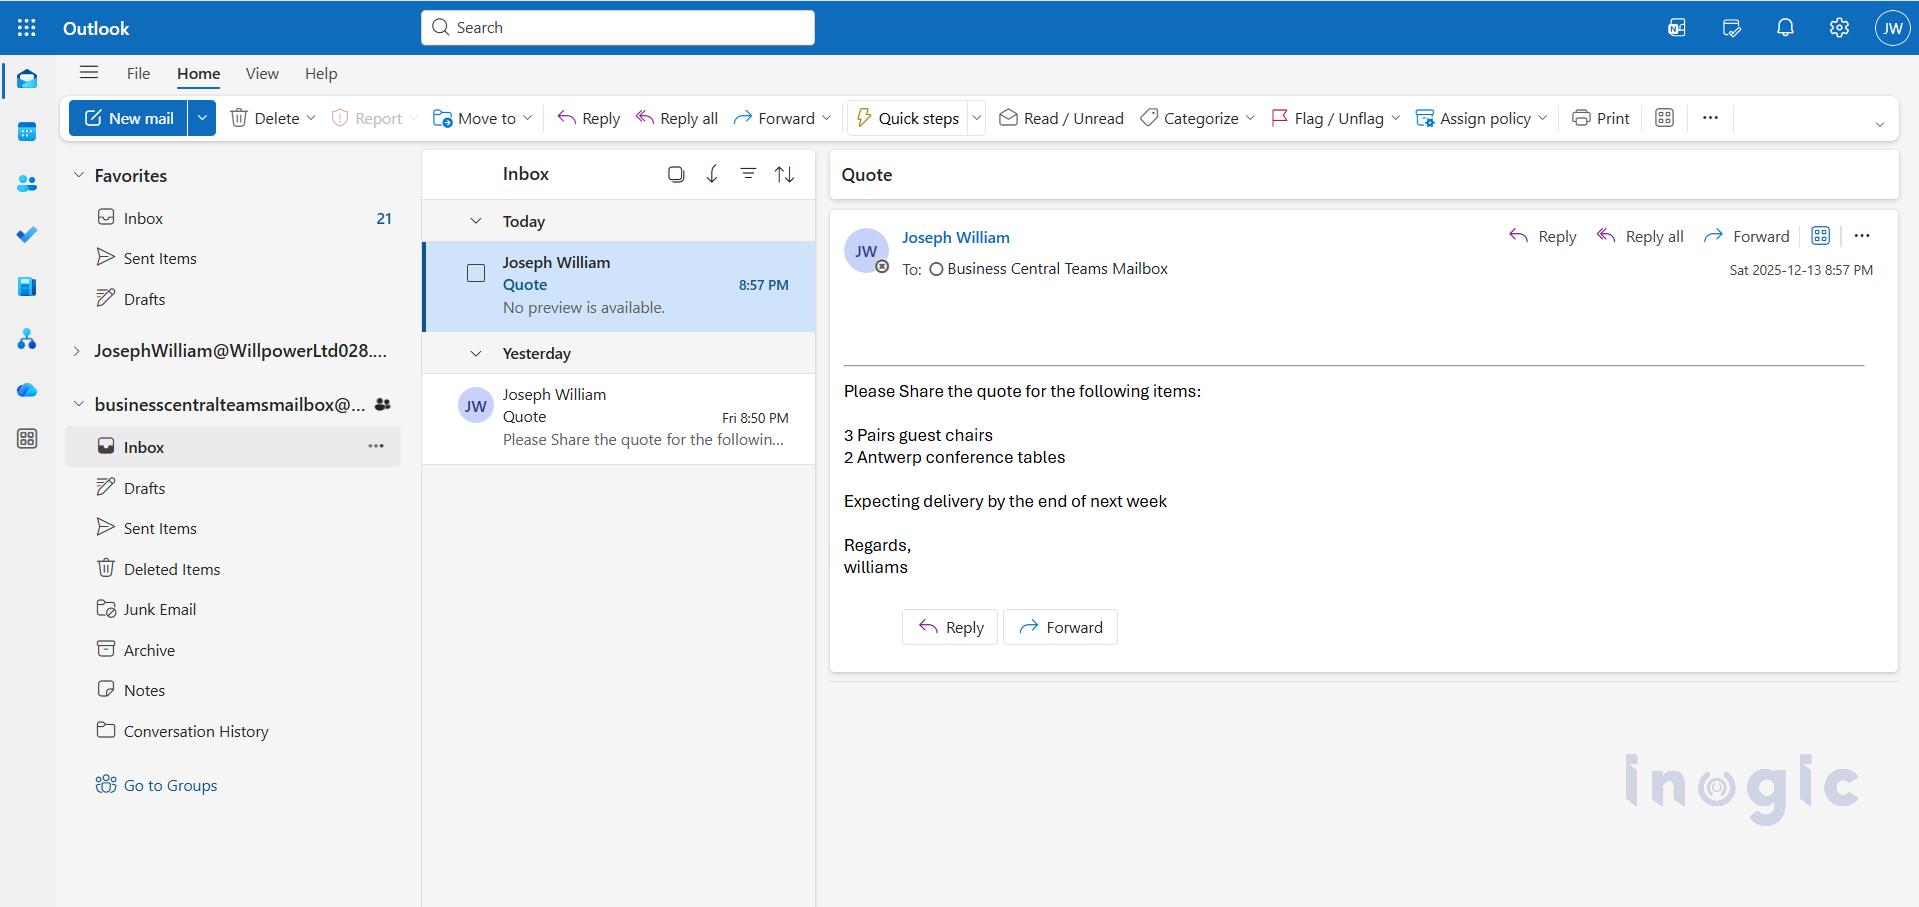
Imagine you run a small-to-medium distribution business. A customer sends an order request to your shared sales email:
“Please supply 50 units of Product A and 30 units of Product B – delivery within 15 days. PO #12345.”
Before configuring the Sales Order Agent, ensure that Copilot and Agent capabilities are enabled in Business Central.
“These features are available starting from the 2025 Release Wave 2.”
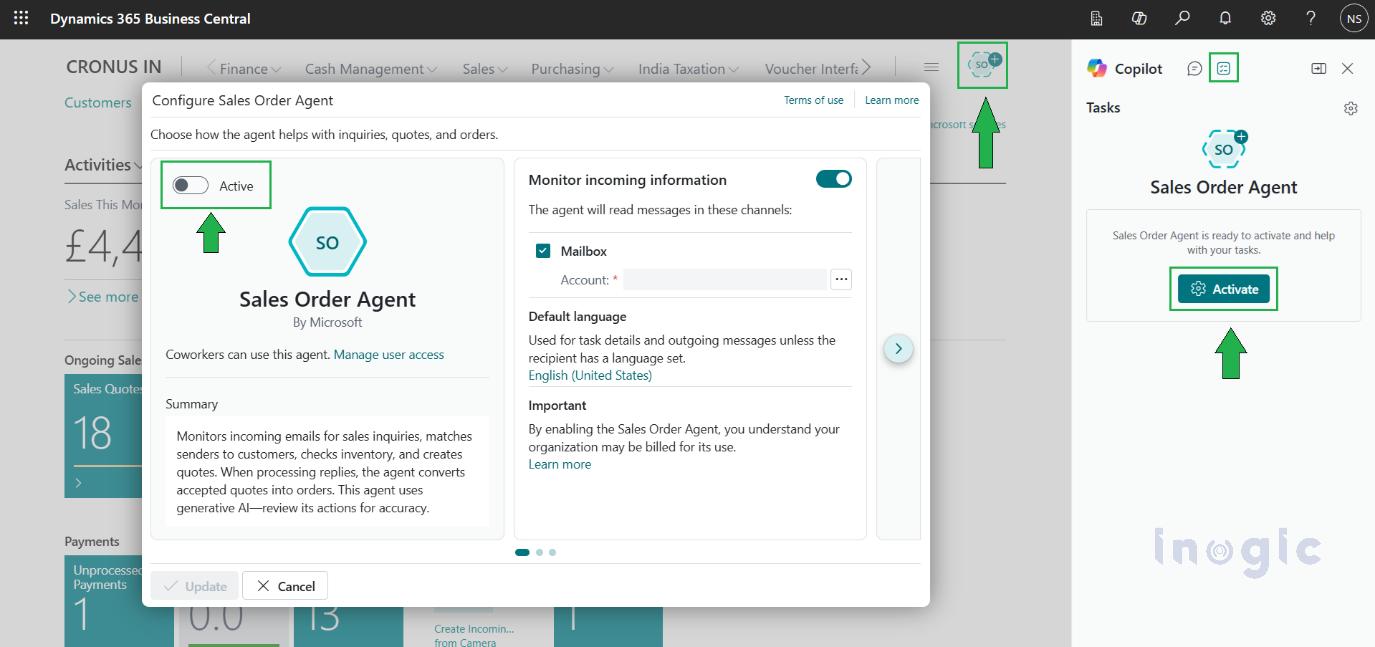
Activating the Sales Order Agent allows Copilot to start reading incoming sales emails and assist with quotes and orders.
Enables the agent to process incoming sales inquiries.
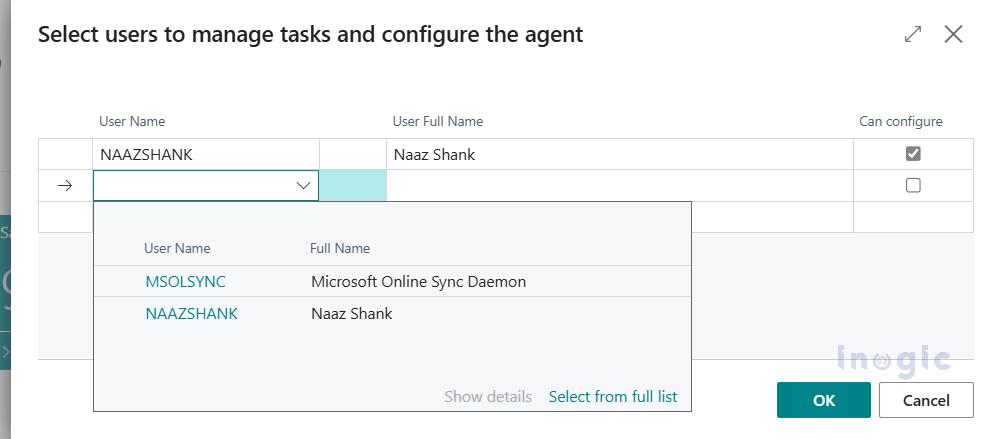
Define which users can view and interact with the Sales Order Agent.
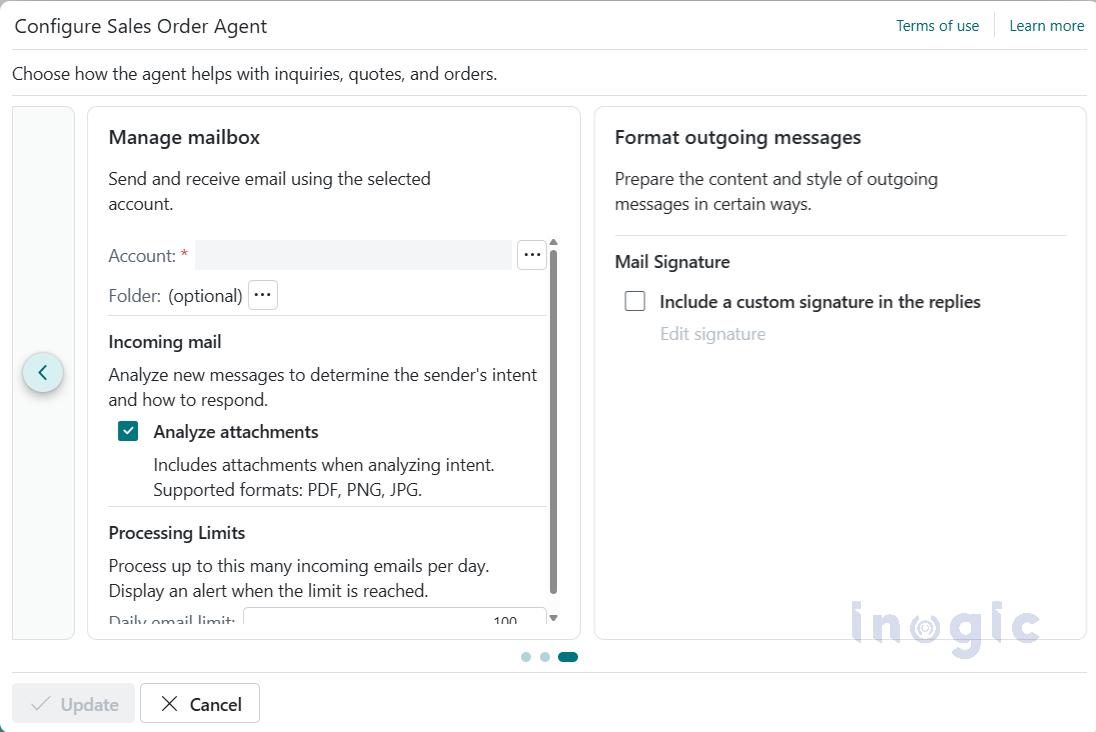
Choose the mailbox the agent will monitor.
Set a default language for all AI-generated responses.
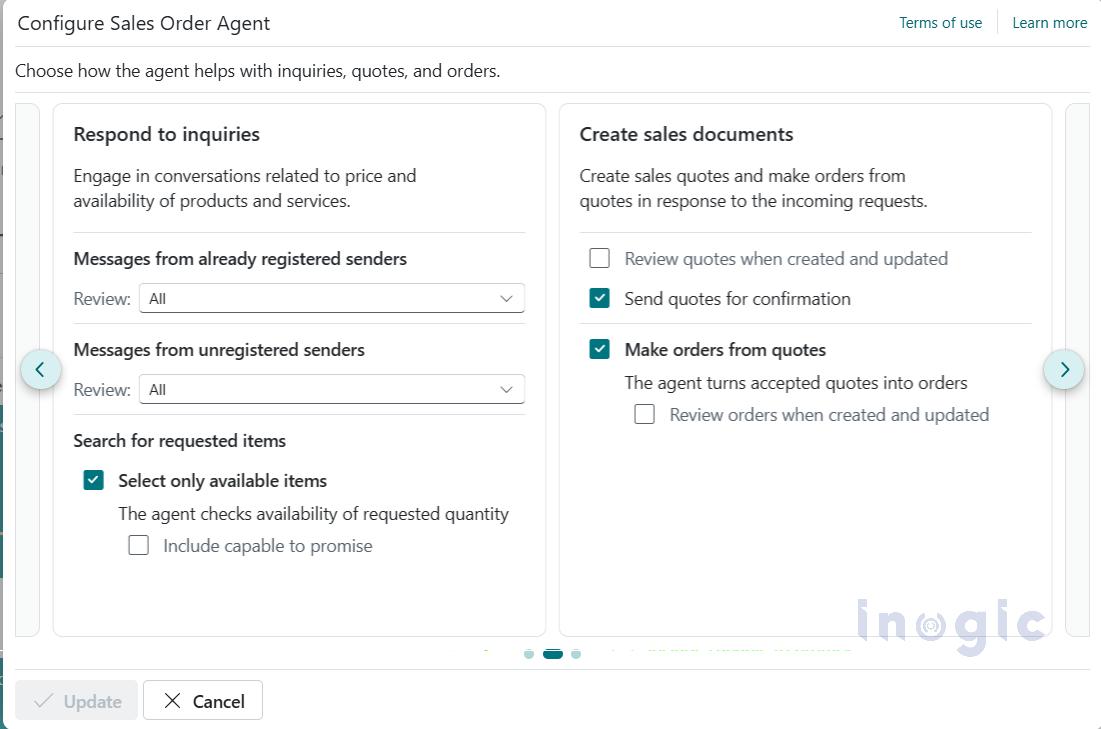
Choose which actions the agent should perform automatically and where human review is required.
Controls how the agent responds to incoming inquiries, including:
Defines whether the agent:
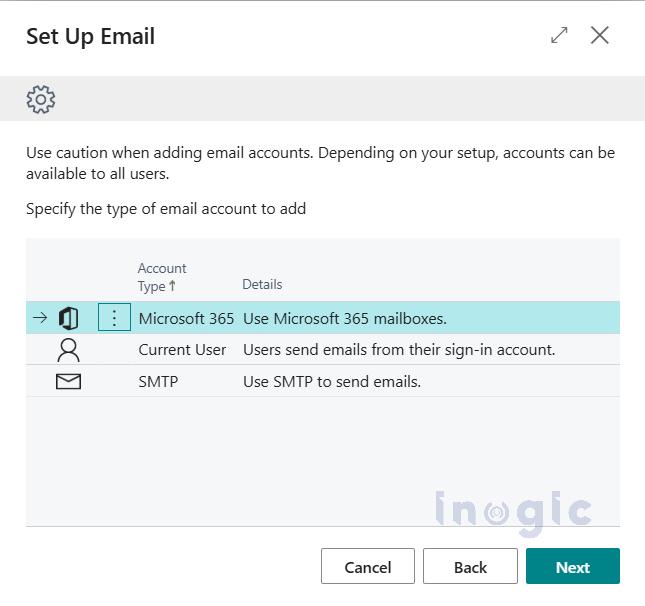
Specify a shared Microsoft 365 mailbox that the agent will monitor for incoming sales inquiries.
Agent Activity
You retain full visibility and control over all agent actions.
Note:
Verify that the configured mailbox is a valid Microsoft 365 (Exchange Online) mailbox, is accessible within the same tenant, has Full Access permissions assigned, and is properly connected in Business Central so the Sales Order Agent can read and send emails without access issues.
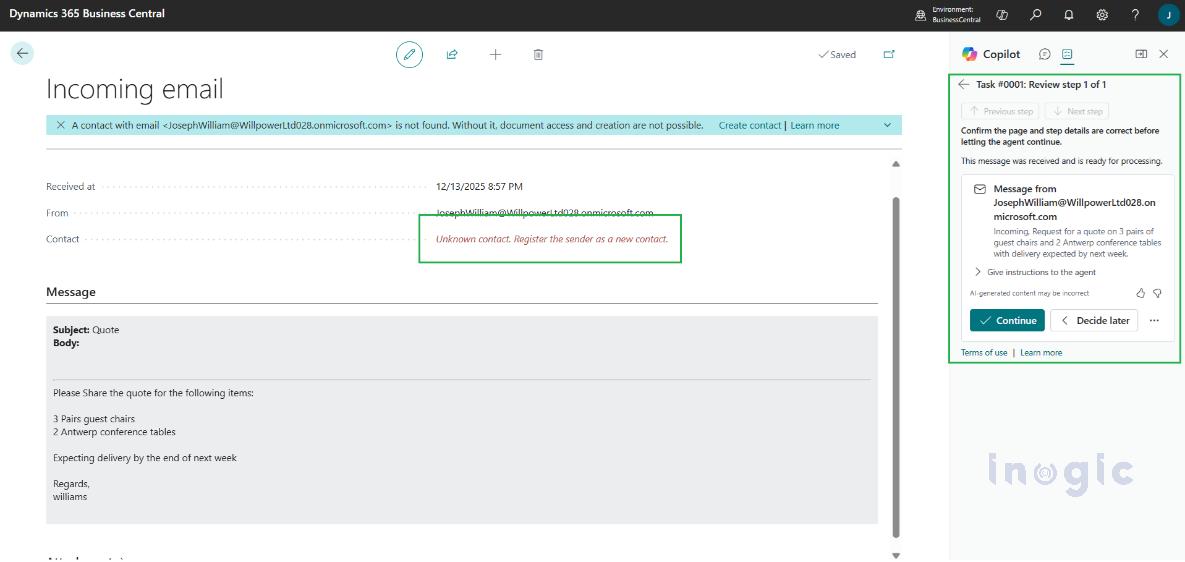
After reviewing the Mail:
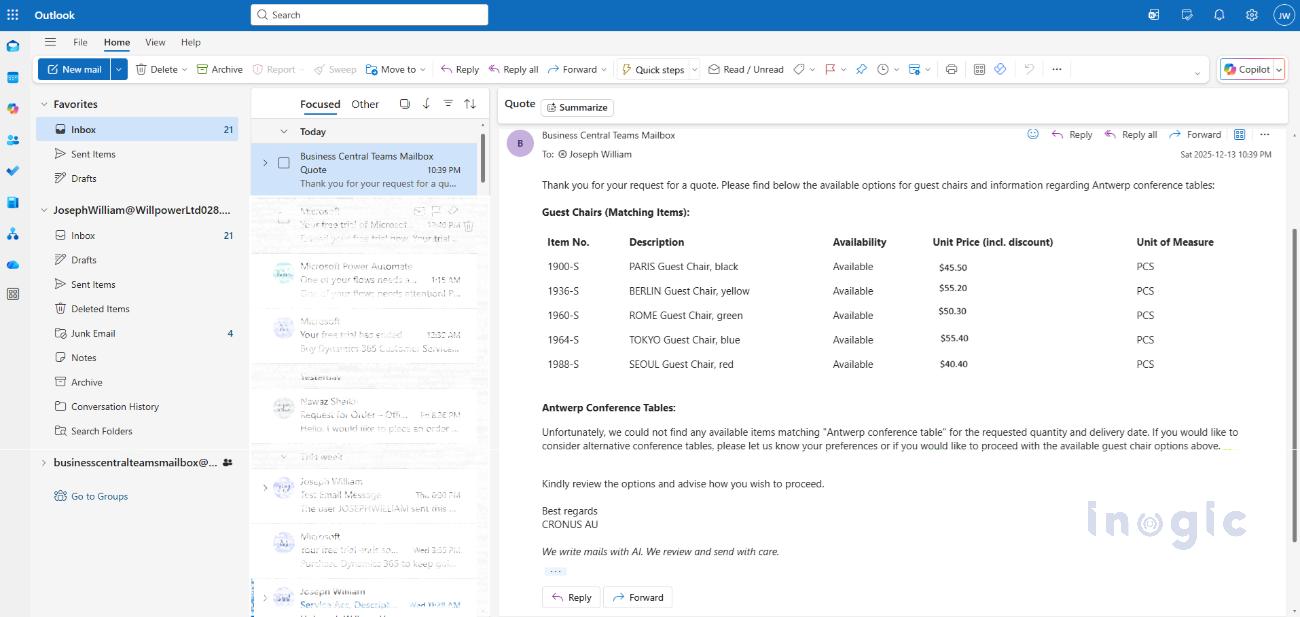
The customer replies with all necessary information needed to finalize the quote, such as item confirmation, quantities, delivery preferences, or additional requirements.
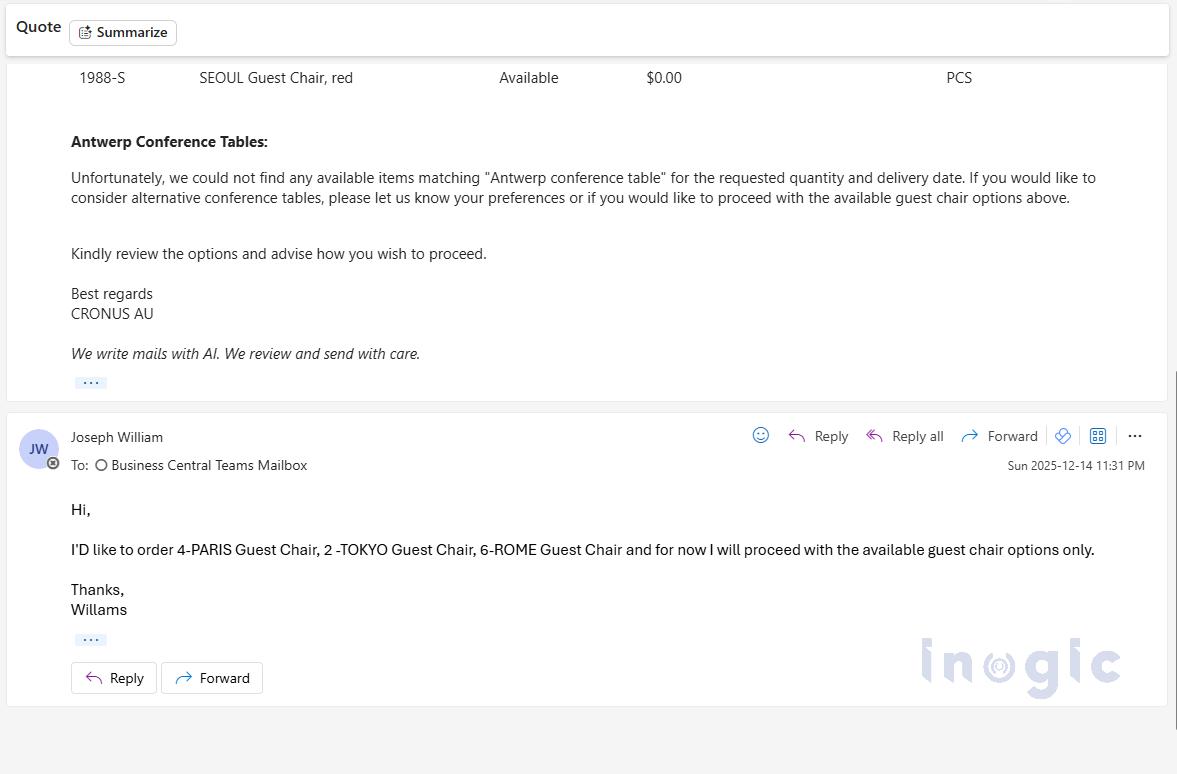
The Sales Order Agent prepares the quote, which is then reviewed by the salesperson to ensure pricing, availability, and terms are accurate.

Quote Visibility in Dynamics 365 CRM (Sales)
At the same time, the quote is synchronized to Dynamics 365 CRM, ensuring sales teams have real-time visibility without switching systems.
When Dynamics 365 CRM (Sales) is integrated with Business Central, all sales documents created by the Sales Order Agent in Business Central are automatically synchronized and visible in CRM. Learn more about setting this up in Microsoft’s official documentation: Integrating Business Central with Dynamics 365 Sales. https://learn.microsoft.com/en-us/dynamics365/business-central/admin-prepare-dynamics-365-for-sales-for-integration
As soon as the Sales Quote is created in Business Central, it becomes available to CRM users in near real time through standard integration mappings.
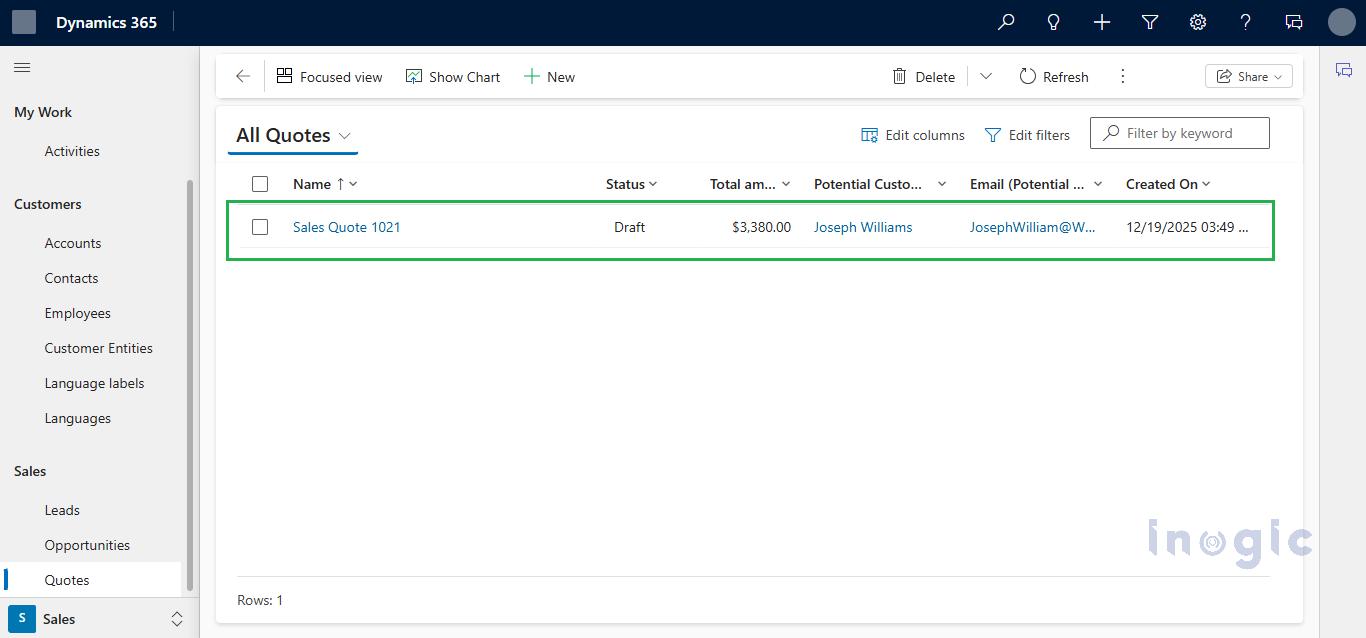

Once this integration is configured, any quote created by the Sales Order Agent in Business Central will be mirrored into CRM, giving sales teams near-real-time visibility without needing to switch applications
After approval, the Sales Order Agent sends the finalized sales quote as a PDF to the customer via email.
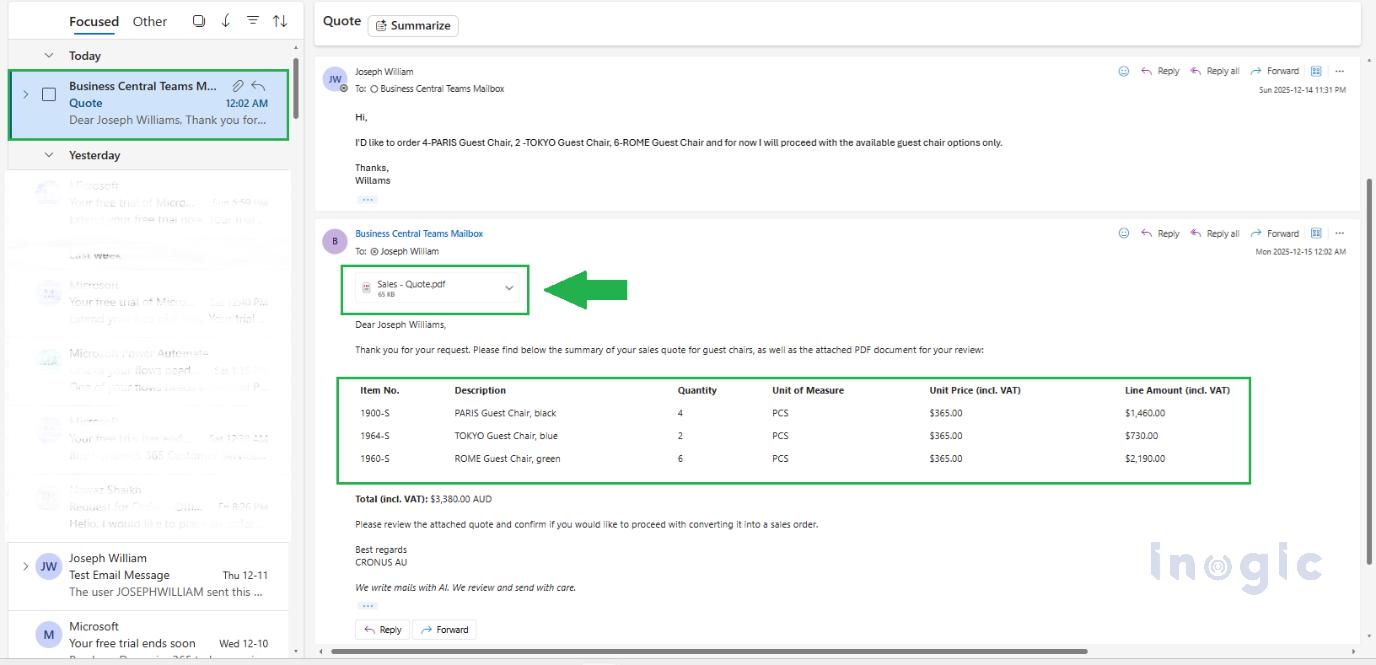
After Quote Confirmation
Once the customer approves the quote, the Sales Order Agent automatically converts it into a sales order and sends an order confirmation to the customer, completing the end-to-end sales process.
The Sales Order Agent in Dynamics 365 Business Central is an AI-powered Copilot feature that automatically processes customer order requests received via email. It reads incoming emails, identifies customers, extracts order details, checks inventory availability, creates sales quotes, and converts approved quotes into sales orders with minimal manual intervention.
The Sales Order Agent monitors a shared mailbox, analyzes incoming customer emails, extracts product and quantity information, validates customer records, checks inventory, and drafts sales quotes. Once the customer approves the quote, the agent automatically converts it into a confirmed sales order in Business Central.
Yes, the Sales Order Agent supports shared Microsoft 365 (Exchange Online) mailboxes. The mailbox must be in the same tenant, properly connected to Business Central, and have Full Access permissions assigned for the agent to read and send emails.
Sales Order Agent is configurable. Businesses can choose full automation or require human review before quotes are sent or orders are created. This ensures accuracy while maintaining control over pricing, availability, and customer communication.
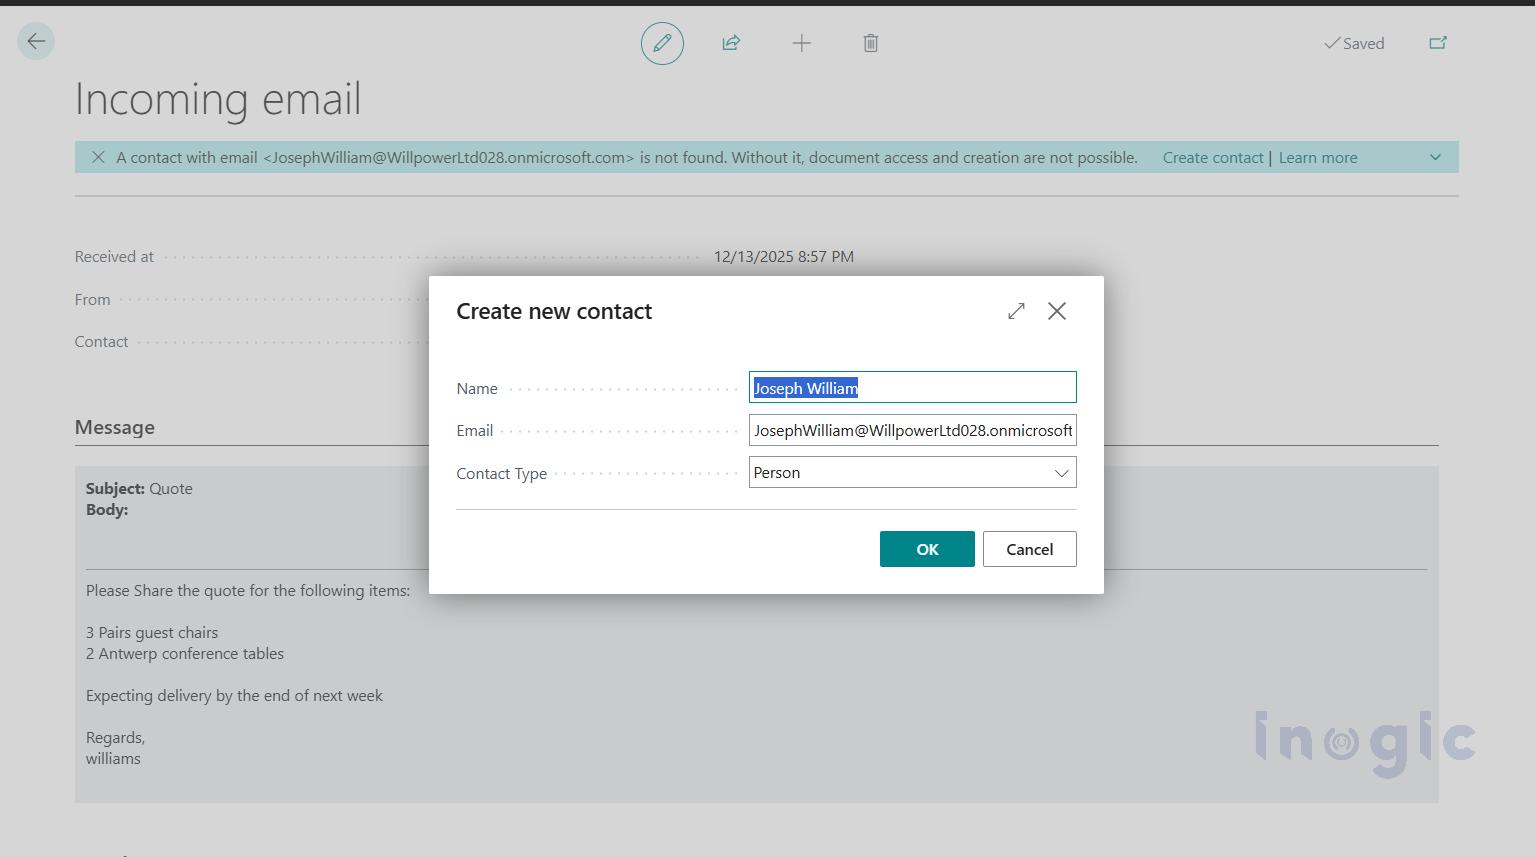
If the Sales Order Agent cannot find the sender in Business Central, it allows the user to create a new contact or customer record. Once created, the agent continues processing the request without interrupting the workflow.
Sales Order Agent transforms how businesses handle order processing converting a traditionally manual, time-consuming workflow into a fast, AI-driven automation. By reading customer emails, identifying customers, checking inventory, drafting quotes, and converting orders all with minimal human effort it speeds up the sales cycle, reduces errors and boosts productivity. And yet, it keeps your team in control, with full transparency and oversight.
If your business handles email-based orders regularly especially at scale integrating Sales Order Agent into Dynamics 365 Business Central can deliver significant efficiency gains and help you manage growth smoothly.
The post Automate Order Processing: Connect Dynamics 365 CRM & Business Central with Co-pilot Sales Order Agent first appeared on Microsoft Dynamics 365 CRM Tips and Tricks.
2025 was a remarkable year for Maplytics. Across product innovation, AI breakthroughs, and meaningful engagement with the broader CRM community, Maplytics re-emphasized how location analytics and intelligent automation can transform everyday business operations.
As enterprises continue to embrace digital transformation and data-driven decision-making, Maplytics has positioned itself at the forefront of end-to-end geo-mapping and analytical solutions. In this yearly recap, we reflect on the major accomplishments that defined 2025 and look ahead to where 2026 could take us, especially as features like conversational AI become more central to how teams work.
At the start of the year, Maplytics aimed at delivering deeper functionality and features that help users extract actionable insights from their CRM data with ease. The focus was to make geo-mapping more powerful, workflows more efficient, and analytics more intuitive.
This vision came to life through several major updates and new capabilities throughout 2025, expanding what users could expect from their CRM’s location intelligence. It shifted from interactive, manual mapping to AI-driven intelligence.
| You can download a 15-day free trial of Maplytics now and experience the tool in your environment! |
One of the most substantial releases of the year landed in the summer, bringing significant enhancements across the product:
These updates helped teams visualize data in ways that were more contextually rich and more relevant to the decisions they make every day.
Perhaps the most talked-about launch of the year was MapCopilot– a conversational AI assistant built directly into Maplytics. With the rise of AI adoption across enterprise software, MapCopilot brought a new dimension to geo-analytics by letting users interact with their data using natural-language prompts.
Rather than navigating through multiple menus and filters, users could simply type or speak requests such as:
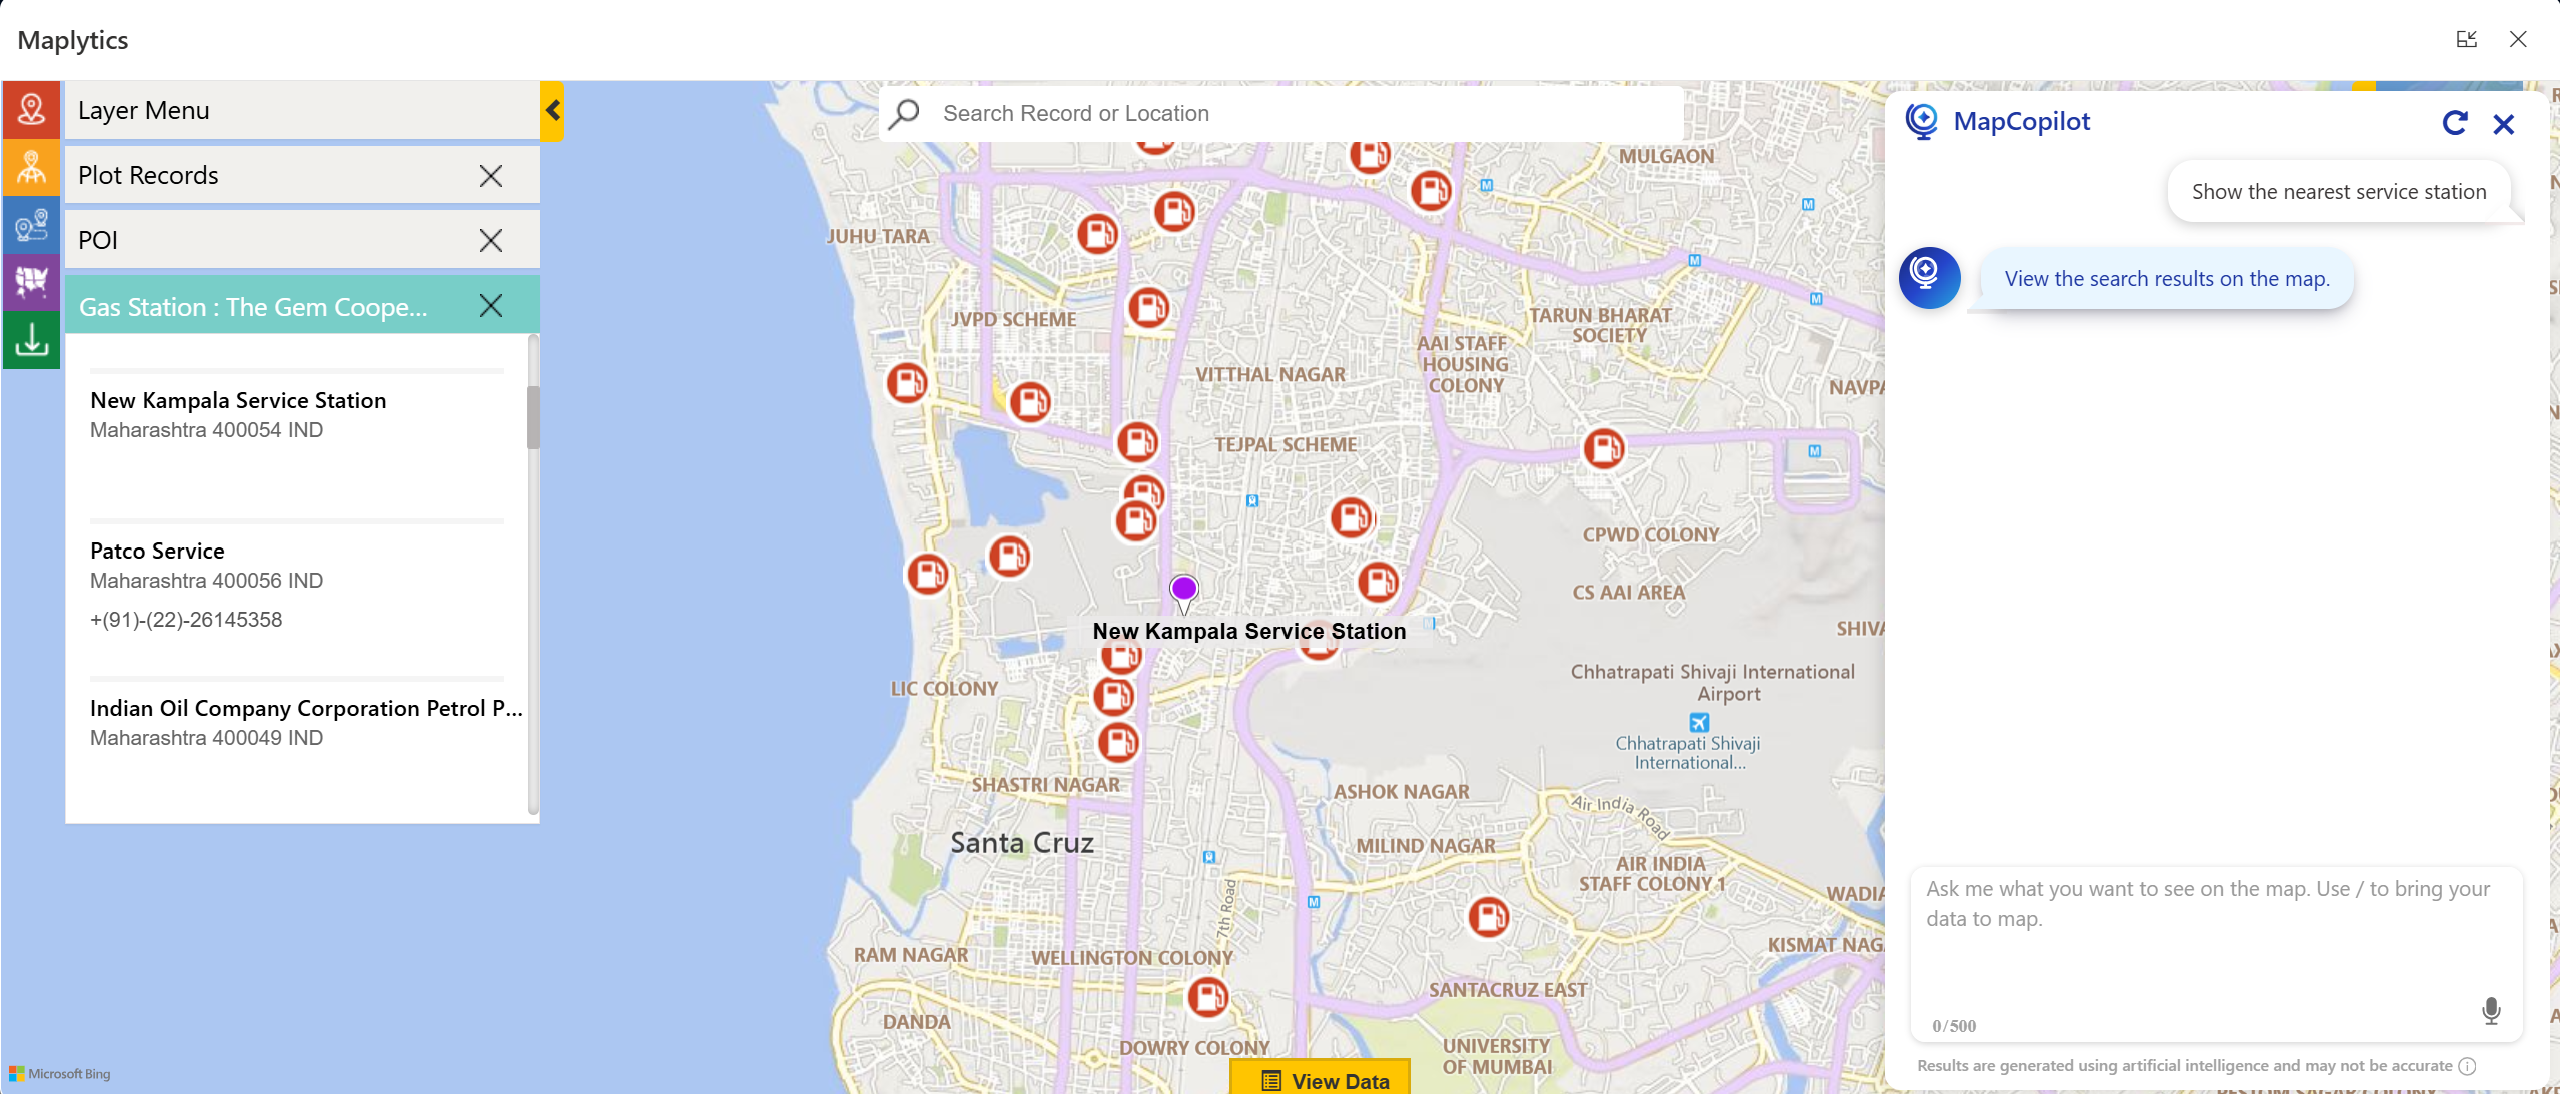
These conversational interactions get instantly translated into visual insights on the map, proximity searches, or optimized route plans, creating a more intuitive user experience and lowering the barrier to entry for advanced location intelligence. This innovation empowers even non-technical team members to get fast, accurate spatial insights without a steep learning curve.
MapCopilot also assists users in motion, such as field reps, managers, and service personnel. They can ask questions directly from mobile devices, enabling smarter decisions on the go. The contextual understanding across prompts (viz., requesting a follow-up filter after an initial plot) further enhances its utility.
The real value of Maplytics in 2025 was measured in impact as well. Organizations using Maplytics reported:
By combining CRM data with spatial intelligence and AI assistance, Maplytics helped users focus less on data wrangling and more on driving value with decisions that matter.
Maplytics also made its presence felt across key industry events in 2025, engaging with customers, partners, and Dynamics 365 professionals around the globe.
In May 2025, Maplytics took the stage at DynamicsMinds- a leading event for CRM and Power Platform professionals. Attendees were introduced to the latest mapping innovations and real-world use cases, seeing firsthand how location intelligence could enhance business outcomes across industries.
At this event, the Maplytics team showcased map visualizations, territory workflows, and how CRM data could be turned into actionable insights in an interactive setting that encouraged learning and hands-on exploration.
Later in the year, Maplytics featured prominently at the Community Summit North America event, where the spotlight was on AI + Maps featuring MapCopilot. The booth demonstrated live use cases, inviting attendees to experience how natural language queries could literally transform the way they interact with maps and CRM records.
These events highlighted Maplytics’ innovation and reinforced that location intelligence is a strategic asset for modern business.
From a leadership perspective, 2025 underscored several key insights-
As we look to 2026, the Maplytics roadmap is focused on expanding AI capabilities even further, evolving MapCopilot to provide deeper predictive insights, and creating more intelligent automation that anticipates user needs.
As organizations continue to rethink how location intelligence fits into everyday decision-making, the focus moving into 2026 remains on making mapping smarter, more intuitive, and easier to act upon. The next phase of innovation is expected to emphasize greater use of AI, improved automation, and experiences that adapt naturally to how teams work.
2025 was a transformative year for Maplytics- blending smart maps, meaningful AI innovation, and strong community engagement. From Azure Maps integration and territory management improvements to the debut of MapCopilot and memorable event appearances, the trajectory was upwards.
But the story doesn’t end here. As we step into 2026, the journey continues with bigger visions, bold innovations, and ever-closer alignment to the needs of organizations that rely on Dynamics 365 for mission-critical decisions.
Here’s to another year of smarter mapping!
Organizations interested in adopting Maplytics, 15-day free trials, or personalized demos are encouraged to contact Maplytics’ sales team at crm@inogic.com
For more information, visit our Website or Microsoft Marketplace. One can hop onto the detailed Blogs, Client Testimonials, Success Stories, Industry Applications, and Video Library for a quick query resolution. Technical docs for the working of Maplytics are also available for reference.
Kindly leave us a review or write about your experience on AppSource or the G2 Website.
The post Maplytics 2025 RoundUp and the Road to 2026 first appeared on Microsoft Dynamics 365 CRM Tips and Tricks.
In today’s data-driven enterprises, critical business information often arrives in the form of PDFs—bank statements, invoices, policy documents, reports, and contracts. Although these files contain valuable information, turning them into structured, reusable data or finalized business documents often requires significant manual effort and is highly error-prone.
By leveraging Azure Document Intelligence (for PDF data extraction), Azure Functions (for custom business logic), and Power Automate (for workflow orchestration) together, businesses can create a seamless automation pipeline that interprets PDF content, transforms extracted information through business rules, and produces finalized documents automatically, eliminating repetitive manual work and improving overall efficiency.
In this blog, we will explore how these Azure services work together to automate document creation from business PDFs in a scalable and reliable way.
Let’s consider a potential use case.
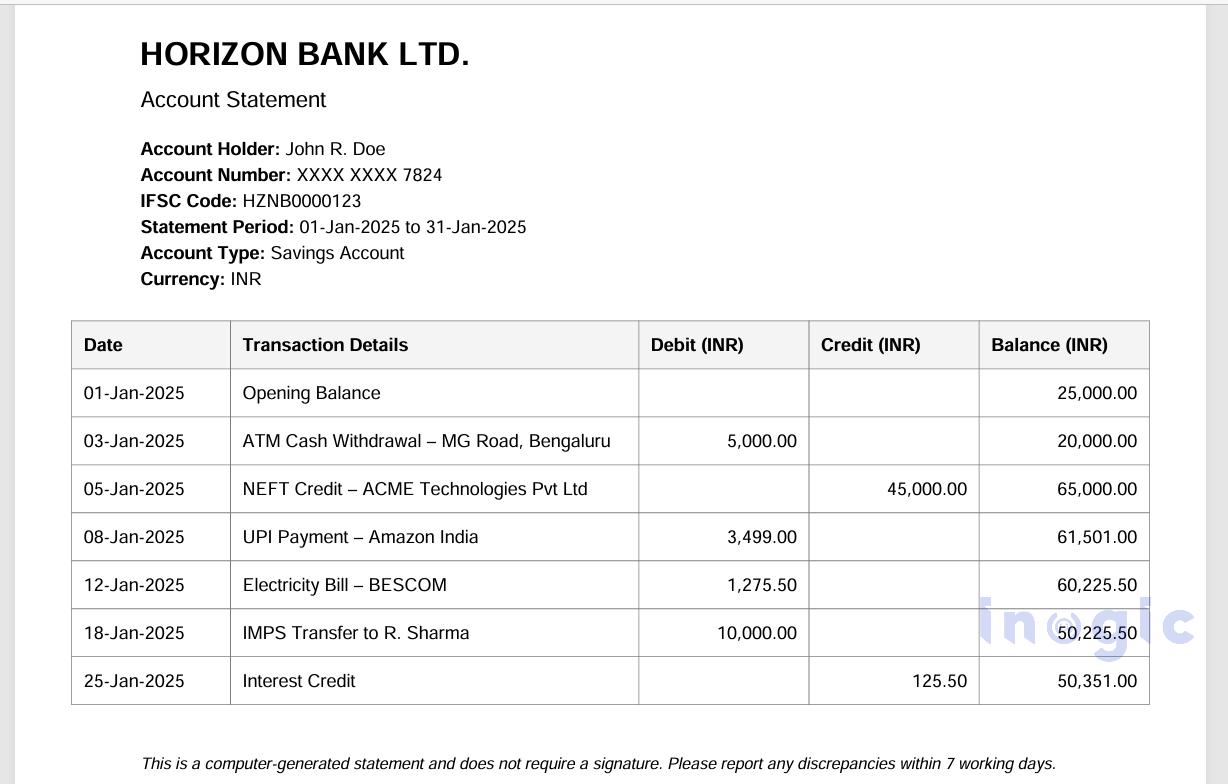
The finance team receives bank statements as PDF attachments in a shared mailbox on a regular basis. These statements contain transaction details in tabular format, but extracting the data manually into Excel or CSV files is time-consuming and often leads to formatting issues such as broken rows, missing dates, and incorrect debit or credit values.
The goal is to automatically process these emailed PDF bank statements as soon as they arrive, extract the transaction data accurately, and generate a clean, structured CSV file that can be directly used for reconciliation and financial reporting.
By using Power Automate to monitor incoming emails, Azure Document Intelligence to analyze the PDFs, and Azure Functions to apply custom data-cleaning logic, the entire process can be automated, eliminating manual effort and ensuring consistent, reliable output.
Let’s walk through the steps below to achieve this requirement.
Prerequisites:
Before we get started, we need to have the following things ready:
• Azure subscription.
• Access to Power Automate to create email-triggered flows.
• Visual Studio 2022
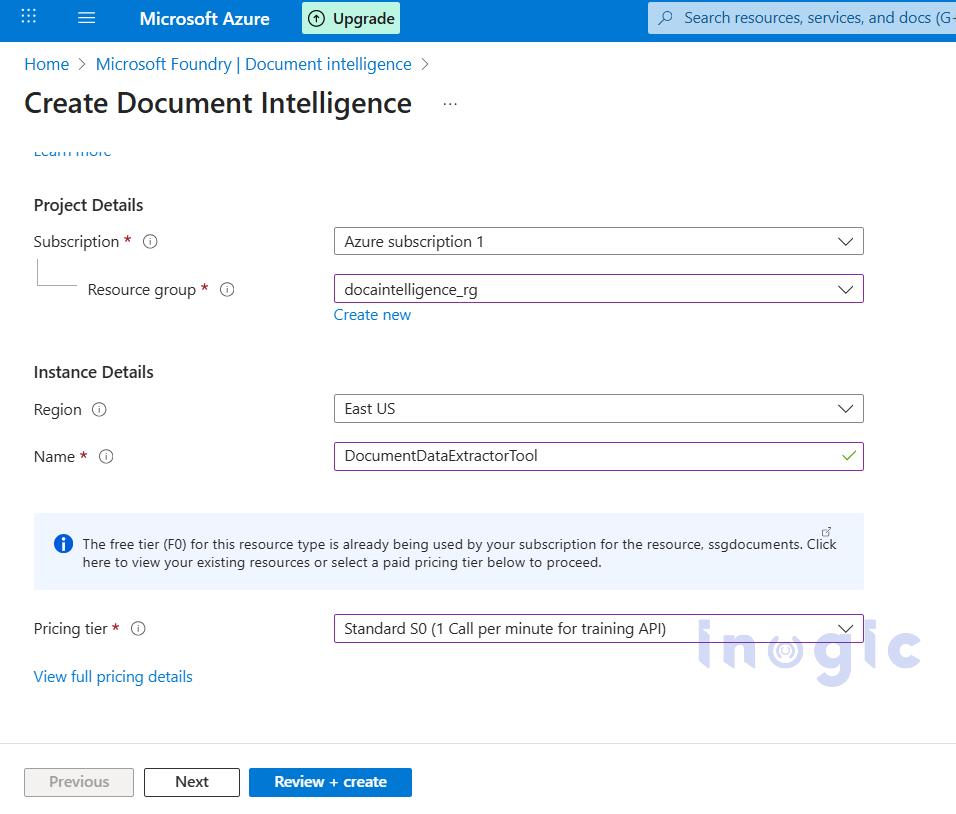
Navigate to the Azure portal (https://portal.azure.com), search for the Azure Document Intelligence service, and click Create to provision a new resource.
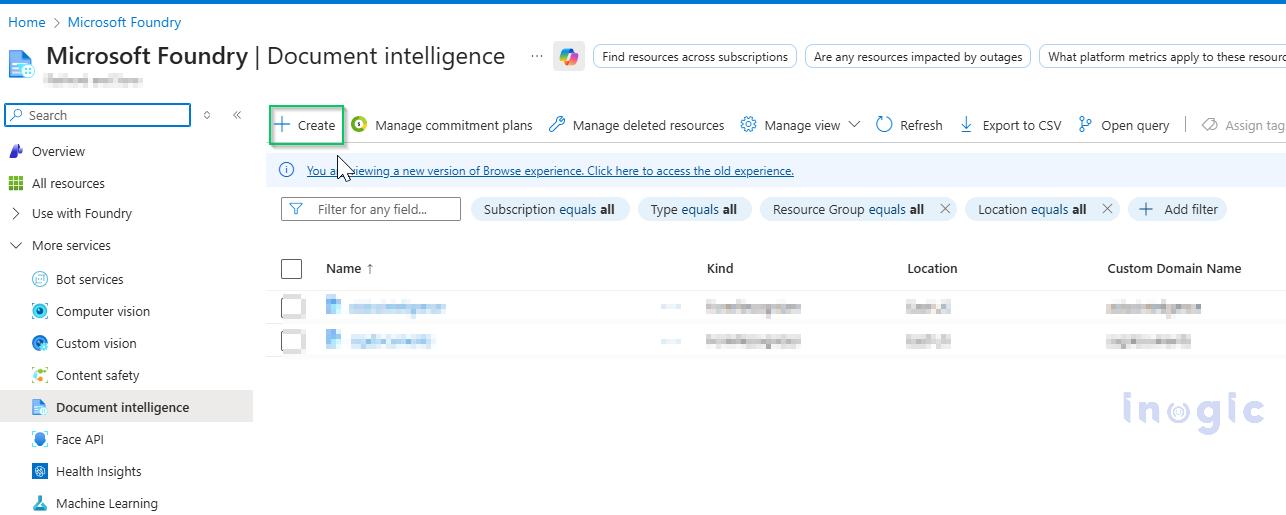
Choose Azure subscription 1 as the subscription, create a new resource group, enter an appropriate name for the Document Intelligence instance, select the desired pricing tier, and click Review + Create to proceed.
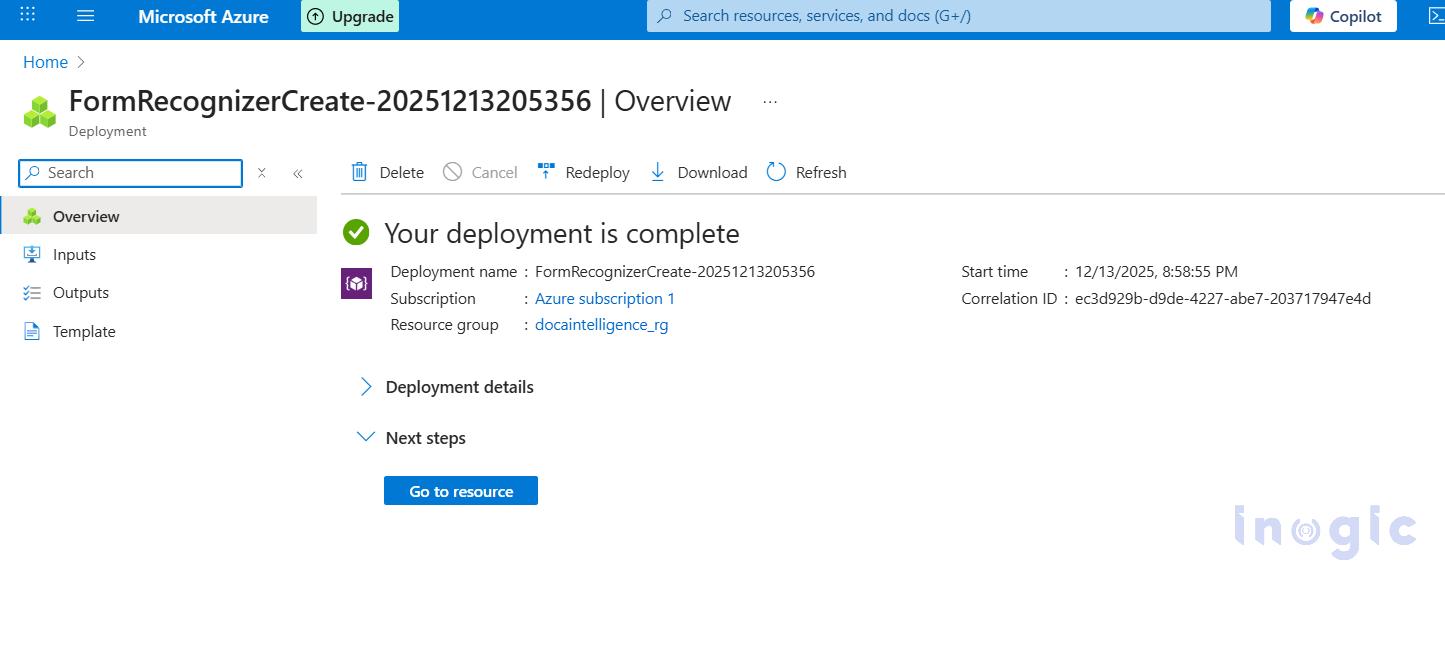
After reviewing the configuration, click Create and wait for the deployment to complete. Once the deployment is finished, select Go to resource.
Navigate to the newly created Document Intelligence resource, and make a note of the endpoint and any one of the keys listed at the bottom of the page.

Create a new Azure Function in Visual Studio 2022 using an HTTP trigger with the .NET isolated worker model, and add the following code.
[Function("PdfToCsvExtractor")]
public async Task Run(
[HttpTrigger(AuthorizationLevel.Anonymous, "post")] HttpRequest req)
{
_logger.LogInformation("Form Recognizer extraction triggered.");
// Accept either multipart/form-data (file field) OR raw application/pdf bytes.
Stream pdfStream = null;
try
{
// If content-type is multipart/form-data => read form and file
if (req.HasFormContentType)
{
var form = await req.ReadFormAsync();
var file = form.Files?.FirstOrDefault();
if (file == null || file.Length == 0)
return new BadRequestObjectResult("No file was uploaded in the multipart form-data.");
pdfStream = new MemoryStream();
await file.CopyToAsync(pdfStream);
pdfStream.Position = 0;
}
else
{
// Otherwise expect raw PDF bytes with Content-Type: application/pdf
if (!req.Body.CanRead)
return new BadRequestObjectResult("Request body empty.");
pdfStream = new MemoryStream();
await req.Body.CopyToAsync(pdfStream);
pdfStream.Position = 0;
}
string endpoint = Environment.GetEnvironmentVariable("FORM_RECOGNIZER_ENDPOINT");
string key = Environment.GetEnvironmentVariable("FORM_RECOGNIZER_KEY");
if (string.IsNullOrEmpty(endpoint) || string.IsNullOrEmpty(key))
return new BadRequestObjectResult("Missing Form Recognizer environment variables.");
var credential = new AzureKeyCredential(key);
var client = new DocumentAnalysisClient(new Uri(endpoint), credential);
var operation = await client.AnalyzeDocumentAsync(
WaitUntil.Completed,
"prebuilt-document",
pdfStream
);
var result = operation.Value;
_logger.LogInformation("pdfstream: " + pdfStream);
_logger.LogInformation("Result: "+ result.Tables.ToList());
// returns raw JSON table data
var filteredTables = result.Tables.ToList());
if (filteredTables.Count == 0)
return new BadRequestObjectResult("No transaction table found.");
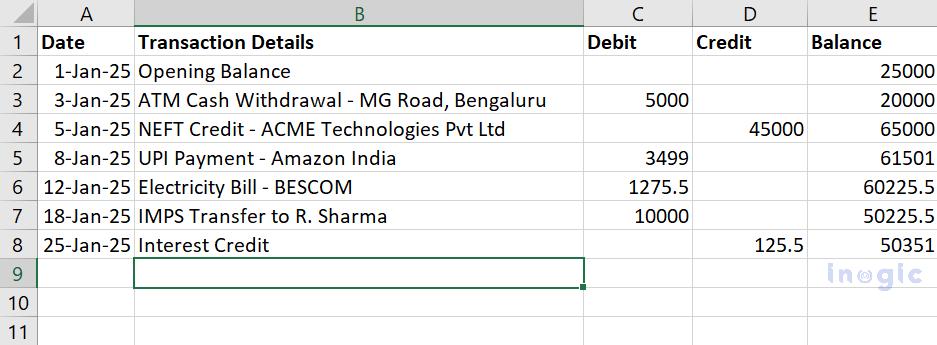
string csvOutput = BuildCsvFromTables(filteredTables);
var csvBytes = Encoding.UTF8.GetBytes(csvOutput);
var emailResult = await SendEmailWithCsvAsync(
_logger,
csvBytes,
"ExtractedTable.csv");
return new OkObjectResult(“Table data extracted and exported to csv file”);
}
catch (Exception ex)
{
_logger.LogError(ex, ex.Message);
return new StatusCodeResult(500);
}
finally
{
pdfStream?.Dispose();
}
}
//method to create csv file
private string BuildCsvFromTables(IReadOnlyList tables)
{
var csvBuilder = new StringBuilder();
// Write CSV header
csvBuilder.AppendLine("Date,Transaction,Debit,Credit,Balance");
foreach (var table in tables)
{
// Group cells by row index
var rows = table.Cells
.GroupBy(c => c.RowIndex)
.OrderBy(g => g.Key);
foreach (var row in rows)
{
// Skip header row (row index 0)
if (row.Key == 0)
continue;
var rowValues = new string[5];
foreach (var cell in row)
{
if (cell.ColumnIndex < rowValues.Length)
{
// Clean commas and line breaks for CSV safety
rowValues[cell.ColumnIndex] =
cell.Content.Replace(",", " ").Replace("\n", " ").Trim();
}
}
csvBuilder.AppendLine(string.Join(",", rowValues));
}
}
return csvBuilder.ToString();
}
// method to send csv file as an attachment to an email
public async Task SendEmailWithCsvAsync(
ILogger log,
byte[] csvBytes,
string csvFileName)
{
log.LogInformation("Inside AzureSendEmailOnSuccess");
string clientId = Environment.GetEnvironmentVariable("InogicFunctionApp_client_id");
string clientSecret =Environment.GetEnvironmentVariable("InogicFunctionApp_client_secret");
string tenantId = Environment.GetEnvironmentVariable("Tenant_ID");
string receiverEmail = Environment.GetEnvironmentVariable("ReceiverEmail");
string senderEmail = Environment.GetEnvironmentVariable("SenderEmail");
var missing = new List();
if (string.IsNullOrEmpty(clientId)) missing.Add(nameof(clientId));
if (string.IsNullOrEmpty(clientSecret)) missing.Add(nameof(clientSecret));
if (string.IsNullOrEmpty(tenantId)) missing.Add(nameof(tenantId));
if (string.IsNullOrEmpty(receiverEmail)) missing.Add(nameof(receiverEmail));
if (string.IsNullOrEmpty(senderEmail)) missing.Add(nameof(senderEmail));
if (missing.Count > 0)
{
return new BadRequestObjectResult(
new { message = "Missing: " + string.Join(", ", missing) }
);
}
var app = ConfidentialClientApplicationBuilder
.Create(clientId)
.WithClientSecret(clientSecret)
.WithAuthority($"https://login.microsoftonline.com/{tenantId}")
.Build();
var result = await app.AcquireTokenForClient(
new[] { "https://graph.microsoft.com/.default" })
.ExecuteAsync();
string token = result.AccessToken;
string emailBody =
"Hello,
"
+ "Please find attached the extracted CSV.
"
+ "Regards,
Inogic Developer.";
var attachment = new Dictionary<string, object>
{
{ "@odata.type", "#microsoft.graph.fileAttachment" },
{ "name", csvFileName },
{ "contentType", "text/csv" },
{ "contentBytes", Convert.ToBase64String(csvBytes) }
};
var emailPayload = new Dictionary<string, object>
{
{
"message",
new Dictionary<string, object>
{
{ "subject", "Extracted PDF Table CSV" },
{
"body",
new Dictionary<string, object>
{
{ "contentType", "HTML" },
{ "content", emailBody }
}
},
{
"toRecipients",
new[]
{
new Dictionary<string, object>
{
{
"emailAddress",
new Dictionary<string, object>
{
{ "address", receiverEmail }
}
}
}
}
},
{ "attachments", new[] { attachment } }
}
},
{ "saveToSentItems", "false" }
};
string json = JsonSerializer.Serialize(emailPayload);
using var httpClient = new HttpClient();
httpClient.DefaultRequestHeaders.Authorization =
new System.Net.Http.Headers.AuthenticationHeaderValue("Bearer", token);
var httpContent = new StringContent(json, Encoding.UTF8, "application/json");
var response = await httpClient.PostAsync(
$"https://graph.microsoft.com/v1.0/users/{senderEmail}/sendMail",
httpContent
);
if (response.IsSuccessStatusCode)
return new OkObjectResult("CSV Email sent successfully.");
string errorBody = await response.Content.ReadAsStringAsync();
log.LogError($"Graph Error: {response.StatusCode} - {errorBody}");
return new StatusCodeResult(500);
}
Build the Azure Function project in Visual Studio and publish it to the Azure portal.
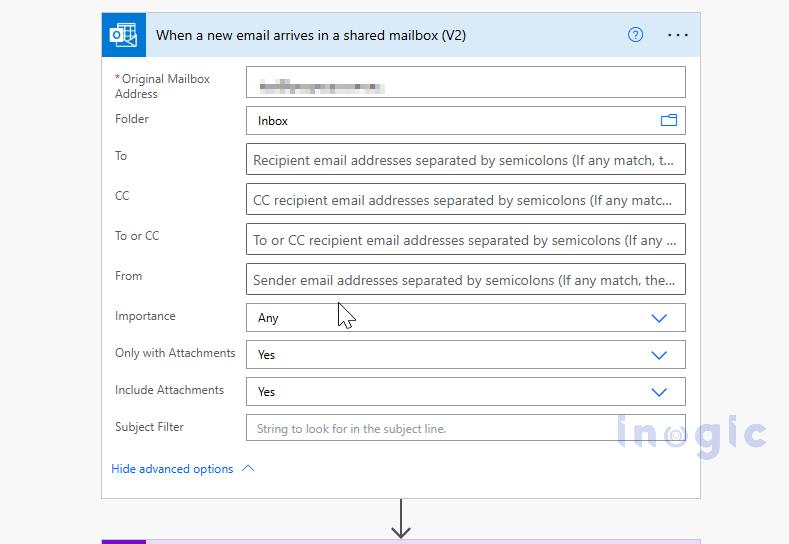
Open https://make.powerautomate.com and create a new cloud flow using the When a new email arrives in a shared mailbox (V2) trigger. Enter the shared mailbox email address in Original Mailbox Address, and set both Only with Attachments and Include Attachments to Yes.
Add a Condition action to verify that the attachment type is PDF.

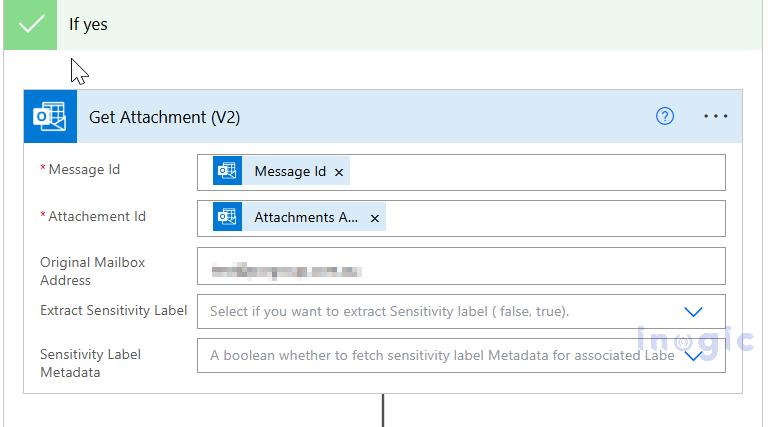
If the condition is met, in the Yes branch add the Get Attachment (V2) action. Configure Message Id using the value from the trigger and Attachment Id using the value from the current loop item and the email address of the shared mailbox.
Add a Compose action to convert the attachment content bytes to Base64 using the following expression:
base64(outputs(‘Get_Attachment_(V2)’)?[‘body/contentBytes’])
Add another Compose action to convert the Base64 output from the previous step into a string using:
base64ToString(outputs(‘Compose’))
Add an HTTP (Premium) action, set the method to POST, provide the URL of the published Azure Function, and configure the request body as shown below:
{
"$content-type": "application/pdf",
"$content": "@{outputs('Compose_2')}"
}

To test the setup, send an email to the shared mailbox with the sample PDF attached.
Note: For demonstration purposes, a simplified one-page bank statement PDF is used. Real-world bank statements may contain multi-page tables, wrapped rows, and inconsistent layouts, which are handled through additional parsing logic.
This blog demonstrated how an email-driven automation pipeline can simplify the processing of business PDFs by converting them into structured, usable data.
By combining Power Automate for orchestration, Azure Functions for custom processing, and Azure Document Intelligence for AI-based document analysis, organizations can build scalable, reliable, and low-maintenance document automation solutions that eliminate manual effort and reduce errors.
1. What is Azure Document Intelligence used for?
Azure Document Intelligence is used to extract structured data from unstructured documents such as PDFs, images, invoices, receipts, contracts, and bank statements using AI models.
2. How does Azure Document Intelligence extract data from PDF files?
It analyzes PDF content using prebuilt or custom AI models to identify text, tables, key-value pairs, and document structure, and returns the extracted data in a structured JSON format.
3. Can Power Automate process PDF attachments automatically?
Yes. Power Automate can automatically detect incoming PDF attachments from email, SharePoint, or OneDrive and trigger workflows to process them using Azure services.
4. How do Azure Functions integrate with Power Automate?
Power Automate can call Azure Functions via HTTP actions, allowing custom business logic, data transformation, and validation to run as part of an automated workflow.
5. Is Azure Document Intelligence suitable for bank statements and invoices?
Yes. Azure Document Intelligence can accurately extract tables, transaction data, and key fields from bank statements, invoices, and other financial documents.
The post Automating Business PDFs Using Azure Document Intelligence and Power Automate first appeared on Microsoft Dynamics 365 CRM Tips and Tricks.
In the Dynamics 365 and Power Apps ecosystem, we have several options for building applications, each one is for a specific type of requirement. Model-driven Apps works well when we need a structured UI with standard components, while we use Canvas Apps to create custom, mobile-friendly interfaces with a low-code approach. Recently, Microsoft introduced another application type called Code Apps, which offers a completely different way to build applications using pro code approach.
With the introduction of Power Apps Code Apps, things have changed. Code Apps let us build standalone single page applications using modern web frameworks. These are independent applications that cannot be integrated with Canvas Apps or Model-driven Apps.
The best part is that we get direct access to more than 1,500 standard and premium connectors through the Power Apps SDK. We do not have to write any authentication code, no OAuth flows, no custom APIs, no middleware. We just have to connect and use.
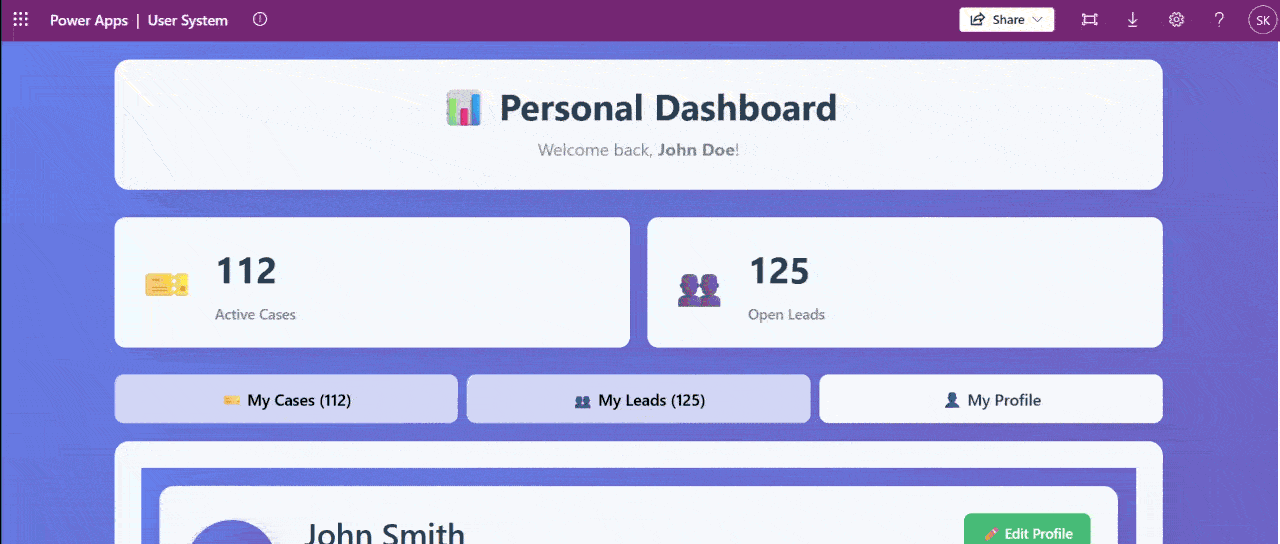
In this article, we’ll walk you through creating a Code App from scratch. We’ll build Personal Dashboard, a simple application that pulls assigned cases and leads from Dataverse and shows current logged in user details using the Office 365 Users and Dataverse connectors.
We can build a UI of our own choice and connect to a wide range of data sources using more than 1,500 standard and premium connectors provided by the Power Platform. All connections are secure because the Power Apps SDK handles authentication, and each connector enforces user-level permissions. This means the app can only access data that the signed-in user is allowed to see, so there’s no need to write custom authentication code.
Code Apps provide a balanced approach with several key advantages:
The connector integration is particularly valuable. Whether the need is to query Dataverse, access current user profile details, or use other services, the connector can be called directly. There’s no need to configure service principals, manage app registrations, or implement token management. The integration works seamlessly within the platform.
Before getting started, we have to make sure the following prerequisites are in place:
Let’s create the app. Open VS Code, launch a PowerShell terminal, and run the following command:
npm create vite@latest PersonalDashboard — –template react-ts
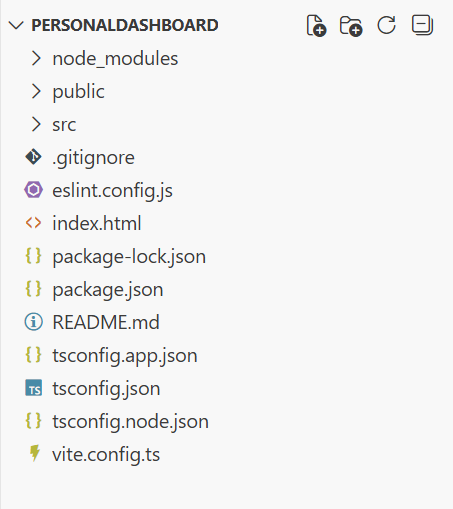
For this application, we are using React as the framework and TypeScript as the variant. After that, navigate to the project folder and install the dependencies:
npm install
Install the node type definitions:
npm i –save-dev @types/node
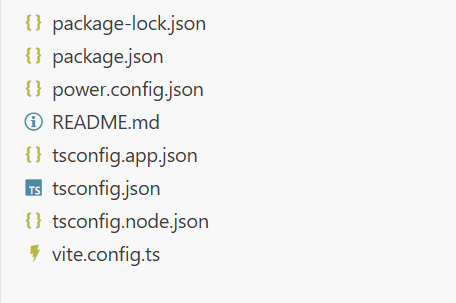
After executing these commands, the project structure will appear as shown in the image below.
According to the official Microsoft documentation, the Power Apps SDK currently requires the port to be 3000 in the default configuration. To configure this, open vite.config.ts and replace the content with the following code:
import { defineConfig } from 'vite'

import react from '@vitejs/plugin-react'

import * as path from 'path'


// https://vite.dev/config/

export default defineConfig({

base: "./",

server: {

host: "::",

port: 3000,

},

plugins: [react()],

resolve: {

alias: {

"@": path.resolve(__dirname, "./src"),

},

},

});
Note for Mac users: It may be necessary to modify the package.json scripts section.
Change from:
"scripts":  {

"dev": "start vite && start pac code run",

"build": "tsc -b && vite build",

"lint": "eslint .",

"preview": "vite preview"

}
to this
"scripts": {
"dev": "vite && pac code run",
"build": "tsc -b && vite build",
"lint": "eslint .",
"preview": "vite preview"
}
Save the file and run the Code App locally by executing:
npm run dev
Browse to http://localhost:3000. If the application loads successfully, press Ctrl+C to stop the server.
First authenticate to Power Platform:
pac auth create
After that, sign in with the credentials and select the environment:
pac env select -env <environment-url>
Initialize the Code App:
pac code init –displayName “Personal Dashboard”
This will create a power.config.json file in the project as shown in the image below.
Now install the Power Apps SDK. This package provides APIs that allow the application to interact directly with Power Platform services and includes built-in logic to manage connections automatically as they are added or removed.
npm install –save-dev “@microsoft/power-apps
Update package.json to run both Vite and the Power Apps SDK server:
"scripts": {
"dev": "start pac code run && vite",
"build": "tsc -b && vite build",
"lint": "eslint .",
"preview": "vite preview"
}
Create PowerProvider.tsx under src and add the Power SDK context provider code given below.
import { initialize } from "@microsoft/power-apps/app";

import { useEffect, type ReactNode } from "react";

interface PowerProviderProps {

children: ReactNode;

}

export default function PowerProvider({ children }: PowerProviderProps) {

useEffect(() => {

const initApp = async () => {

try {

await initialize();

console.log('Power Platform SDK initialized successfully');

} catch (error) {

console.error('Failed to initialize Power Platform SDK:', error);

}

};

initApp();

}, []);

return <>{children}</>;

}
Update the main.tsx and add this line in the imports section:
import PowerProvider from './PowerProvider.tsx'
and change this code snippet
<StrictMode>
<App />
</StrictMode>,
to this
<StrictMode>

<PowerProvider>

<App />

</PowerProvider>

</StrictMode>,
Run the app by executing :
npm run dev
Now comes the part where we will add the data source to our application. In this step, we’ll use the Dataverse connector to fetch assigned cases and leads for the logged-in user.
For that First, we need to create a connection:
1. Go to Power Apps and open Connections.
2. Click New Connection and select Dataverse.
Follow the instruction properly to create the connection, as shown in the
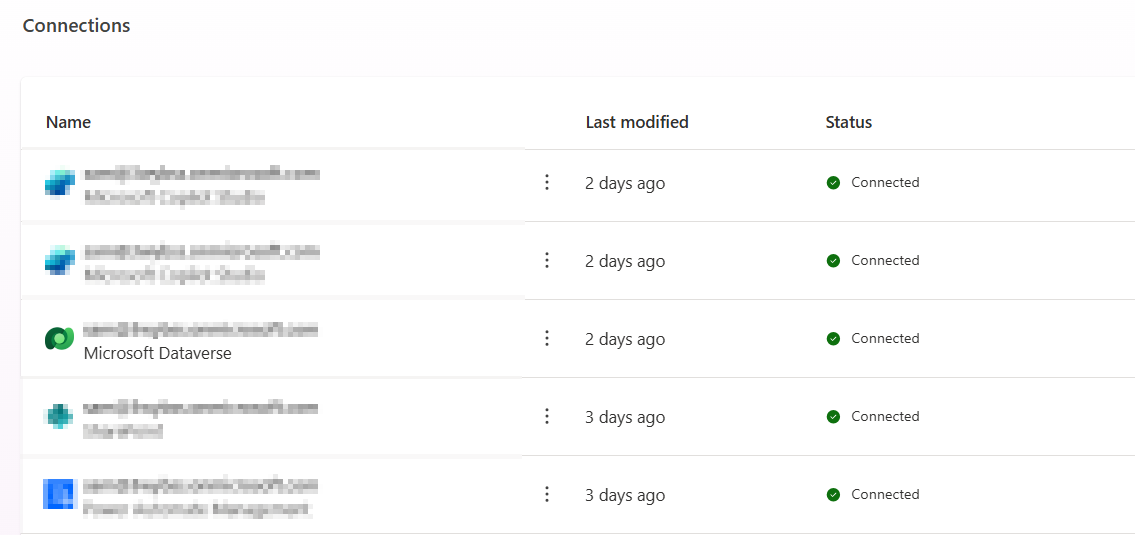
Once the connection is ready, we have to open the terminal. For Dataverse, we have to add the tables required for the application. For this example, we’ll add the Leads and Incident (Cases) tables using the following commands:
pac code add-data-source -a dataverse -t lead
pac code add-data-source -a dataverse -t incident
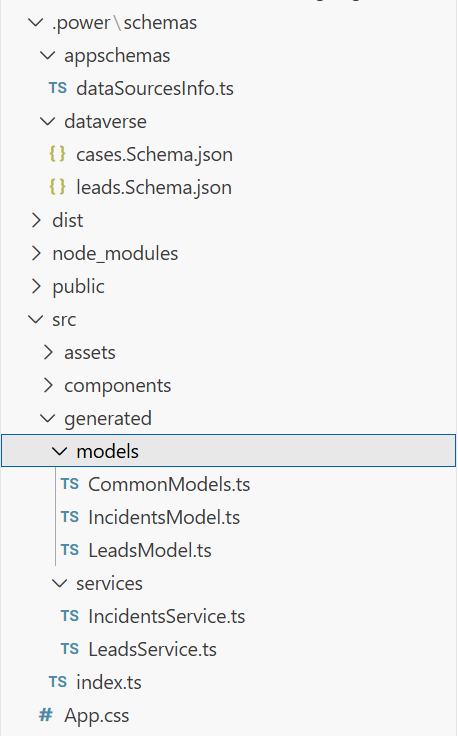
After running these commands, we can see that some files and folders are added to the project. Inside the generated folder, there are services and models folders. These contain the files for Leads, Incidents, and other tables, which can be used in the code. For example:
import { AccountsService } from './generated/services/AccountsService';

Import type { Accounts } from './generated/models/AccountsModel';
CRUD operations can be performed on Dataverse using the app. Before accessing any data, we have to initialize the Power Apps SDK to avoid errors. An async function or state check can ensure the SDK is ready before making API calls. For example:
useEffect(() => {

// Define a function of asynchronous type to properly initialize the Power Apps SDK to avoid any error during runtime


const init = async () => {

try {

await initialize(); // Wait for SDK initialization

setIsInitialized(true); // Mark the app as ready for data operations

} catch (err) {

setError('Failed to initialize Power Apps SDK'); // Handle initialization errors

setLoading(false); // Stop any loading indicators

}

};


init(); // Call the initialization function when the component mounts

}, []);


useEffect(() => {

If (!isInitialized) return;


// Place your data reading logic here
Similar to Dataverse, we need to create a connection for Office 365 Users by following the same steps. Once the connection is ready, we need to add it to the application. First, list all available connections to get the connection ID using command:
pac connection list
It will list all the connections available in the selected environment. We need to Copy the connection ID for Office 365 Users from the list, then add it to the project using:
pac code add-data-source -a “shared_office365users” -c “<connection-id>”
After running this command, the Office 365 Users connector will be available to use in the application, allowing access to user profiles, and other Office 365 user data.
There are two ways to build a good UI. The first is the traditional coding approach where we write the complete code manually. The second is by using GitHub Copilot integrated in VS Code with the help of prompts.
We can generate the UI by writing a detailed prompt in GitHub Copilot. Here’s an example prompt:
Create a Personal Dashboard UI component in React with TypeScript that displays:
– Left section: Display a list of assigned Cases (Incidents) from Dataverse
* Show case title, case number, priority, status, and created date
* Use card layout for each case
* Add loading state and error handling
– Right section: Display a list of assigned Leads from Dataverse
* Show lead name, company, topic, status, and created date
* Use card layout for each lead
* Add loading state and error handling
– Responsive layout (works on desktop and mobile)
– Tailwind CSS for styling
– Professional color scheme (blues and grays)
– Proper spacing and typography
– Loading spinners while data is fetching
– Error messages if data fails to load
After providing this prompt to GitHub Copilot, it will generate the complete component code. We can then review the generated code, make any necessary adjustments, and integrate it into our application.
Once the code is complete and the app is running locally, the next step is to deploy the application. For Code Apps, deployment is straightforward. First, build the application by running:
npm run build
After a successful build, execute the following command to push the application to Power Apps:
pac code push
This command will deploy the application to Power Apps. To verify the deployment, go to the Power Apps portal and open the Apps section. The newly deployed Code App will be visible in the list as shown in the image below.
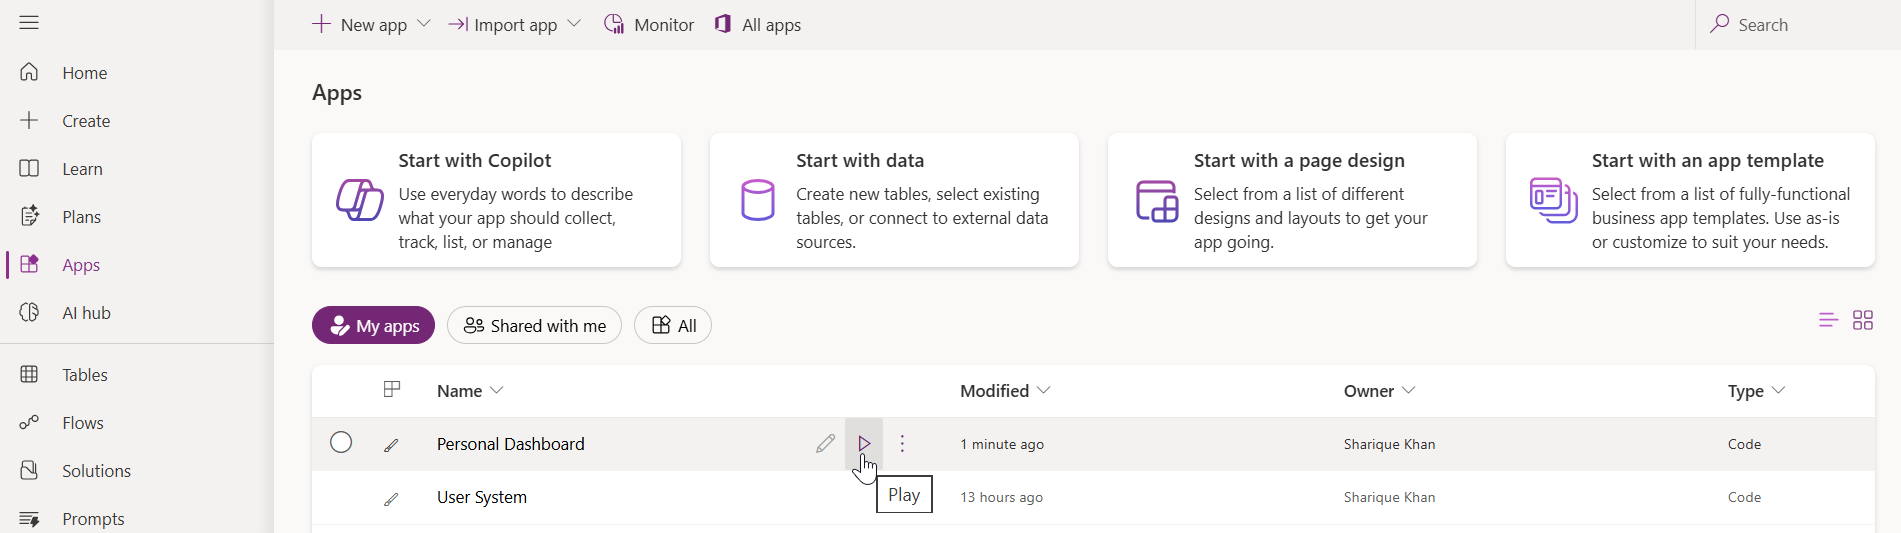
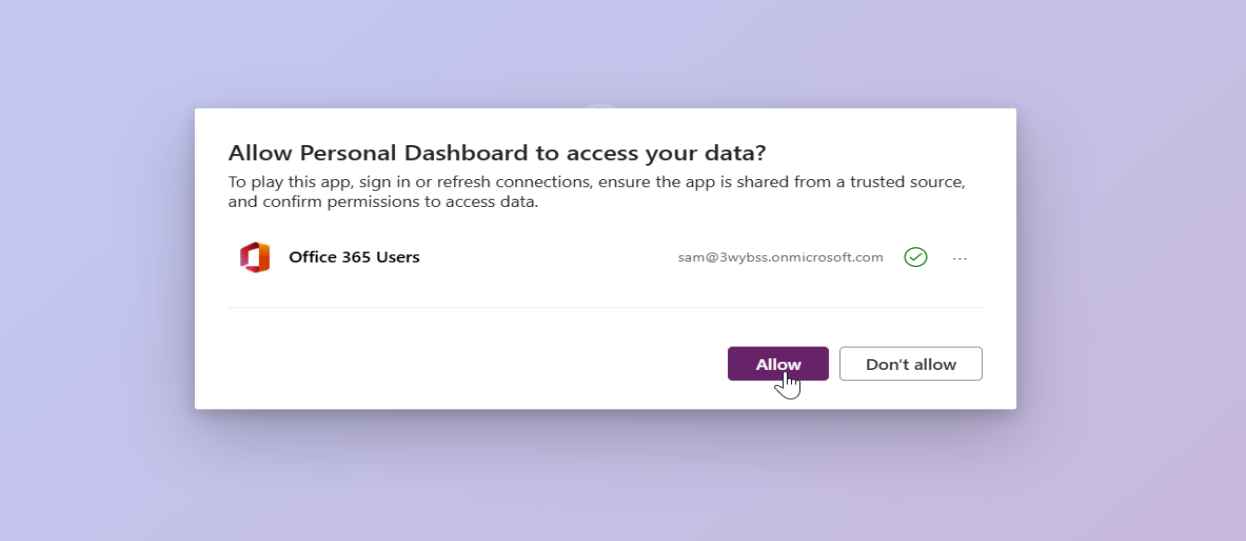
To run the app, click the play button. On the first launch, the application will prompt for permission to access the connected data sources. After allowing the permissions, the application will use those connection references for all subsequent operations.
With Power Apps Code Apps, we can now build standalone applications. The real advantage here is the direct access to over 1,500 connectors through the Power Apps SDK. We can connect to Dataverse, Office 365 Users, and other services without writing any authentication code. The Power Apps SDK handles all the security, and each connector respects user level permissions automatically.
We also get complete freedom to design our own UI using any libraries we prefer. The deployment process is simple. Just run the build command and push it to Power Platform with a single command.
In this article, we built a Personal Dashboard that pulls data from Dataverse and Office 365 Users. The same approach works for any application that needs to connect with Power Platform services. The setup is straightforward, and once the project is initialized, adding new data sources is just a matter of running a few commands.
Code Apps provide a practical way to build custom applications within the Power Platform ecosystem while maintaining secure connections and proper access control.
Power Apps Code Apps are a new application type in Microsoft Power Platform that allow developers to build standalone single-page applications using modern web frameworks such as React, Angular, or Vue. They provide direct access to Power Platform connectors through the Power Apps SDK without requiring custom authentication code.
Unlike Canvas Apps and Model-Driven Apps, Code Apps:
No. Authentication is handled automatically by the Power Apps SDK. Developers do not need to implement OAuth flows, manage tokens, or configure app registrations. All connectors enforce user-level permissions by default.
Yes. Power Apps Code Apps can connect directly to Dataverse using the Dataverse connector. Developers can perform CRUD operations on Dataverse tables, such as Leads and Incidents once the SDK is initialized.
Code Apps use the Office 365 Users connector to retrieve profile details such as name, email, job title, and profile photo. The connector respects the signed-in user’s permissions automatically.
The post Building Standalone Apps with Power Apps Code Apps: Using Dataverse and Office 365 Users Connectors (Part 1) first appeared on Microsoft Dynamics 365 CRM Tips and Tricks.
Organizations generate thousands of documents across SharePoint, including contracts, invoices, proposals, technical specifications, HR files, SOPs, and more.
But finding the right document at the right moment is where the real challenge lies.
AI tools like Microsoft Copilot, when combined with modern semantic search and Azure AI Search, are reshaping how business users discover, understand, and use document-based knowledge—reducing search time from minutes to seconds.
Today’s blog explores the top Copilot features that enhance SharePoint document search and turn Microsoft 365 into a powerful, conversational knowledge hub.
Keyword search was never designed for today’s volume of data. Users face issues like:
This is exactly where AI-powered SharePoint search changes everything.
Copilot enables semantic, conversational, and intent-aware search across your SharePoint content.
Instead of typing keywords, users can simply ask:
“Give me a short summary of all Q4 invoices stored in SharePoint.”
“Show me the risks mentioned in the contract signed with Contoso.”
“Provide the billing details for invoice INV-01002-Q3L3L2.”
And Copilot generates a clear, consolidated answer with citations within seconds.
Behind the scenes, Copilot leverages:
The result? Copilot doesn’t just find documents; it understands their meaning.
During a live Teams call, users can ask:
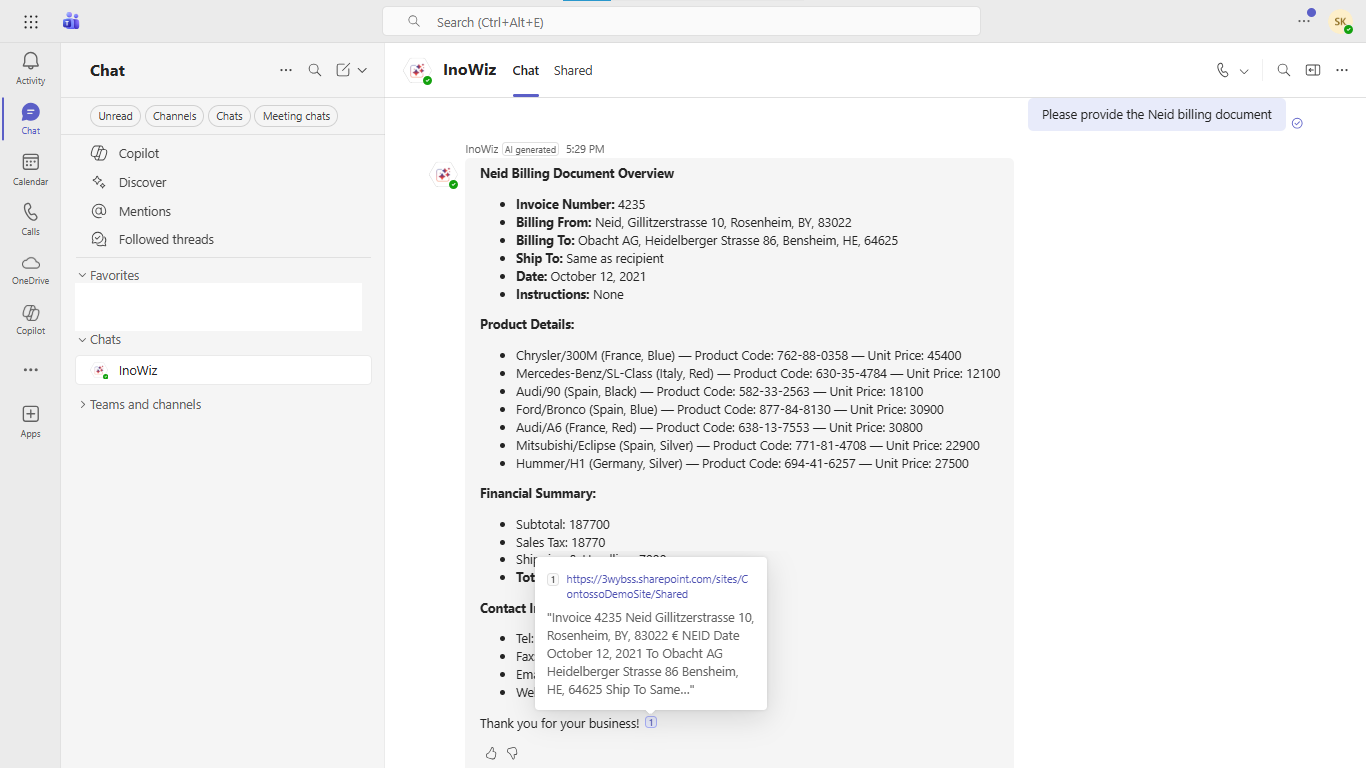
“Summarize the latest billing document for Project Neid.”
“Pull the contract details approved last week.”
Copilot instantly retrieves the relevant SharePoint content, even if it lives in a different site, library, or folder.
This is especially impactful for:
Inside SharePoint, Copilot acts as a knowledge assistant.
You can ask:
“Provide insights from all technical design specs related to the Q3 rollout.”
And Copilot responds with synthesized insights instead of links to browse manually.
The power of SharePoint search doesn’t stay in SharePoint.
Copilot brings AI search to:
This ensures knowledge is available wherever users work.
With context retention, users can ask follow-up questions:
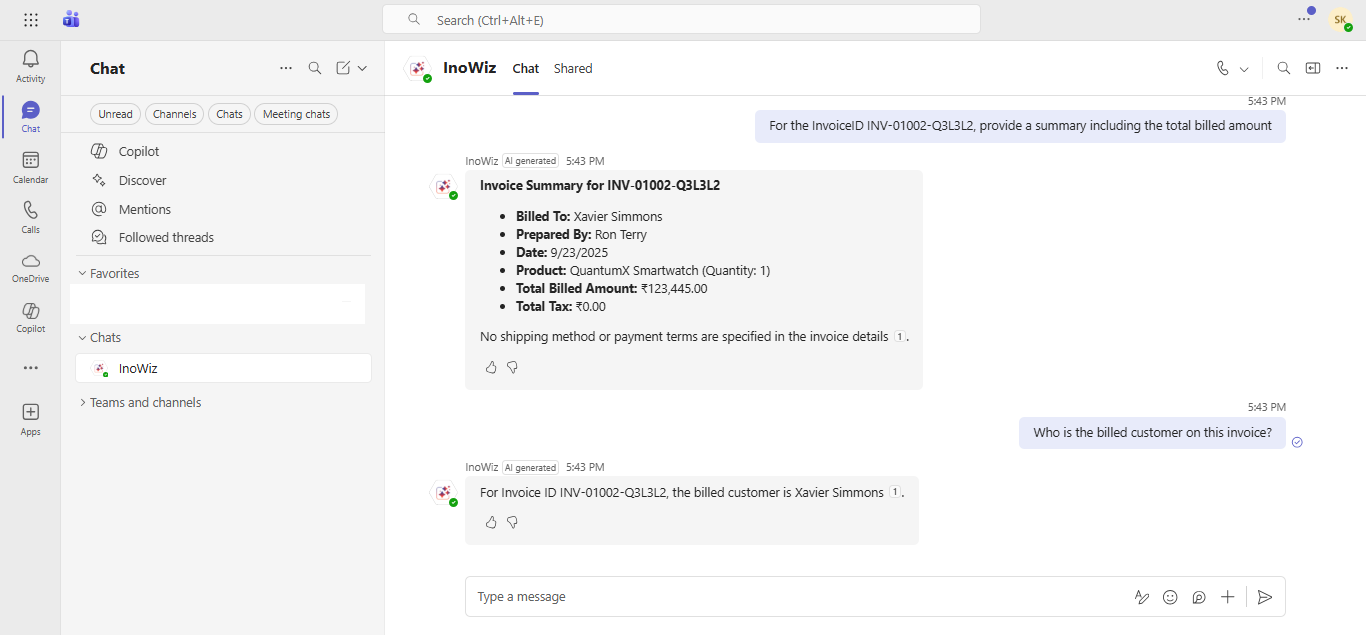
“For invoice INV-01002-Q3L3L2, what is the total billed amount?”
“Now show me the breakdown of line items.”
Copilot understands the topic you’re referring to and maintains continuity—just like a human assistant.
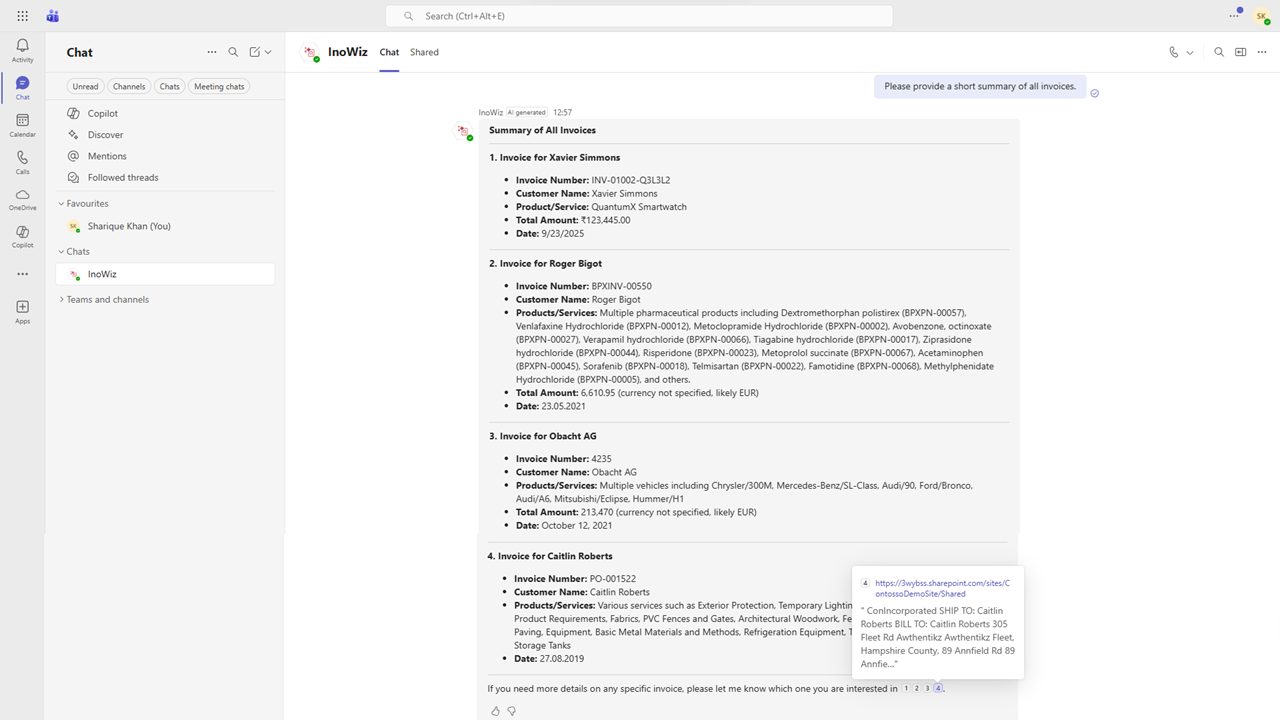
Copilot scans multiple SharePoint files at once and produces:
Every answer includes citations to the exact SharePoint files used—ensuring transparency and auditability.
Example:
“Provide a short summary of all invoices.”
Copilot reviews every invoice document and returns a single, clean summary with links.
Copilot respects SharePoint’s native permission model.
Users only see results they have access to.
Example:
This ensures compliance, security, and privacy without any manual configuration.

Copilot can convert extracted information into instant tables:
This helps teams analyze data quickly without manually formatting spreadsheets.
Copilot supports multilingual semantic search, ideal for organizations across:
Users can query and receive answers in their native languages, boosting collaboration and accessibility.
A standout capability:
Copilot can generate professional email drafts using insights from the documents you reference.
Example:
“Draft an email to the finance team summarizing invoice INV-01002-Q3L3L2.”
Copilot instantly produces a polished draft you can send from Outlook.
Why Combine Copilot + Azure AI Search + SharePoint + Teams/Outlook/Dynamics 365?
Because together, they deliver:
This combination transforms SharePoint from a storage system into a smart corporate brain.
Copilot is redefining SharePoint search by layering semantic intelligence, natural language understanding, and AI summarization across Microsoft 365.
From Teams calls to SharePoint libraries and Outlook emails, AI-powered search is becoming the default way organizations find information.
The future of SharePoint is conversational, semantic, real-time, and AI-driven.
Ready to Enhance Your SharePoint Search with AI?
If you want to implement AI-driven semantic search, Copilot-driven document insights, and enterprise-grade, permission-aware knowledge discovery, request a personalized walkthrough.
For more details, visit the Inogic Website or Microsoft Marketplace.
Reach us at crm@inogic.com to get a demo of Copilot-powered SharePoint document search (AI-based).
The post The Ultimate Guide to AI Semantic Search in SharePoint with Microsoft Copilot first appeared on Microsoft Dynamics 365 CRM Tips and Tricks.
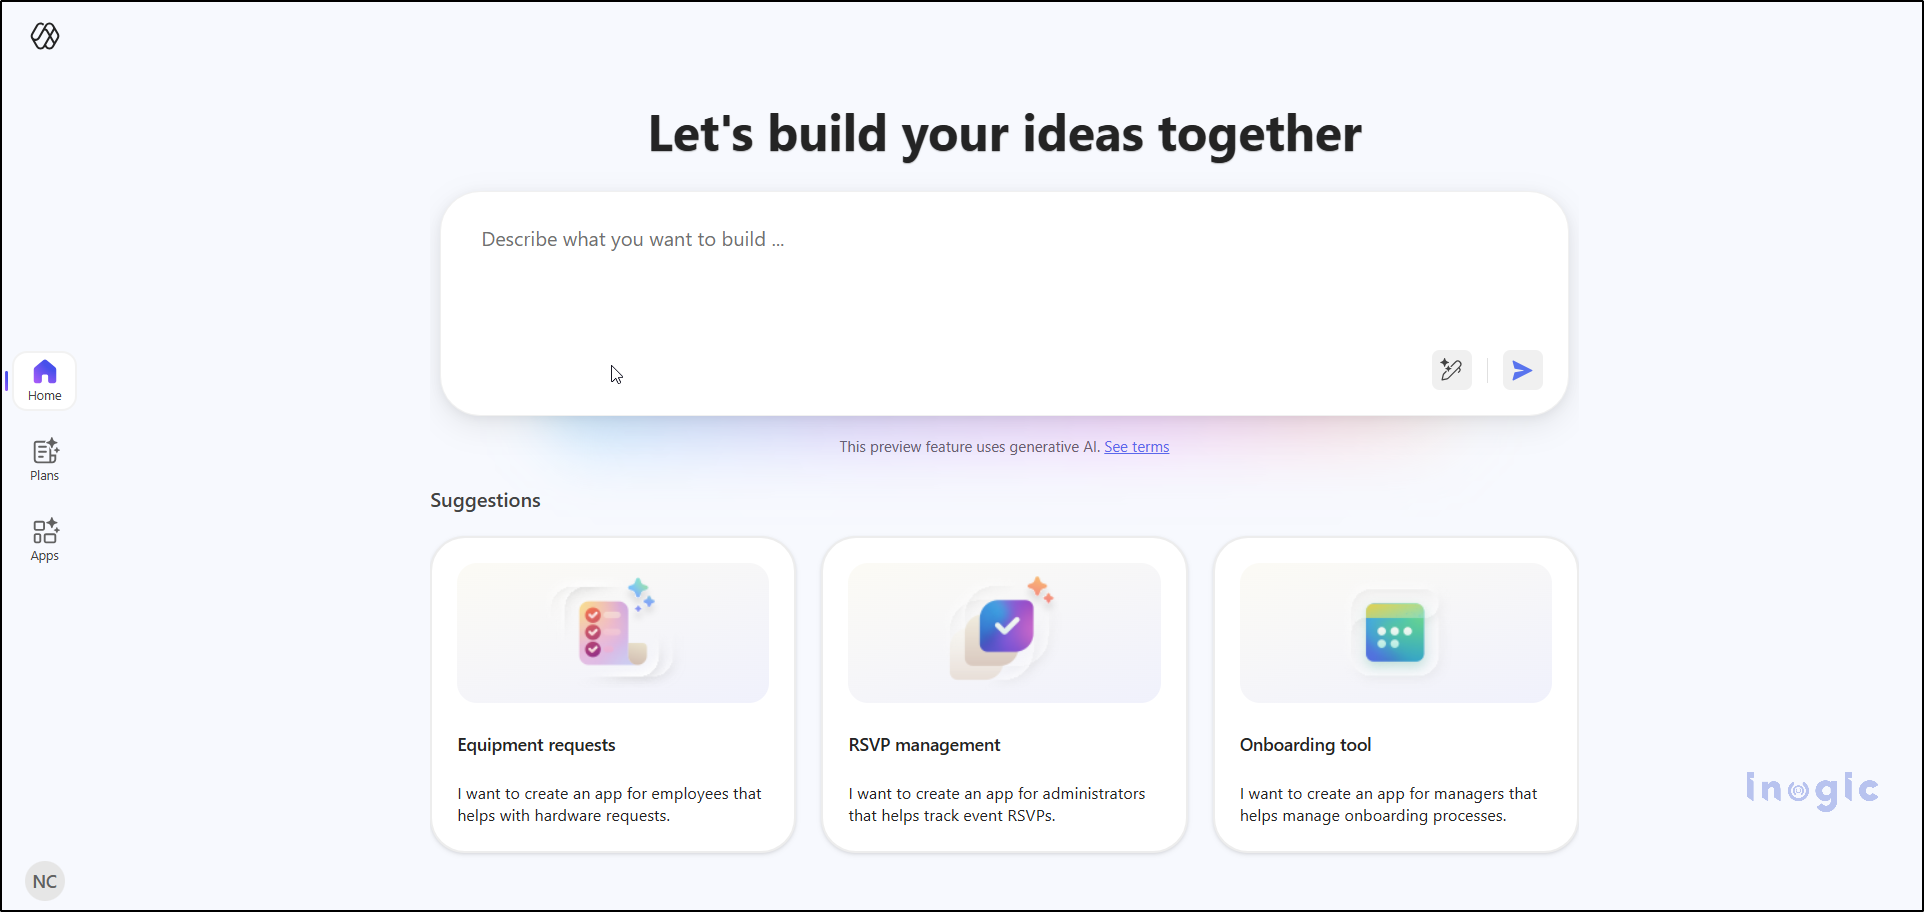
If you’ve ever tried building apps with Microsoft Power Apps, you know the process: creating tables, designing screens, adding controls, connecting data, and writing formulas. While the traditional app-building process is effective, it can also be time-consuming and complex.
You simply describe the app you need, and within minutes, Power Apps Vibe takes over:
All this, without having to drag a single control or write a line of code.
Welcome to Power Apps Vibe—a revolutionary AI-powered app development platform. Unlike traditional app design methods, Power Apps Vibe makes building apps simpler, faster, and more intuitive than ever before.
Instead of spending hours designing screens and wiring logic, Vibe transforms app development into a simple, conversational experience. You describe what you need, and it creates the foundation for your app—data model, UI, navigation, and logic—automatically.
In this blog, I’ll break down what Vibe is, why Microsoft created it, and how you can start building full-stack apps with nothing more than a sentence.
Power Apps Vibe is Microsoft’s AI-driven app-building experience, designed to simplify app development. Available now in preview, this feature combines the best aspects of low-code and AI-powered development into a single, seamless interface.
Unlike traditional app-building tools such as Canvas or Model-Driven apps, Vibe functions like a creative partner, helping you bring your app ideas to life faster. Here’s how it works:
You still have full control to modify or refine any aspect of the app. Think of Power Apps Vibe as a combination of Power Apps, an AI architect, a UI designer, and a developer, all within a single interface.
Think of it as Power Apps + a smart architect + a designer + a developer, all rolled into one interface.
The goal behind Power Apps Vibe is simple: to make app development faster, smarter, and more accessible for everyone, from business users to developers.
Organizations often face challenges such as:
Power Apps Vibe addresses these issues by enabling anyone, whether a business user, analyst, or developer, to rapidly create a solid app foundation. With Vibe, you can skip the time-consuming setup and dive straight into customizing the app for your specific needs.
We can maintain full control for customization, but the time-consuming initial setup is handled for us.
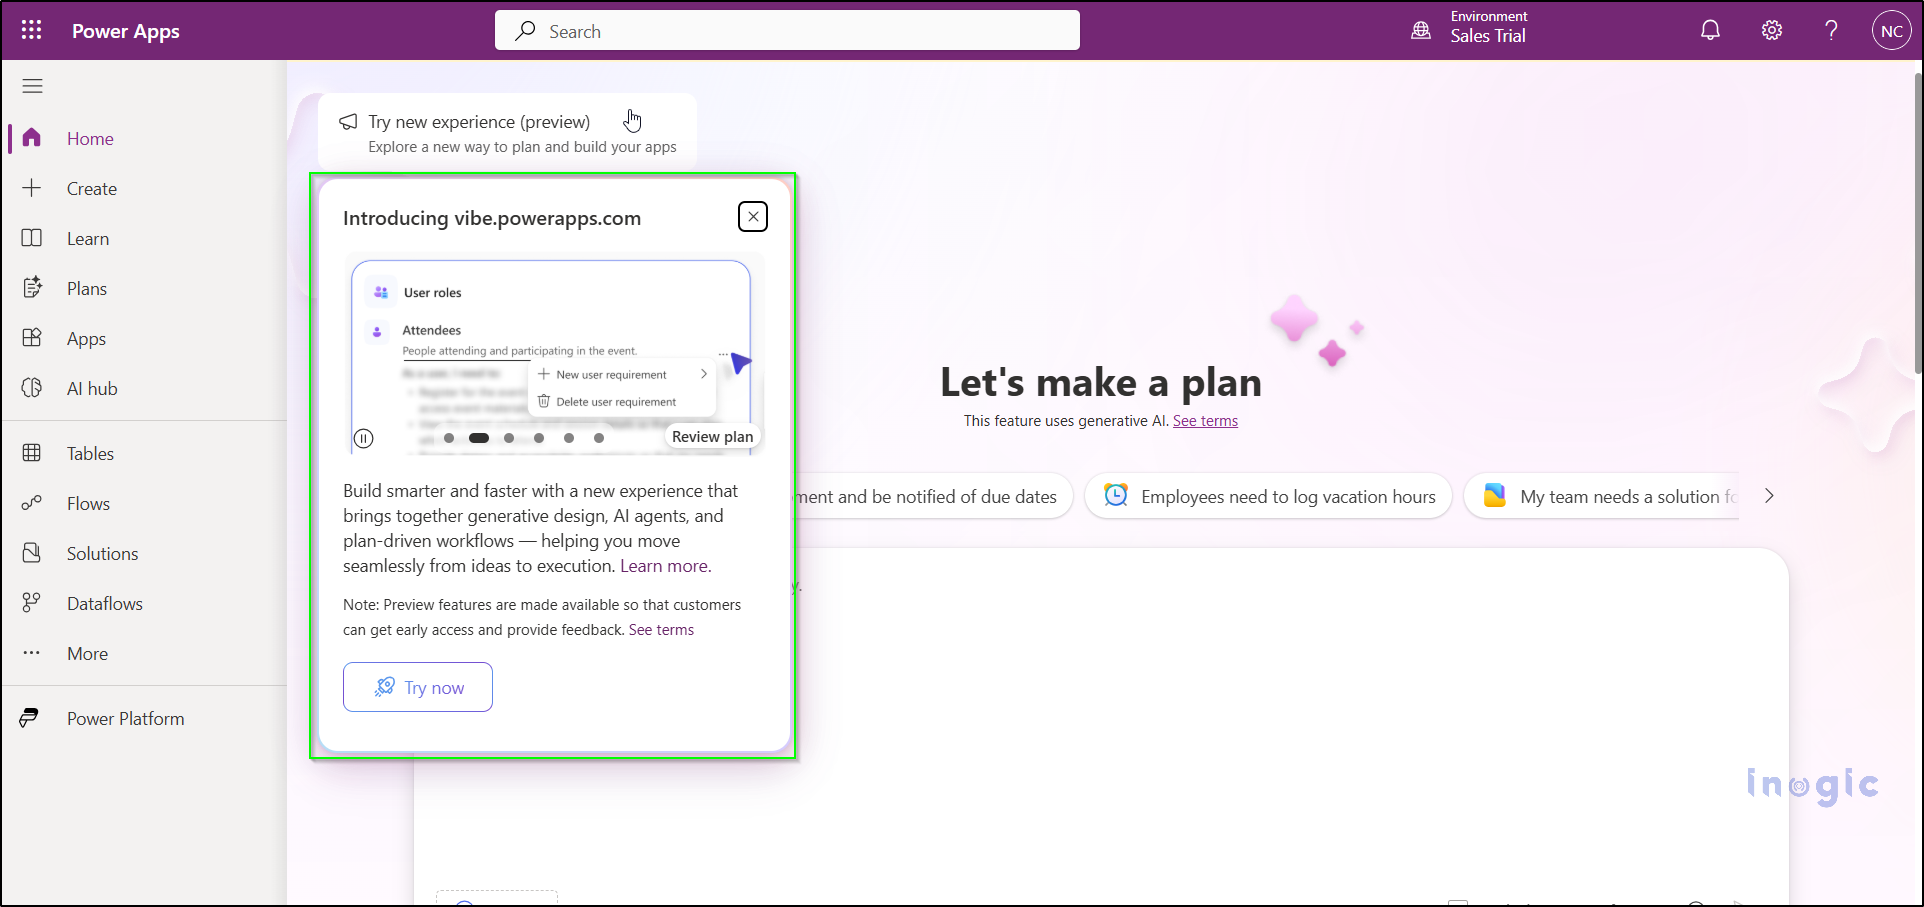
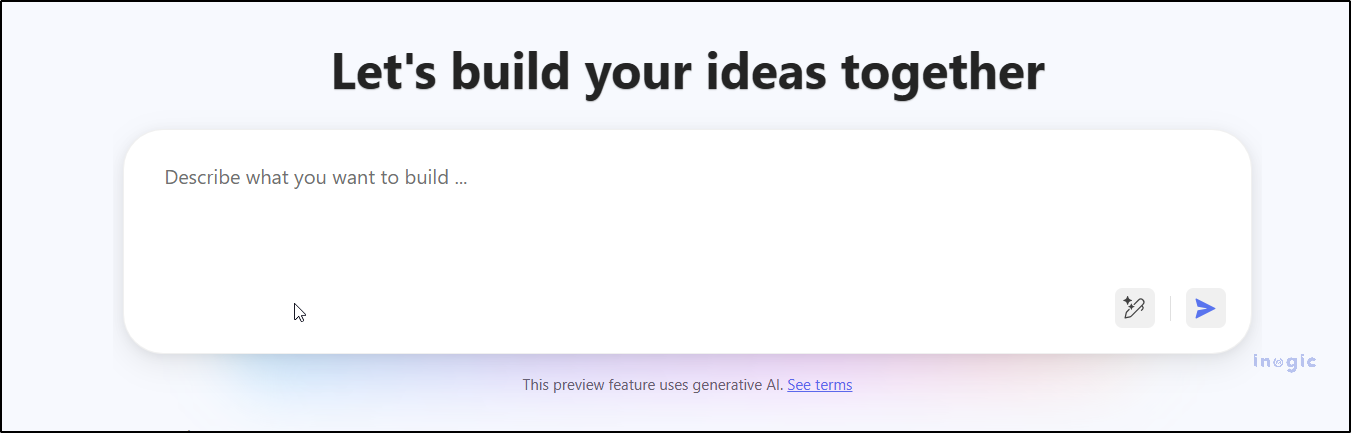
Currently, Power Apps Vibe is available in preview and is not yet part of the standard Power Apps studio. To get started, head over to the preview portal: Power Apps Vibe Preview
Simply sign in with your Microsoft account, and you’ll be greeted with a clean, intuitive workspace. A large prompt box will be ready for your ideas, making it easy to get started.
To use it, Navigate to:
 https://vibe.preview.powerapps.com
Sign in with your Microsoft account, and you’ll enter a clean, streamlined workspace featuring a large prompt area—ready for your ideas.
Here’s what surprises most people:
Using Power Apps Vibe feels less like coding and more like having a conversation with a colleague. You describe what you need, and Vibe does the heavy lifting. Here’s how the process works:
Let’s walk through the complete process step by step.
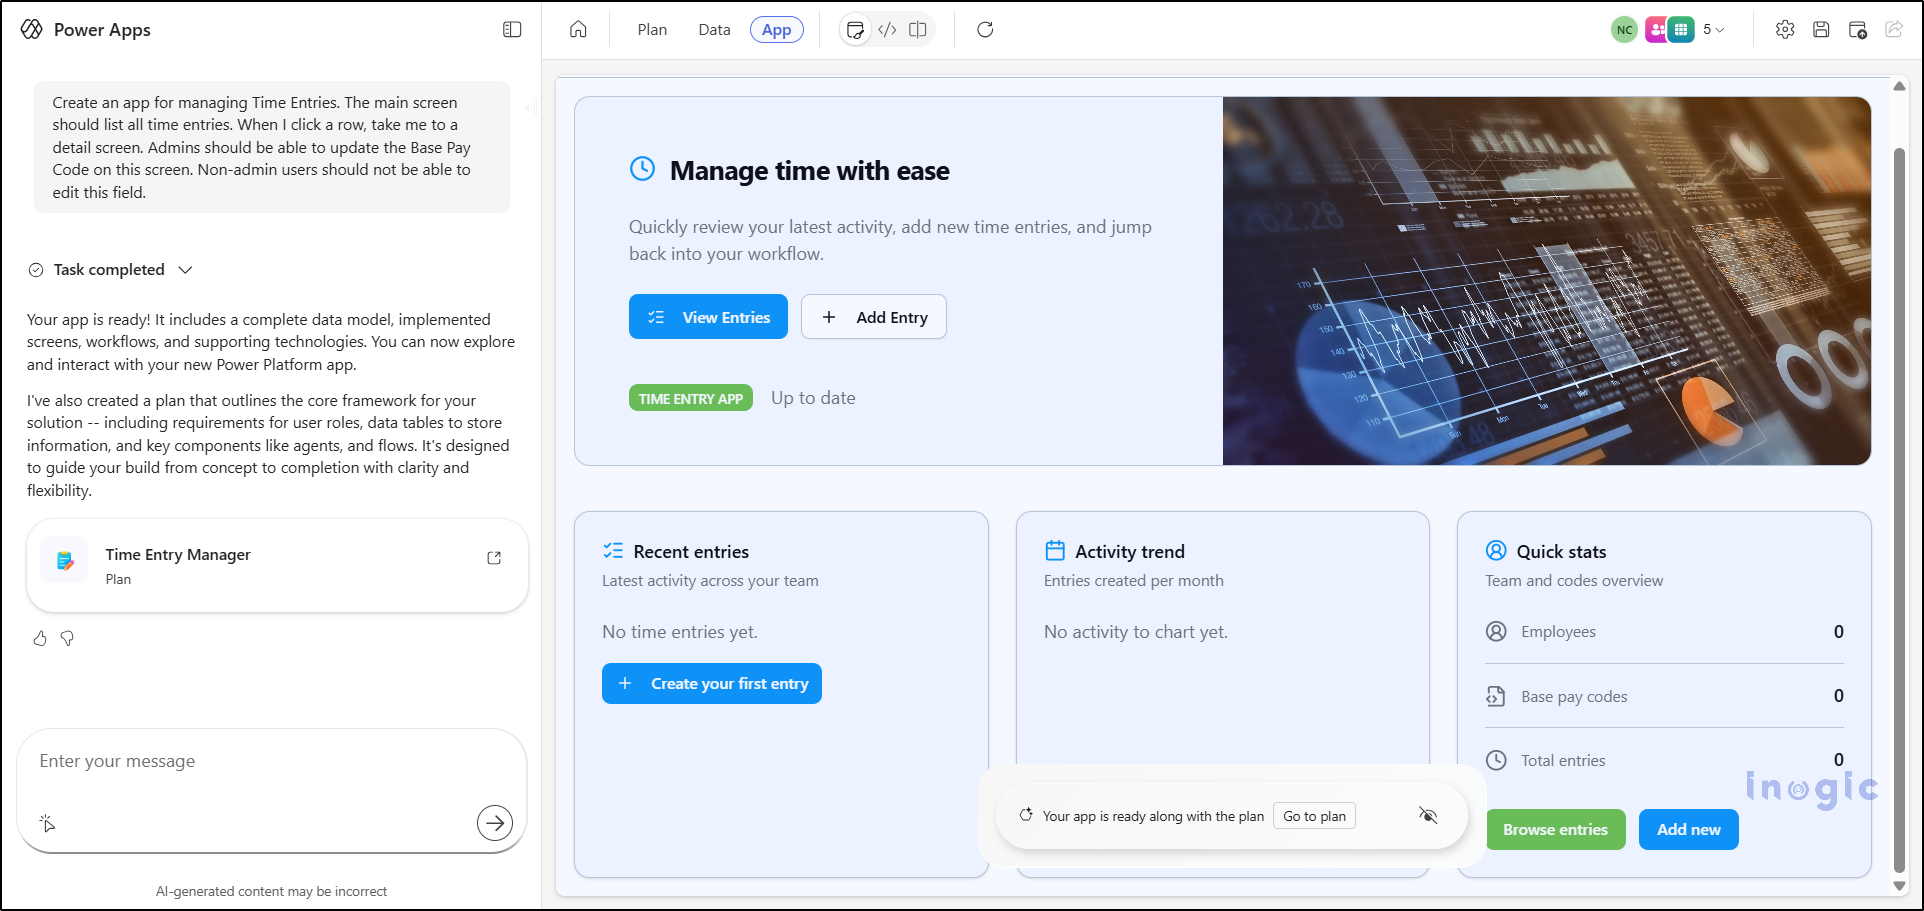
In the prompt box, simply describe your app in plain language. You don’t need to worry about technical jargon or formatting. For example:
“I want to build a Time Entry Admin app. Admins should be able to update the Base Pay Code, view a list of time entries, and edit the Base Pay Code only on this screen.”
No need for complex formatting or technical jargon.
Just describe your app idea as if you were explaining it to a teammate – simple, clear, and conversational.
Once you submit your prompt, Vibe analyses your requirements and generates a detailed plan. This blueprint typically includes:
Test Prompt:
“Create an app for managing Time Entries. The main screen should list all time entries. When I click a row, take me to a detail screen. Admins should be able to update the Base Pay Code on this screen. Non-admin users should not be able to edit this field.”
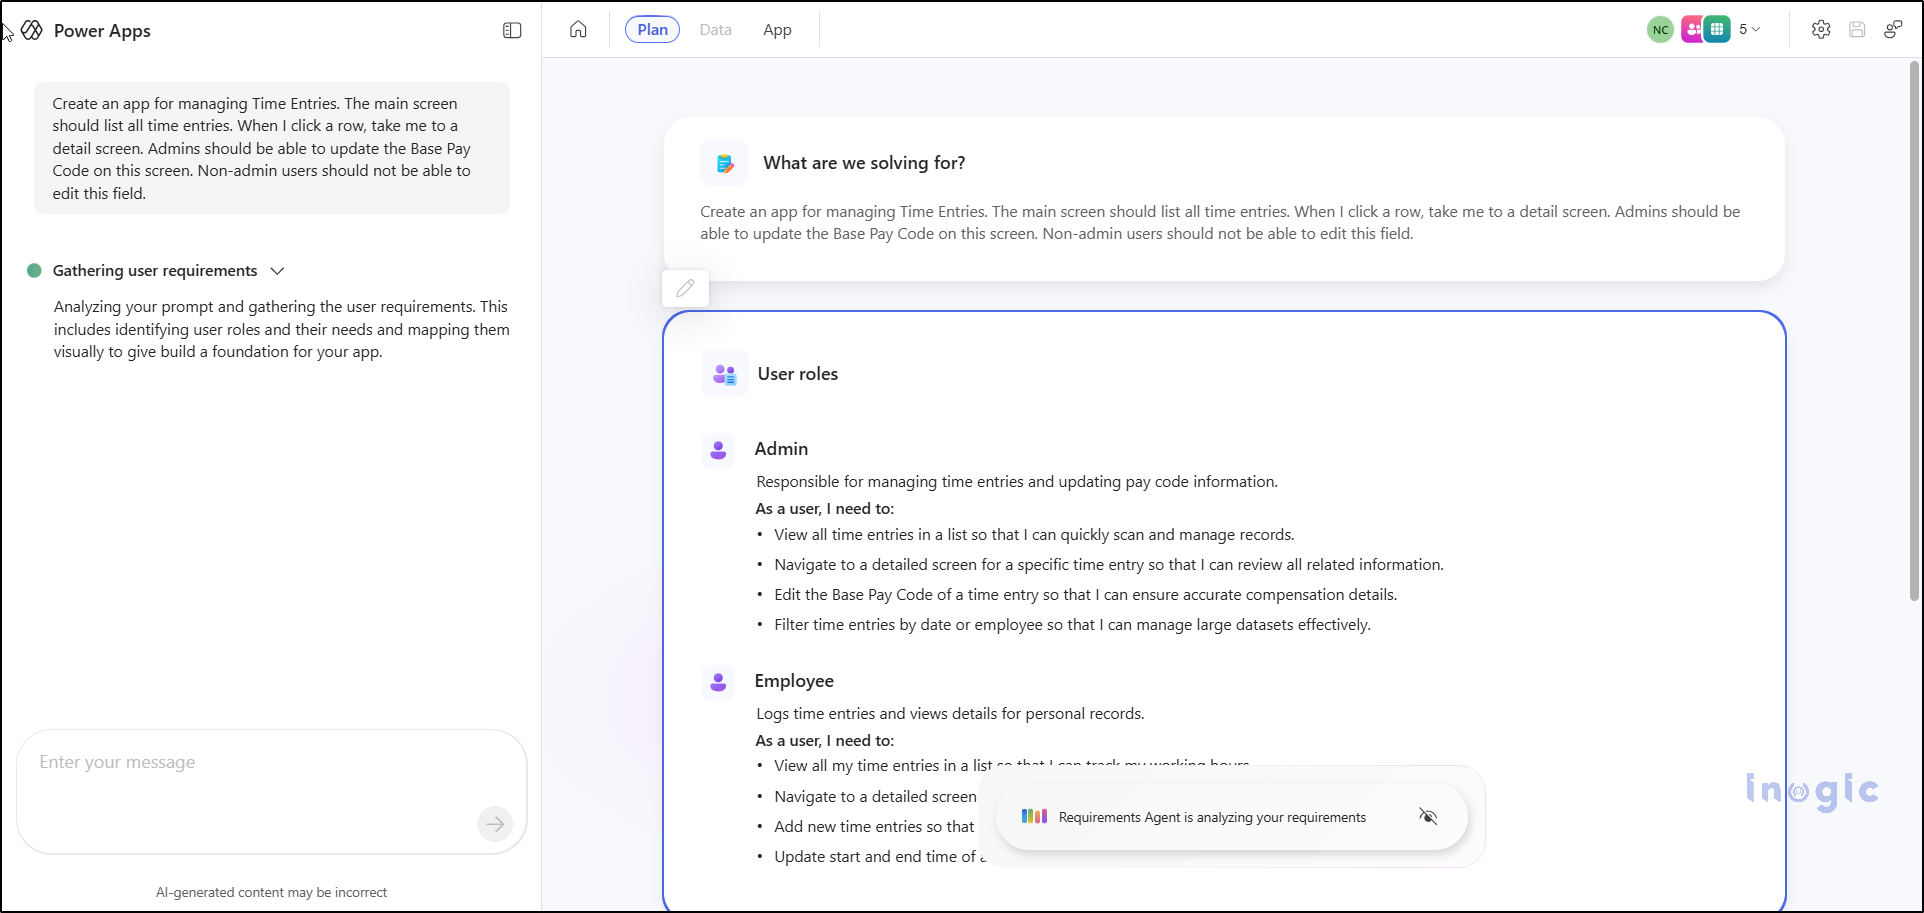
It’s essentially the blueprint of your app. If something doesn’t look right, you don’t need to start over – just refine your prompt. For example:
Vibe instantly updates the plan based on your instructions, making the process feel conversational and effortless.
Once your plan looks good, simply click Create App.
Vibe now builds:
This process yields a functional web application that is available for immediate preview.
Vibe handles all the heavy lifting so you can focus on refining ideas instead of wrestling with syntax.
Step 4: Refine the App Through Natural Language
This is where Vibe feels different from anything we’ve seen before.
You can simply chat with it:
And Vibe will update the app instantly.
It’s the first time Power Apps feels like a conversation instead of a tool.
When you save the app for the first time, Power Apps stores:
All inside a single solution.
It becomes part of your Power Apps environment, just like any other app.
When you first build the app, it uses “draft data” – temporary tables that exist only for prototyping.
Once your app is ready for real use:
This step turns your prototype into a production-ready application.
Once everything looks right, click Publish.
Your app becomes live, and you can share it with your team exactly like any other Power App.
Where Power Apps Vibe Really Shines
After playing with it, I realized Vibe is perfect for:
It reduces friction. It reduces waiting. It reduces technical complexity.
You still get full control — formulas, data, actions, security, connectors — everything you normally have in Power Apps remains available.
But the start is dramatically faster.
Since Vibe is still a preview feature, a few things have limitations:
But even with these limitations, Vibe is powerful enough to start real-world projects and prototypes.
Power Apps Vibe is one of the biggest updates to the Power Platform in years.
It brings a fresh, modern, conversational style of development that feels more natural and less stressful.
Instead of spending hours designing screens and wiring logic, you can now focus on:
If you haven’t tried it yet, open the preview today and type the first idea that comes to mind.
You’ll be surprised how quickly it becomes a working app.
Power Apps Vibe is an AI-powered app-building tool that allows you to create full-stack apps simply by describing your requirements in natural language. Unlike traditional Power Apps, which involve manually designing screens and writing formulas, Vibe automatically generates the data model, UI, navigation, and logic. It simplifies app development by transforming it into a conversational, automated process.
Yes, Power Apps Vibe is designed for users with little or no coding experience. It allows you to create apps by simply describing what you want in plain language. The AI handles the complex aspects of app development, such as data modeling, UI design, and logic, so you can focus on refining your ideas rather than writing code.
Currently, Power Apps Vibe is in preview and can be accessed by users who sign in through the dedicated portal at https://vibe.preview.powerapps.com. While the feature is available globally, its availability might vary based on regional preview settings and Microsoft’s rollout timeline. Keep an eye on updates for broader access.
While Power Apps Vibe is a powerful tool, it does have some limitations:
Once your prototype is ready, you can connect your Power Apps Vibe app to real data by navigating to the Data section within Power Apps and linking it to supported data sources such as Dataverse, SQL, or SharePoint. After mapping the fields, you can publish the app again to make it production-ready.
The post Build AI-Powered Apps in Minutes with Power Apps Vibe: A Complete Guide (Preview) first appeared on Microsoft Dynamics 365 CRM Tips and Tricks.
In many businesses, important updates in Dynamics 365 CRM go unnoticed. One delayed update can cost a deal, damage customer trust, or slow down decision-making. Sales teams miss important lead updates, service teams fail to act on escalations, and marketing teams lose track of campaign responses.
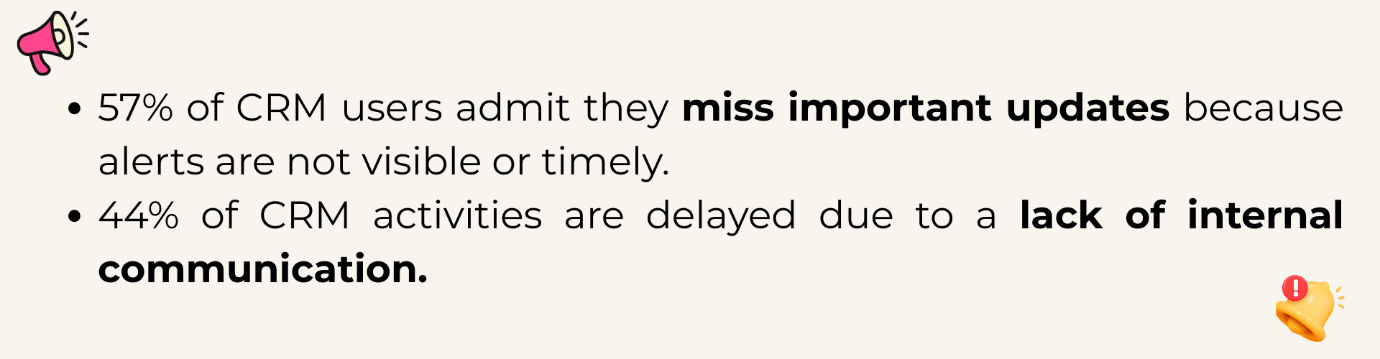
This is exactly why automated alerting is no longer optional; it’s essential.
Dynamics 365 CRM doesn’t offer robust in-app alerts by default.
Alerts4Dynamics fills this gap perfectly by supporting pop-ups, form notifications, email alerts, rich text notifications, multilingual content, user preferences, and much more.
Before we dive into the configuration tutorial, let’s explore the key features with practical examples.
Instant notifications that appear in the alerts panel (Bell icon).
Example:
A new lead is created from the website, and the assigned sales rep receives a pop-up alert instantly.
A pop-up box opens automatically when the user enters a record form.
Example:
When entering an Account record with unpaid invoices, users see a dialog warning:
“This customer has 3 overdue invoices. Please review before proceeding.”
Helps service agents make informed decisions instantly.
A banner-style alert displayed at the top of record forms.
Example:
A quote nearing expiry shows a yellow bar:
“Quote expires in 3 days. Please follow up with the customer.”
Reduces lost revenue from expired quotes.
Send alerts directly to internal users or external contacts.
Example:
When an invoice is marked as “Paid,” an email goes to all contacts related to that Account, notifying them about payment confirmation.
Speeds up customer communication without manual emails.
Trigger alerts when a record is created, updated, or changes status.
Example:
When a case is escalated:
Ensures immediate action across all departments.
Trigger alerts using system views or FetchXML conditions.
Example:
Send alerts for:
Perfect for automated monitoring of high-impact data.
Alerts created for individual records.
Example:
A specific quote is expiring in 48 hours → alert only on that record.
Great for one-time reminders.
CRM
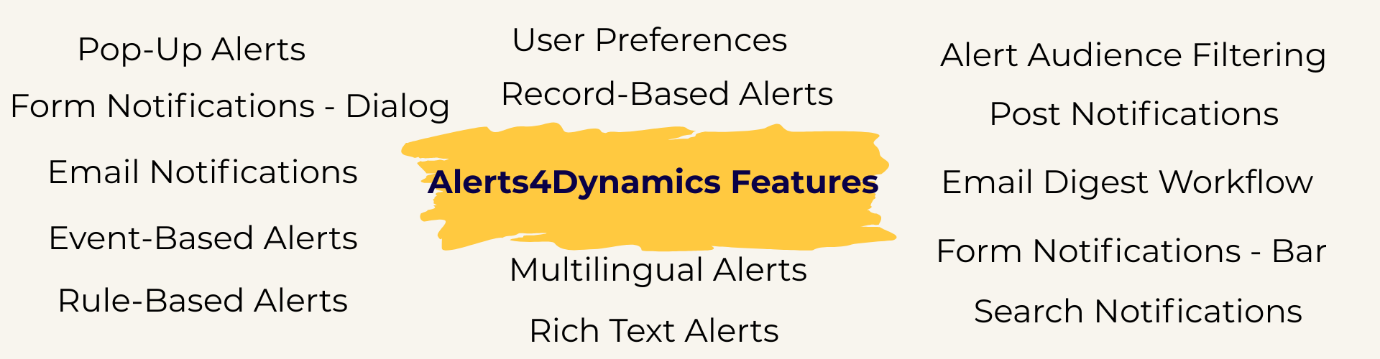
Display alerts in user’s preferred CRM language.
Example:
English user sees:
“Invoice is overdue.”
French user sees:
“Facture en retard.”
Ideal for global companies.
Create visually engaging messages.
Example:
A marketing alert with:
Boosts clarity and engagement.
Let users choose how they want alerts delivered:
Example:
Sales reps prefer email, service agents prefer pop-ups → Alerts4Dynamics adapts accordingly.
Prevents alert fatigue.
Show alerts only to selected users, teams, or roles.
Example:
A finance alert is visible only to the finance team, not sales.
Enhances data confidentiality.
Tag users in Timeline → they receive notifications automatically.
Example:
Support agent tags a sales rep:
“@Bob, please contact this customer regarding renewal.”
Send a summary of unread or active alerts.
Example:
Managers receive a daily digest of:
Replaces manual reporting.
Quickly find alerts using keywords.
Example:
Sales manager searches “Invoice” to view all invoice-related notifications.
Saves time for high-volume CRM users.
6 Real-Time Alerts Every Sales Team Must Set Up in Dynamics 365 CRM
Advanced Settings → Alerts4Dynamics → Alerts → New
Record-Based, Rule-Based, or Event-Based
Add colors, images, links, or formatted text.
Pop-up, form bar, form dialog, email, or user preference.
Information, Warning, Critical
User, team, BU, related records, or entire org.
Alert becomes live instantly.
| Challenge | Impact | Solution |
| Missed data updates | Slow response | Real-time pop-ups + dialogs |
| Too many emails | Alerts ignored | User preference control |
| No workflow visibility | Delayed action | Event-based triggers |
| No multilingual support | Miscommunication | Multi-language alerts |
| Poor engagement | Alerts overlooked | Rich-text notifications |
CRM alert notifications are automated messages that inform users about important updates such as new leads, escalations, deadlines, or record changes. While most CRMs offer basic notifications, tools like Alerts4Dynamics provide advanced real-time pop-ups, form alerts, email alerts, and rich-text messages that ensure nothing gets missed.
Alerts help teams respond quickly, reduce missed follow-ups, and stay updated without manually checking every record. A solution like Alerts4Dynamics adds smart, automated alerting to Dynamics 365 CRM, helping sales, service, and marketing teams act instantly.
CRMs typically support email alerts, reminders, and workflow-based notifications. With Alerts4Dynamics, users can go beyond the basics and send real-time pop-ups, form dialogs, form banners, multilingual alerts, rich-text notifications, audience-filtered alerts, and event-based triggers.
Alerts trigger based on actions like new record creation, updates, or approaching deadlines. In Dynamics 365 CRM, Alerts4Dynamics makes this easier by allowing no-code configuration of event-based and rule-based alerts that fire instantly when something important happens.
Yes. CRMs allow some customization, but Alerts4Dynamics offers deeper flexibility, colored messages, bold text, images, links, icons, and structured formatting. You can also choose levels like Information, Warning, or Critical.
Absolutely. With Alerts4Dynamics, you can target users, teams, roles, business units, or even related record owners. This ensures alerts reach only the right audience while keeping sensitive information restricted.
Sales reps get immediate notifications about new leads, stage changes, high-value deals, and expiring quotes. Alerts4Dynamics helps increase conversions by ensuring reps never miss a follow-up or time-sensitive opportunity.
Yes. In-app pop-ups in Alerts4Dynamics reduce email dependency. Users can choose how they want to receive alerts: pop-up only, email only, both, or none, helping prevent alert fatigue.
Some CRMs offer partial translation support. Alerts4Dynamics goes further by auto-displaying alerts in the user’s preferred CRM language, making it ideal for global teams.
Alert automation transforms how your teams communicate.
With Alerts4Dynamics, you empower your organization to:
This is the missing alert infrastructure that Dynamics 365 CRM always needed.
Try Alerts4Dynamics with a 15-day free trial from our website or Microsoft AppSource alert notifications.
Need a live demo? Contact us at crm@inogic.com.
The post The Ultimate Guide to Setting Up Alerts & Notifications in Dynamics 365 CRM first appeared on Microsoft Dynamics 365 CRM Tips and Tricks.