Power Up - Upskill Yourself...
❌

Reading view

Web tracking and personalization overview (Customer Insights Data) – (Preview)
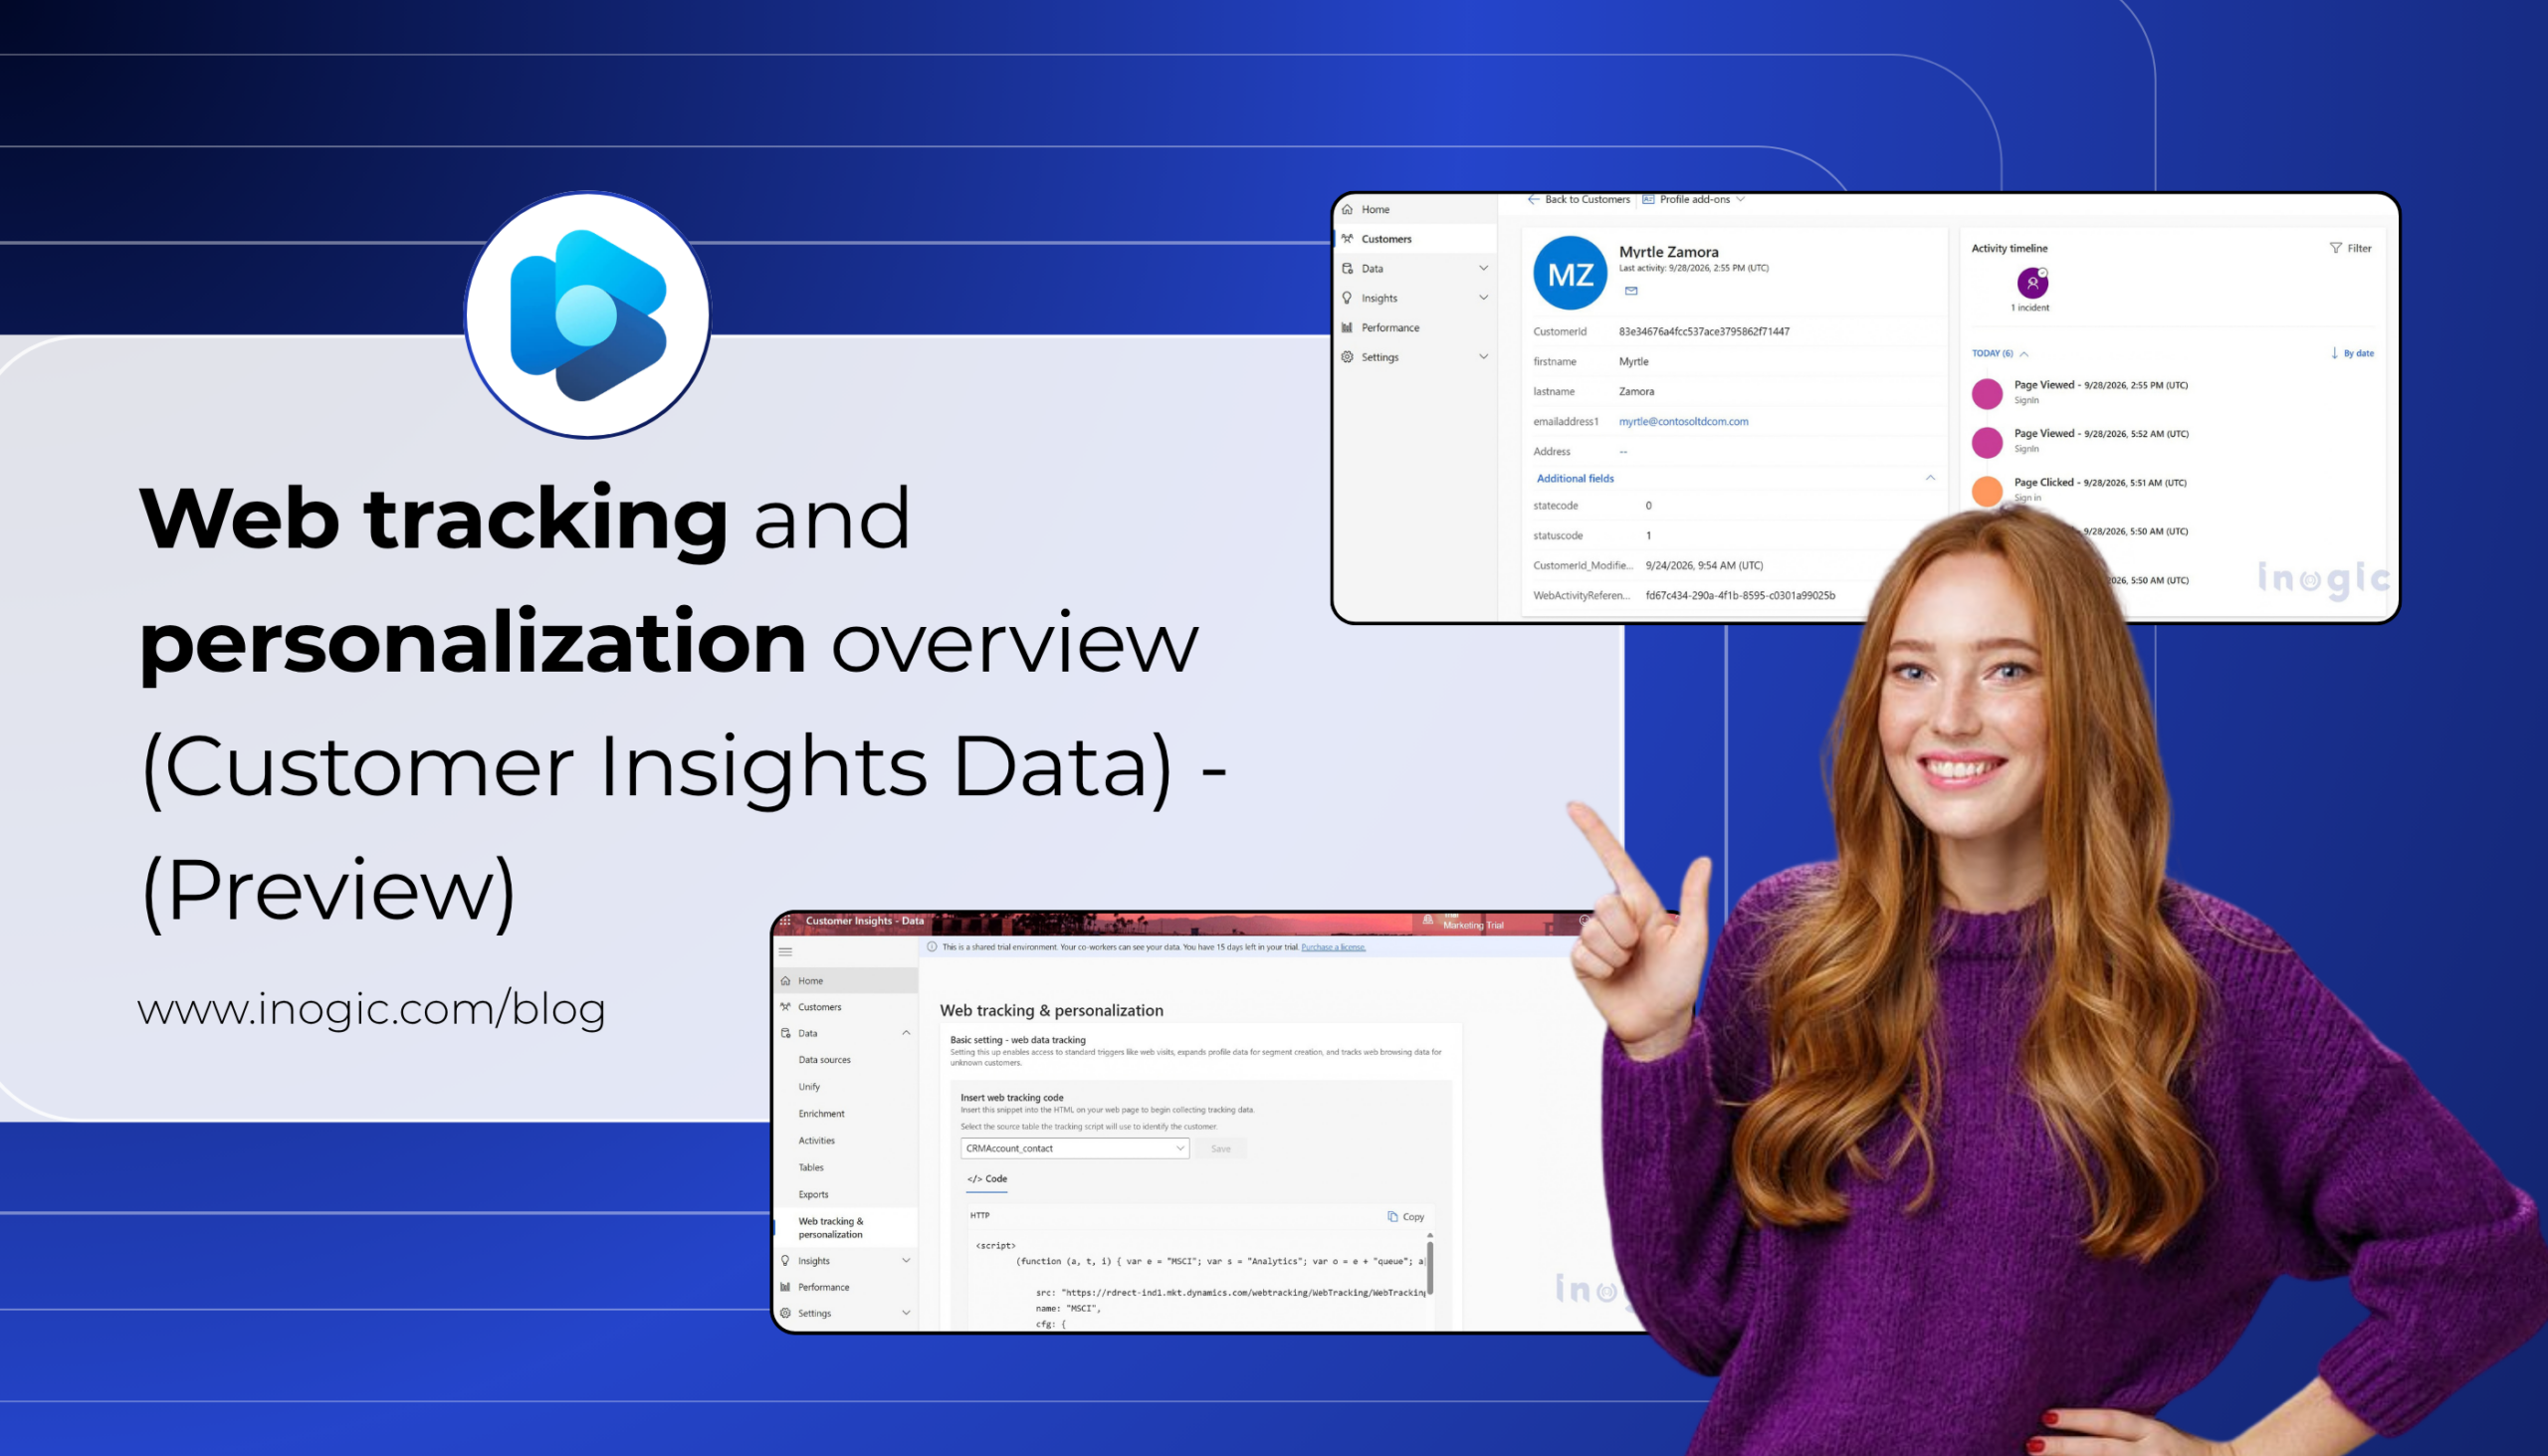
Web tracking and personalization overviewWeb tracking and personalization in Dynamics 365 Customer Insights – Data (Preview) enables organizations to track website interactions from anonymous and known visitors. This data can be associated with customer profiles and used for segmentation and personalized website experiences.

For example, an insurance customer may browse coverage plans and use a quote calculator before creating an account. Web tracking can help connect those earlier interactions with the customer’s known profile.

Note: Web tracking and personalization is a prerelease feature and is subject to change.

The scenario: an insurance quote calculator

Let’s say an insurance company have a customer portal on Power Pages. Visitors can browse coverage plans and calculate a quote without logging in. Once they like their quote, they register for an account to save it and manage future claims.

The goal: don’t lose that pre-signup browsing history. When a site visitor calculates a quote as an anonymous visitor and then signs up, his account should show that he looked at the “Comprehensive Coverage” plan twice before registering — not start with a blank slate.

How it works, conceptually

There are two moving parts:

  1. Anonymous tracking — the moment anyone lands on your site, a small script drops a cookie and starts logging page views. Customer Insights creates an “Unknown” profile keyed to that cookie.
  2. Identity merge — when that visitor eventually logs in or registers, you tell Customer Insights, “this cookie belongs to this real person.” Everything the cookie did gets folded into their actual customer profile.

That is the overall approach. Now, let’s move forward with the implementation.

Step-by-step implementation

Step 1 – Enable the feature and get your script

In Customer Insights – Data, go to Web tracking & personalization, select Contact as your identifying table (this should almost always be Contact, not Account — Contact represents an individual person who can actually log in; Account represents an organization), and copy the generated JavaScript snippet.
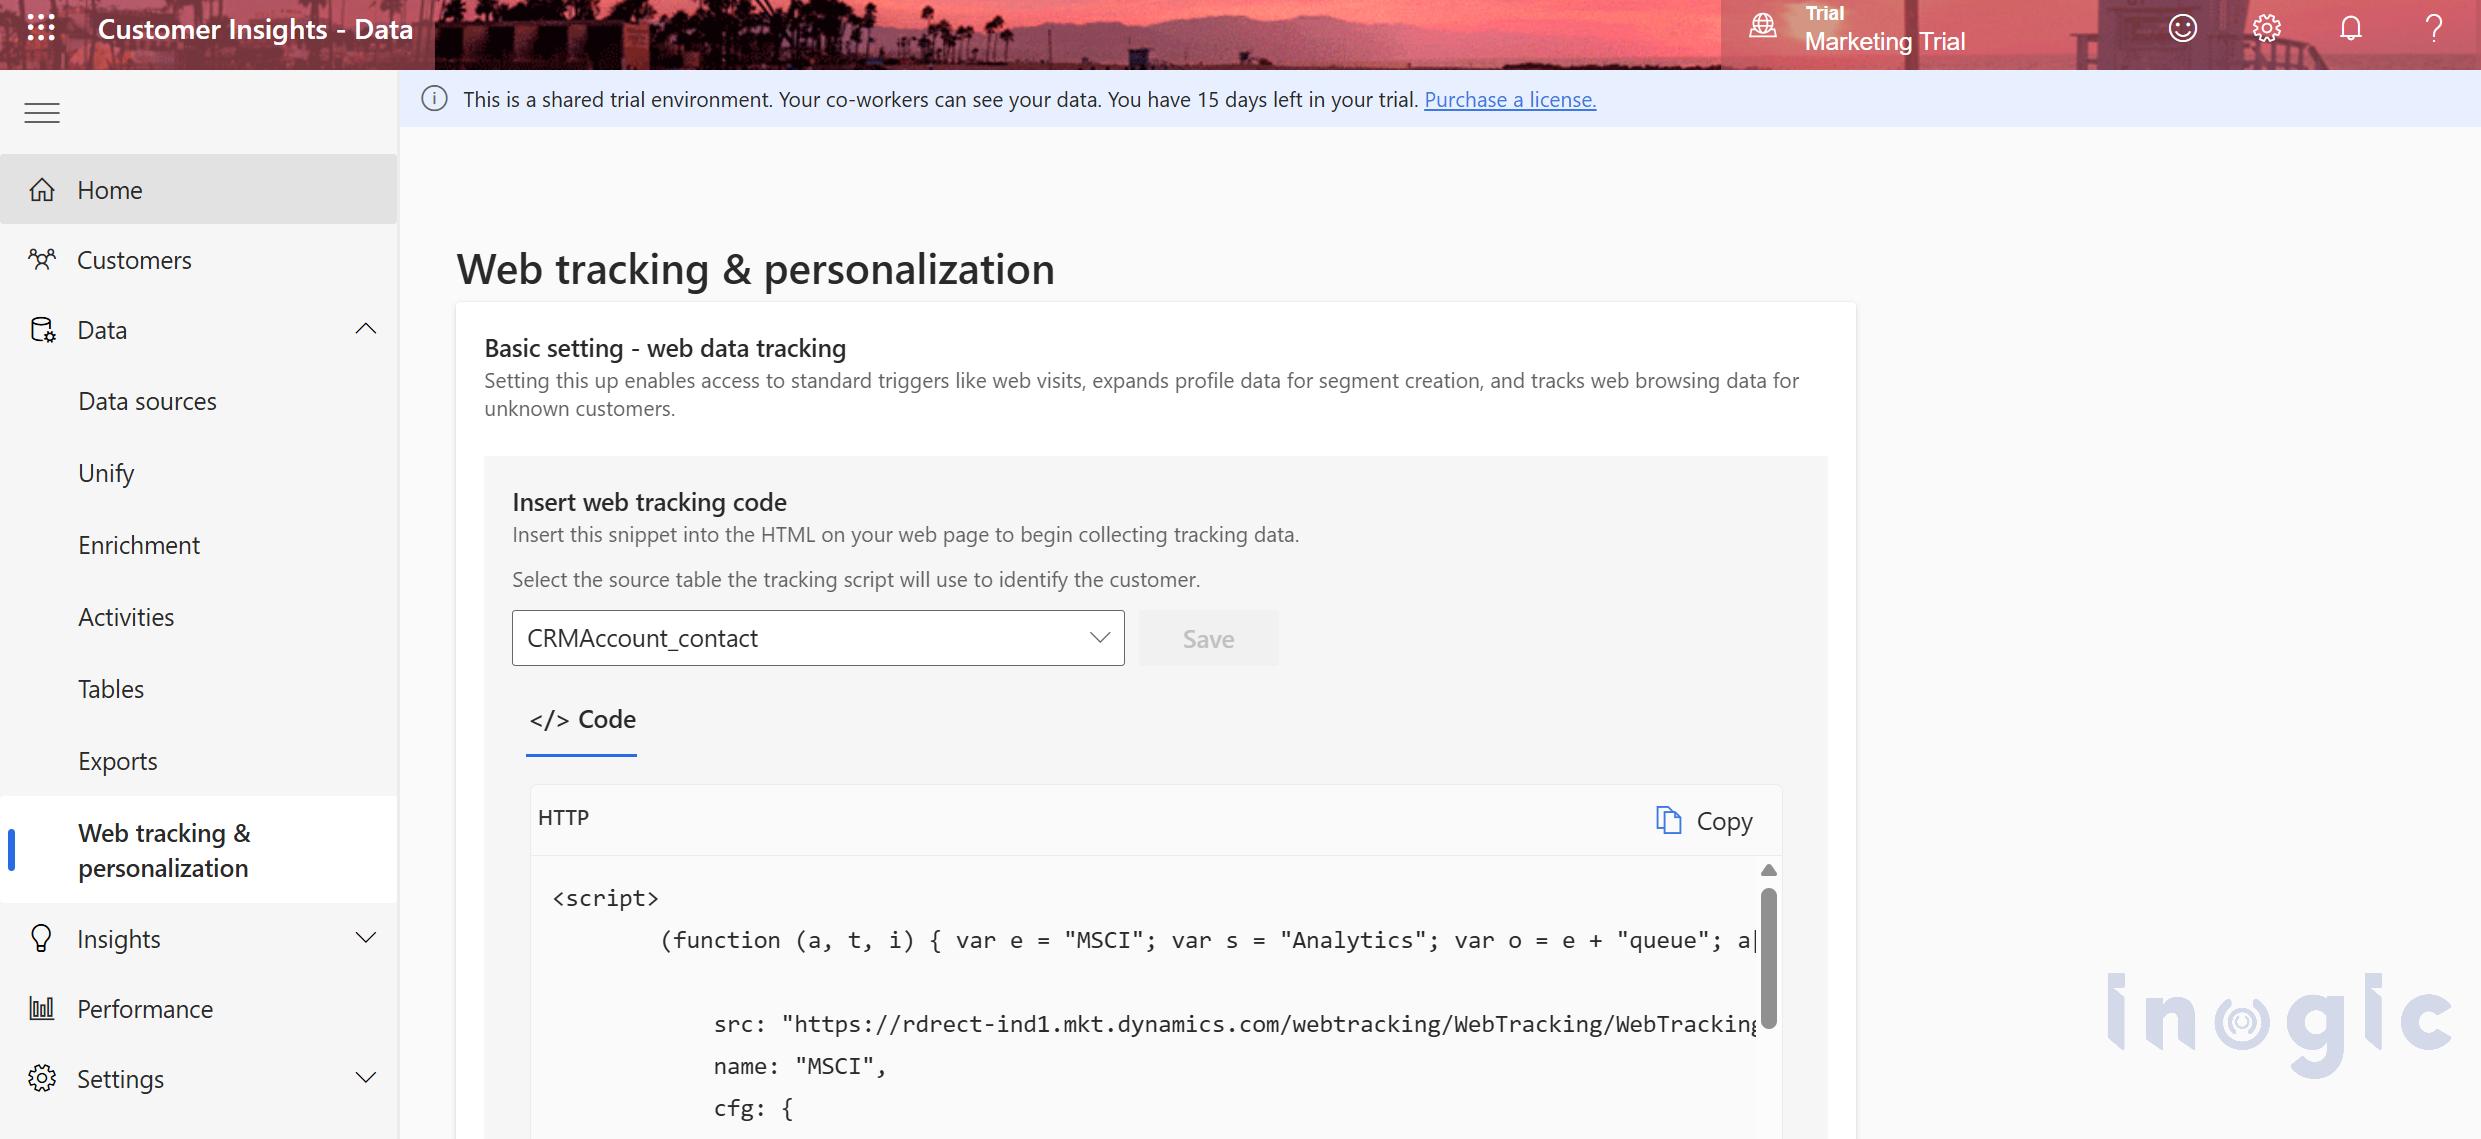
Web tracking and personalization overview

Step 2 – Add the script to your Power Pages site

This is the part that trips people up: the “Header” web template in Power Pages isn’t the literal <head> tag — it’s a partial. The correct place is a Content Snippet named exactly Head/Bottom, set to type HTML, with no language specified so it applies globally. Paste your tracking script in there and publish.
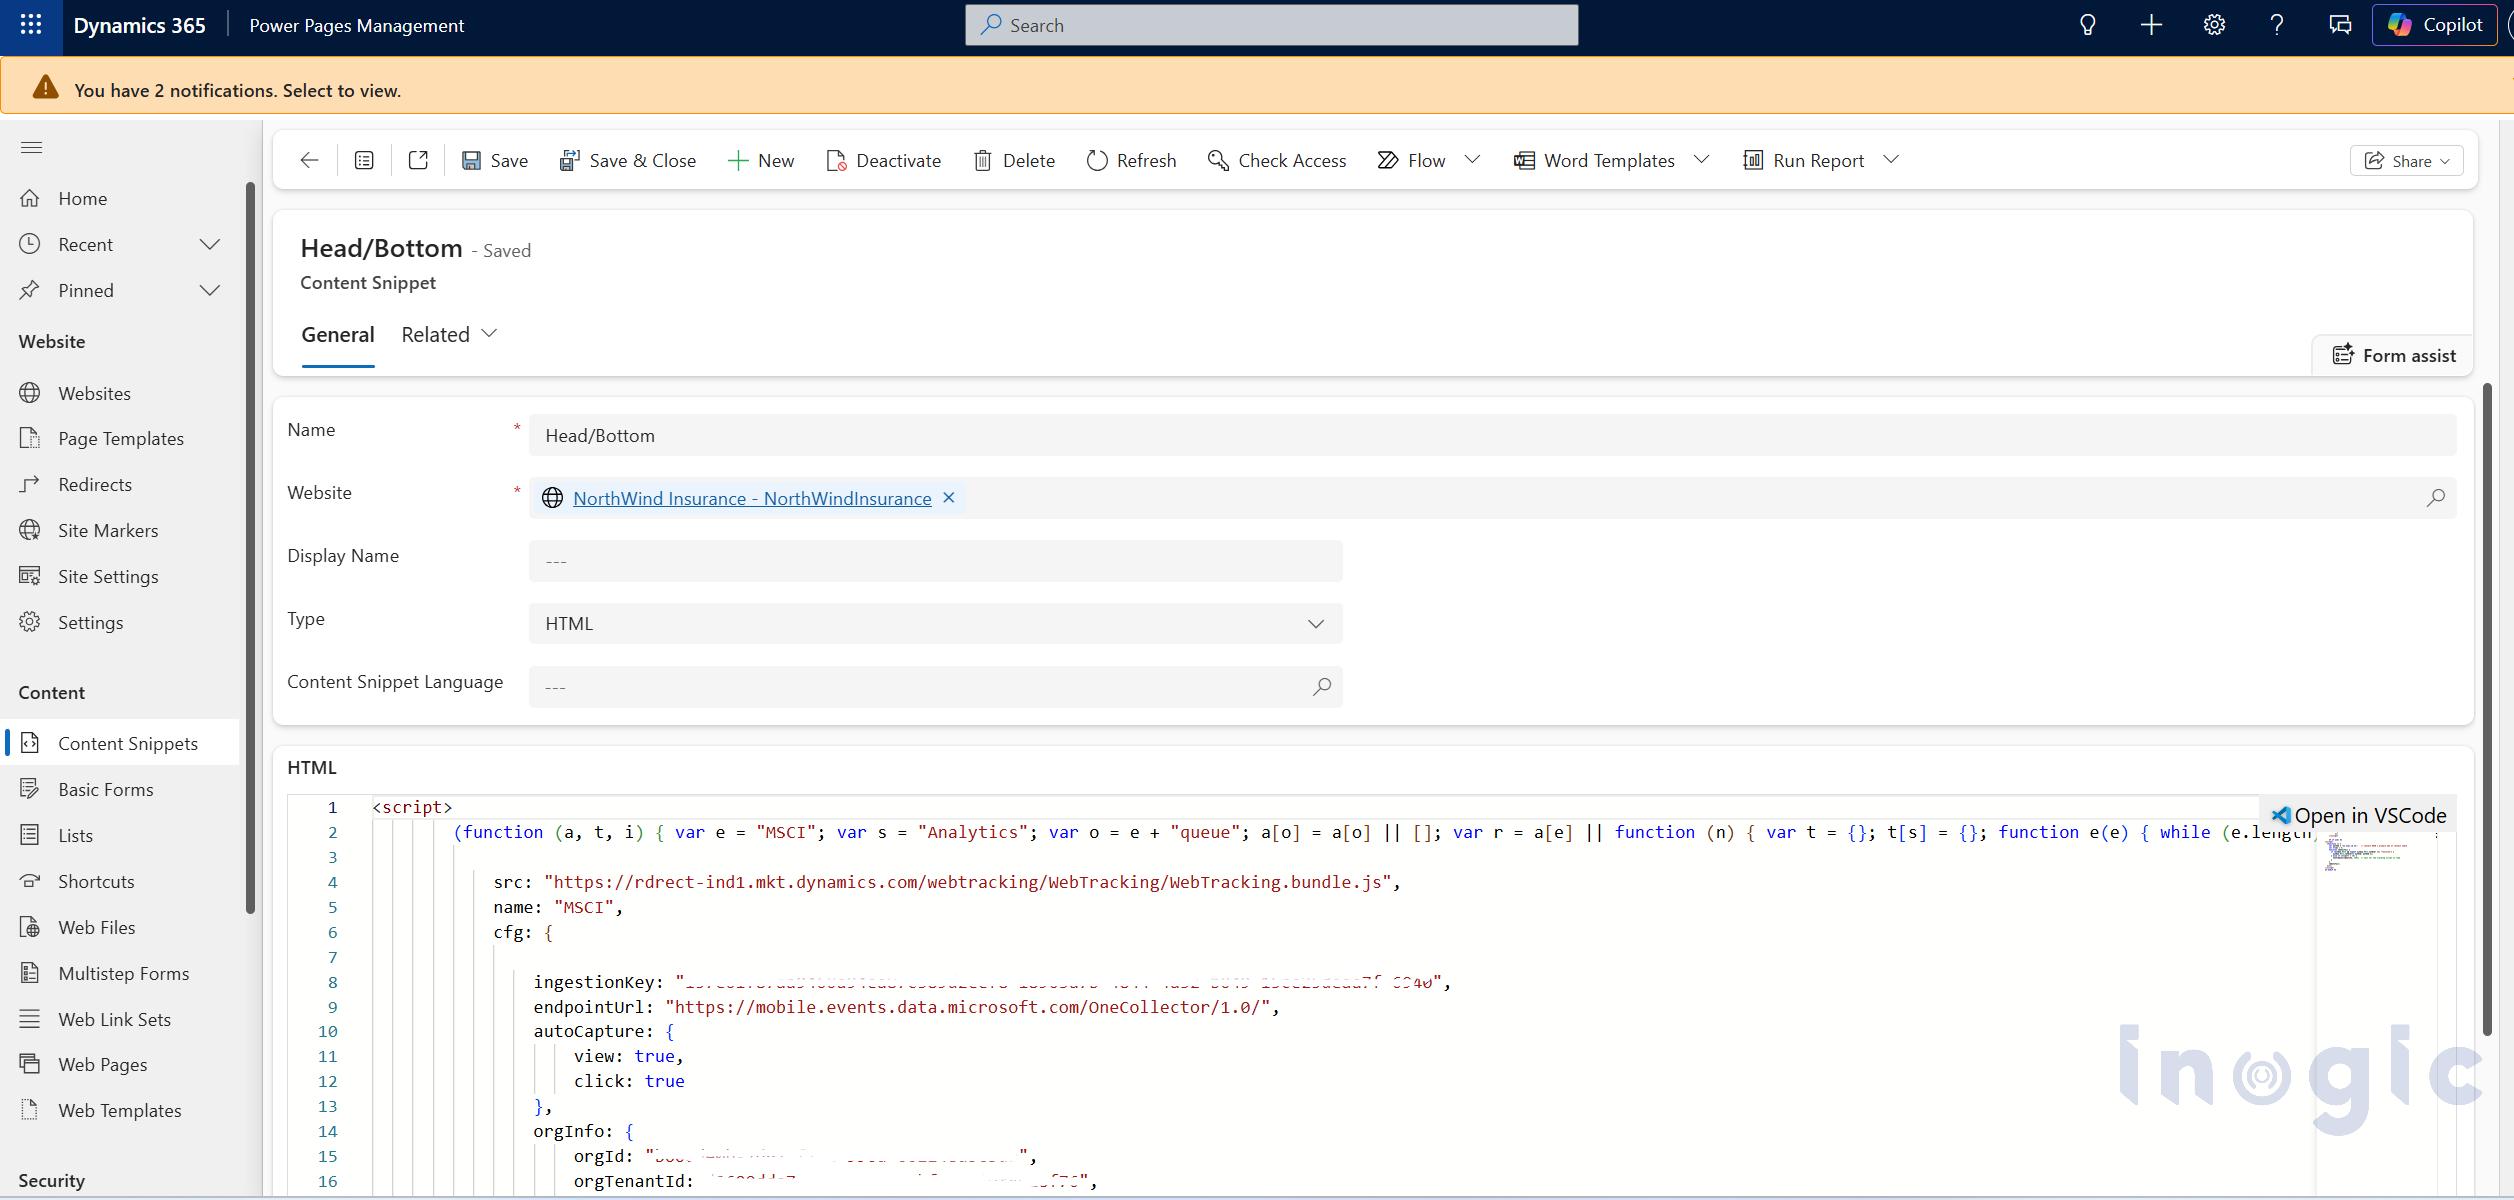
Web tracking and personalization overview

Step 3 – Handle the Content Security Policy

If your site was created recently, Power Pages enforces a Content Security Policy by default, and it’ll block the tracking script’s domain unless you allow it. Go to Portal Management → Site Settings, find (or create) HTTP/Content-Security-Policy, and add the tracking script’s domain to script-src. You’ll see the exact domain to add in your browser console if it gets blocked — copy it from the CSP violation error rather than guessing.
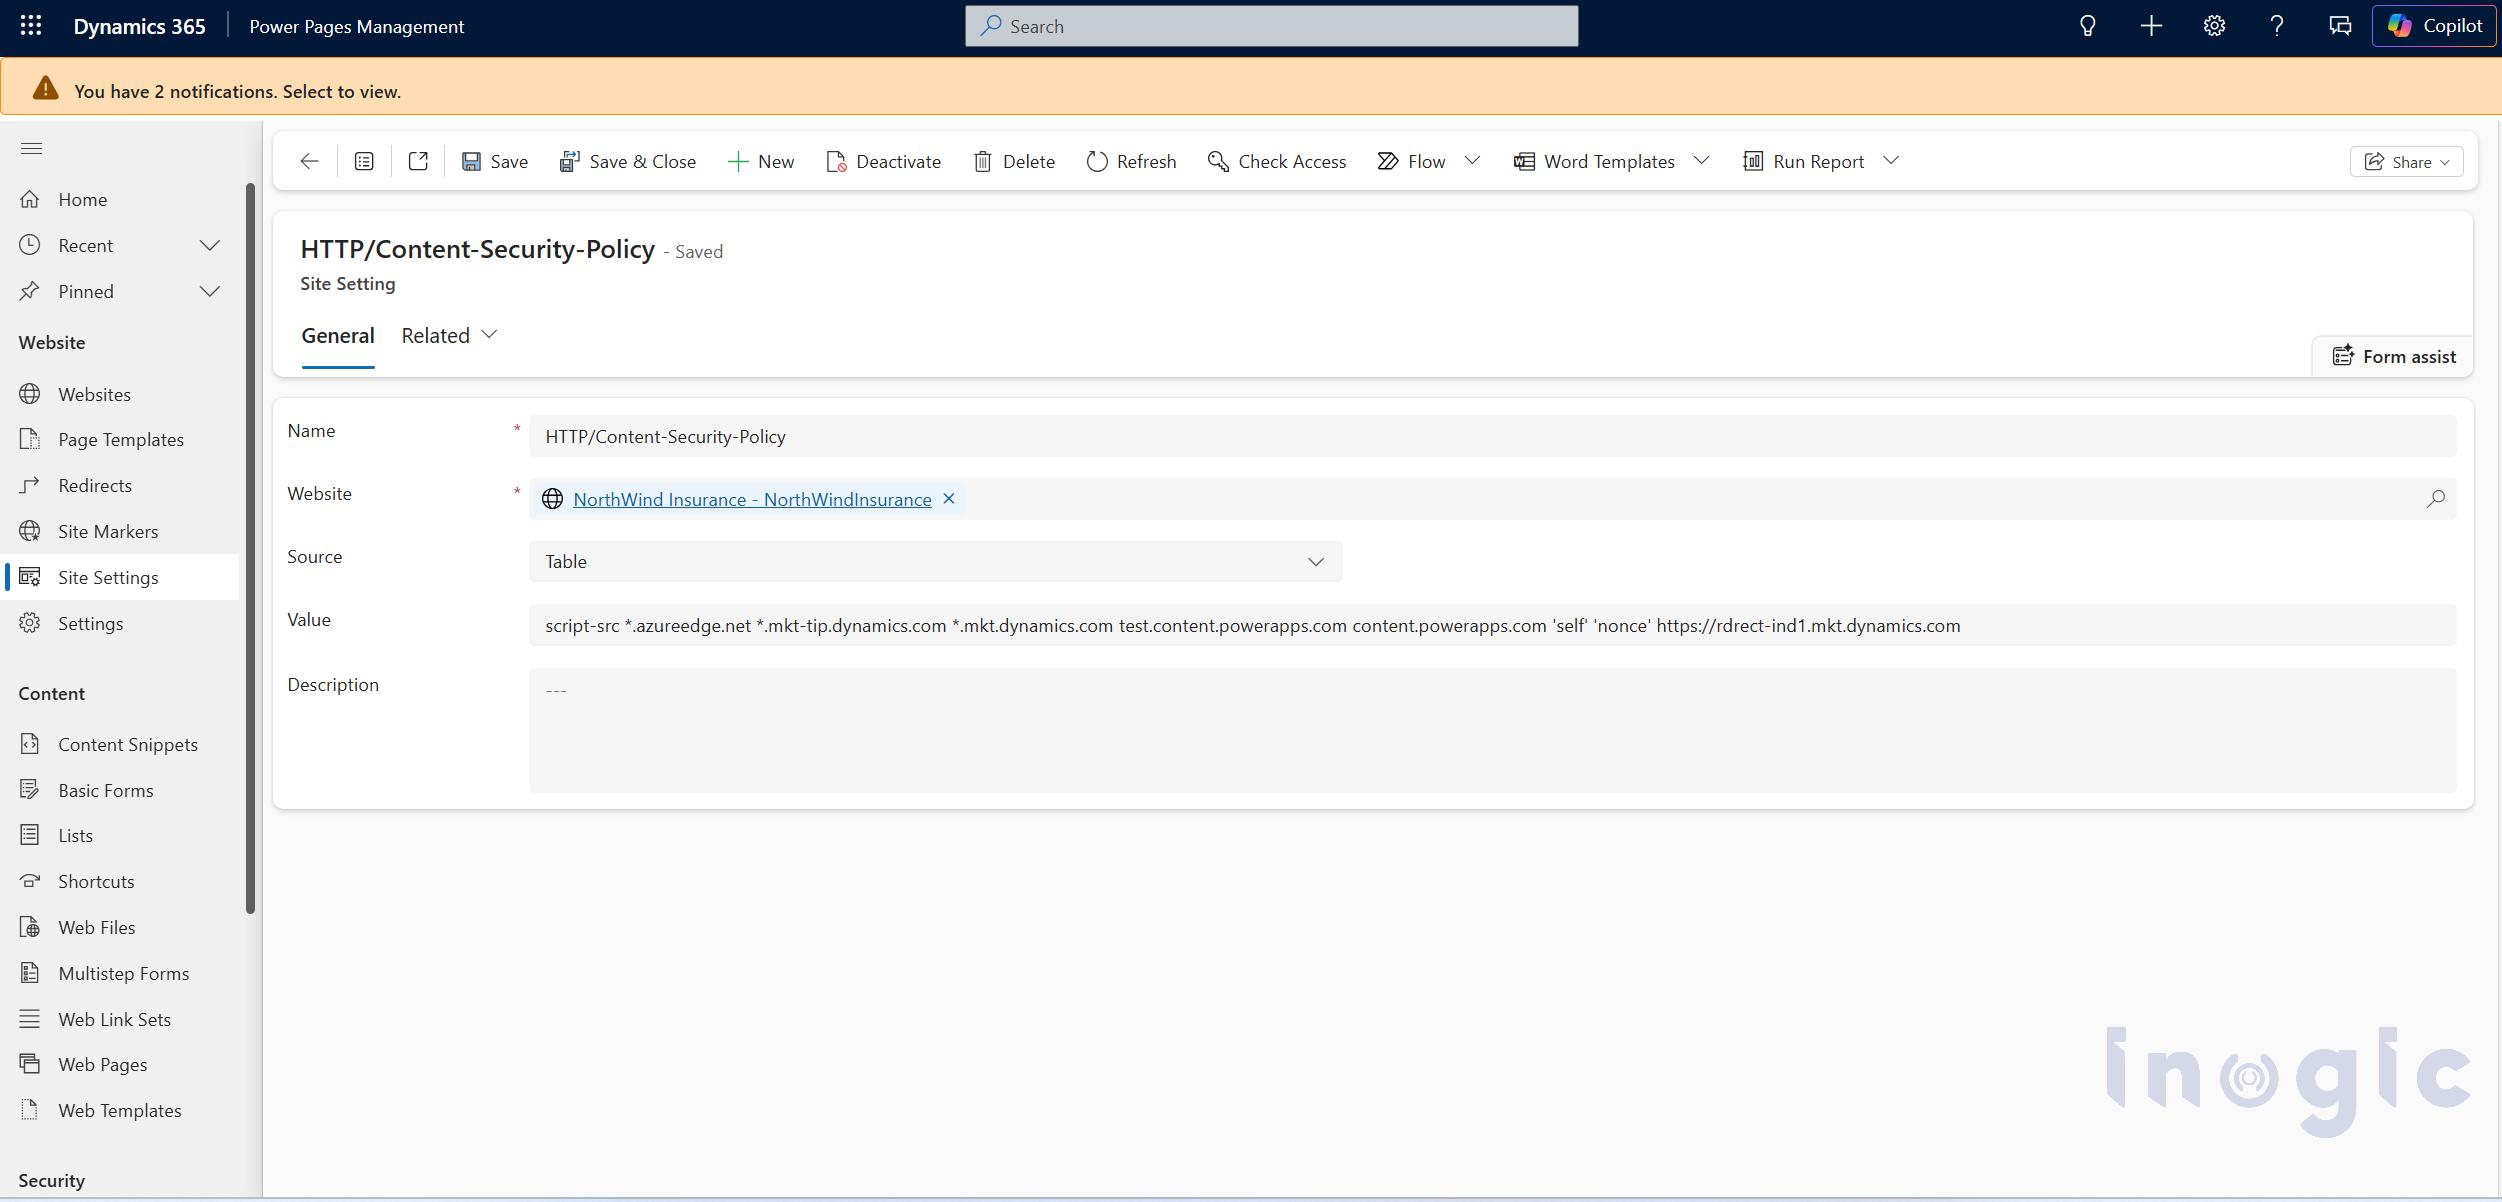
Web tracking and personalization overview

Step 4 – Test as an anonymous visitor

Open your site in an incognito window and click through a couple of pages — say, your quote calculator and a coverage page. Back in Customer Insights, go to Customers → Unknown, and you should see a cookie-ID profile appear with those page visits logged, usually within about 30 seconds.

Step 5 – Link identity on login

Add a small script to the same Head/Bottom snippet, using Liquid to detect an authenticated visitor:

{% if user %}

<script>

if (window.msci && typeof window.msci.setUser === “function”) {

window.msci.setUser(“{{ user.contactid }}”);

}

</script>

{% endif %}

{{ user.contactid }} is Power Pages’ built-in way of exposing the signed-in contact’s ID via Liquid — no custom login code needed. This script runs on every authenticated pageview, which is fine; it just re-confirms the link each time.

Step 6 – Verify the merge

Register a test account, log in, and refresh a page. Back in Customer Insights, search for that Contact under Known customers — their timeline should now show the quote-calculator visit and coverage page views that happened before they ever logged in.
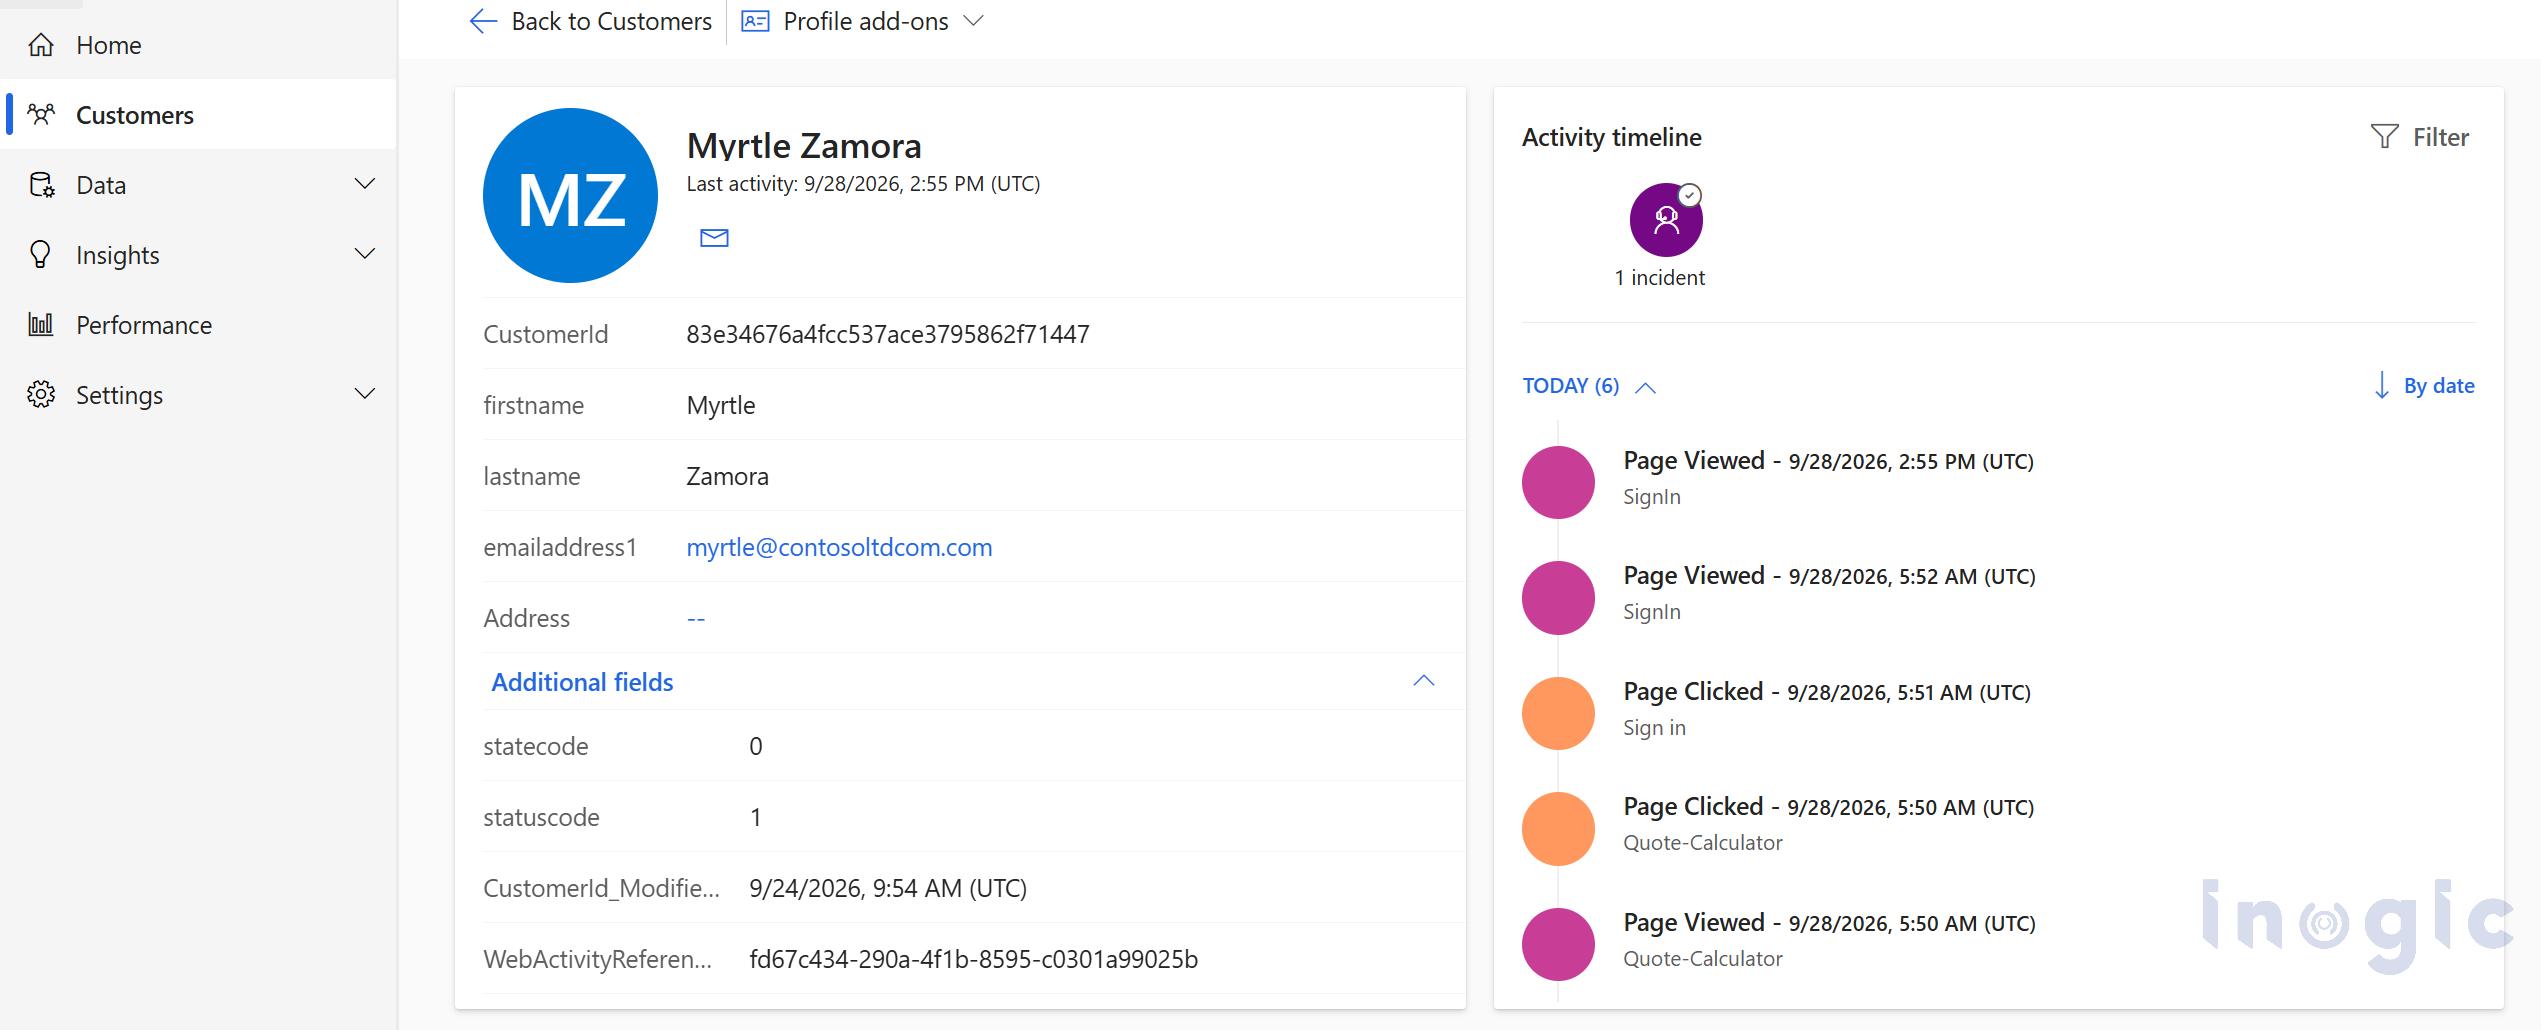
Web tracking and personalization overview

Step 7 – Make the data useful

Once this is flowing, the real payoff shows up in two places:

  • Support: an agent looking at a contact’s profile sees their full journey — which coverage page they read, whether they used the quote calculator — before ever picking up the phone.
  • Marketing/retention: build a segment like “known contacts who viewed Comprehensive Coverage but haven’t upgraded in 30 days” and trigger a targeted follow-up.

Why this matters more than it sounds

The key benefit is not simply tracking page views. The website engagement data can be associated with the customer record in Dynamics 365, alongside other customer information such as policies, support tickets, and claims.

This allows website interactions to become part of the customer’s overall record and provides the business with additional information that can be used for customer segmentation, engagement tracking, and personalized website experiences.

Conclusion

Web tracking and personalization in Dynamics 365 Customer Insights – Data can help organizations connect website engagement with customer profiles. By capturing anonymous interactions and associating them with known contacts, businesses can gain more context about customer interests and use that data for segmentation and personalized experiences.

As this is a Preview capability, implementation details may change as Microsoft continues to develop the feature. If you need help implementing web tracking and personalization with Dynamics 365 Customer Insights, contact the Inogic team at crm@inogic.com.

Frequently Asked Questions

1. What is web tracking and personalization in Dynamics 365 Customer Insights – Data?

Web tracking and personalization is a Preview capability in Dynamics 365 Customer Insights – Data that enables organizations to capture website interactions from anonymous and known visitors. The collected engagement data can be associated with customer profiles and used for segmentation and personalized website experiences.

2. Can Dynamics 365 Customer Insights track anonymous website visitors?

Yes. Web tracking can capture interactions from visitors who have not yet identified themselves. Customer Insights uses an anonymous visitor identifier to associate activity with an Unknown profile. When the visitor is later identified, the organization can associate the anonymous activity with the corresponding known customer profile.

3. How can anonymous website activity be associated with a known contact?

When an anonymous visitor identifies themselves, the website can provide the corresponding customer identifier to Customer Insights. This allows previously captured website interactions to be associated with the known contact profile, subject to the configured identity and tracking setup.

4. Can web tracking be used with Power Pages?

Yes. Power Pages can be configured to include the Customer Insights web tracking script. The implementation may also require additional configuration, such as adding the tracking domain to the site’s Content Security Policy and handling the association between an authenticated Power Pages user and their contact record.

5. What can businesses do with website engagement data in Customer Insights – Data?

Website engagement data can provide additional context about customer interests and interactions. Organizations can use this information with other customer data for scenarios such as segmentation, engagement analysis, and personalized website experiences.

The post Web tracking and personalization overview (Customer Insights Data) – (Preview) first appeared on Microsoft Dynamics 365 CRM Tips and Tricks.
  •  

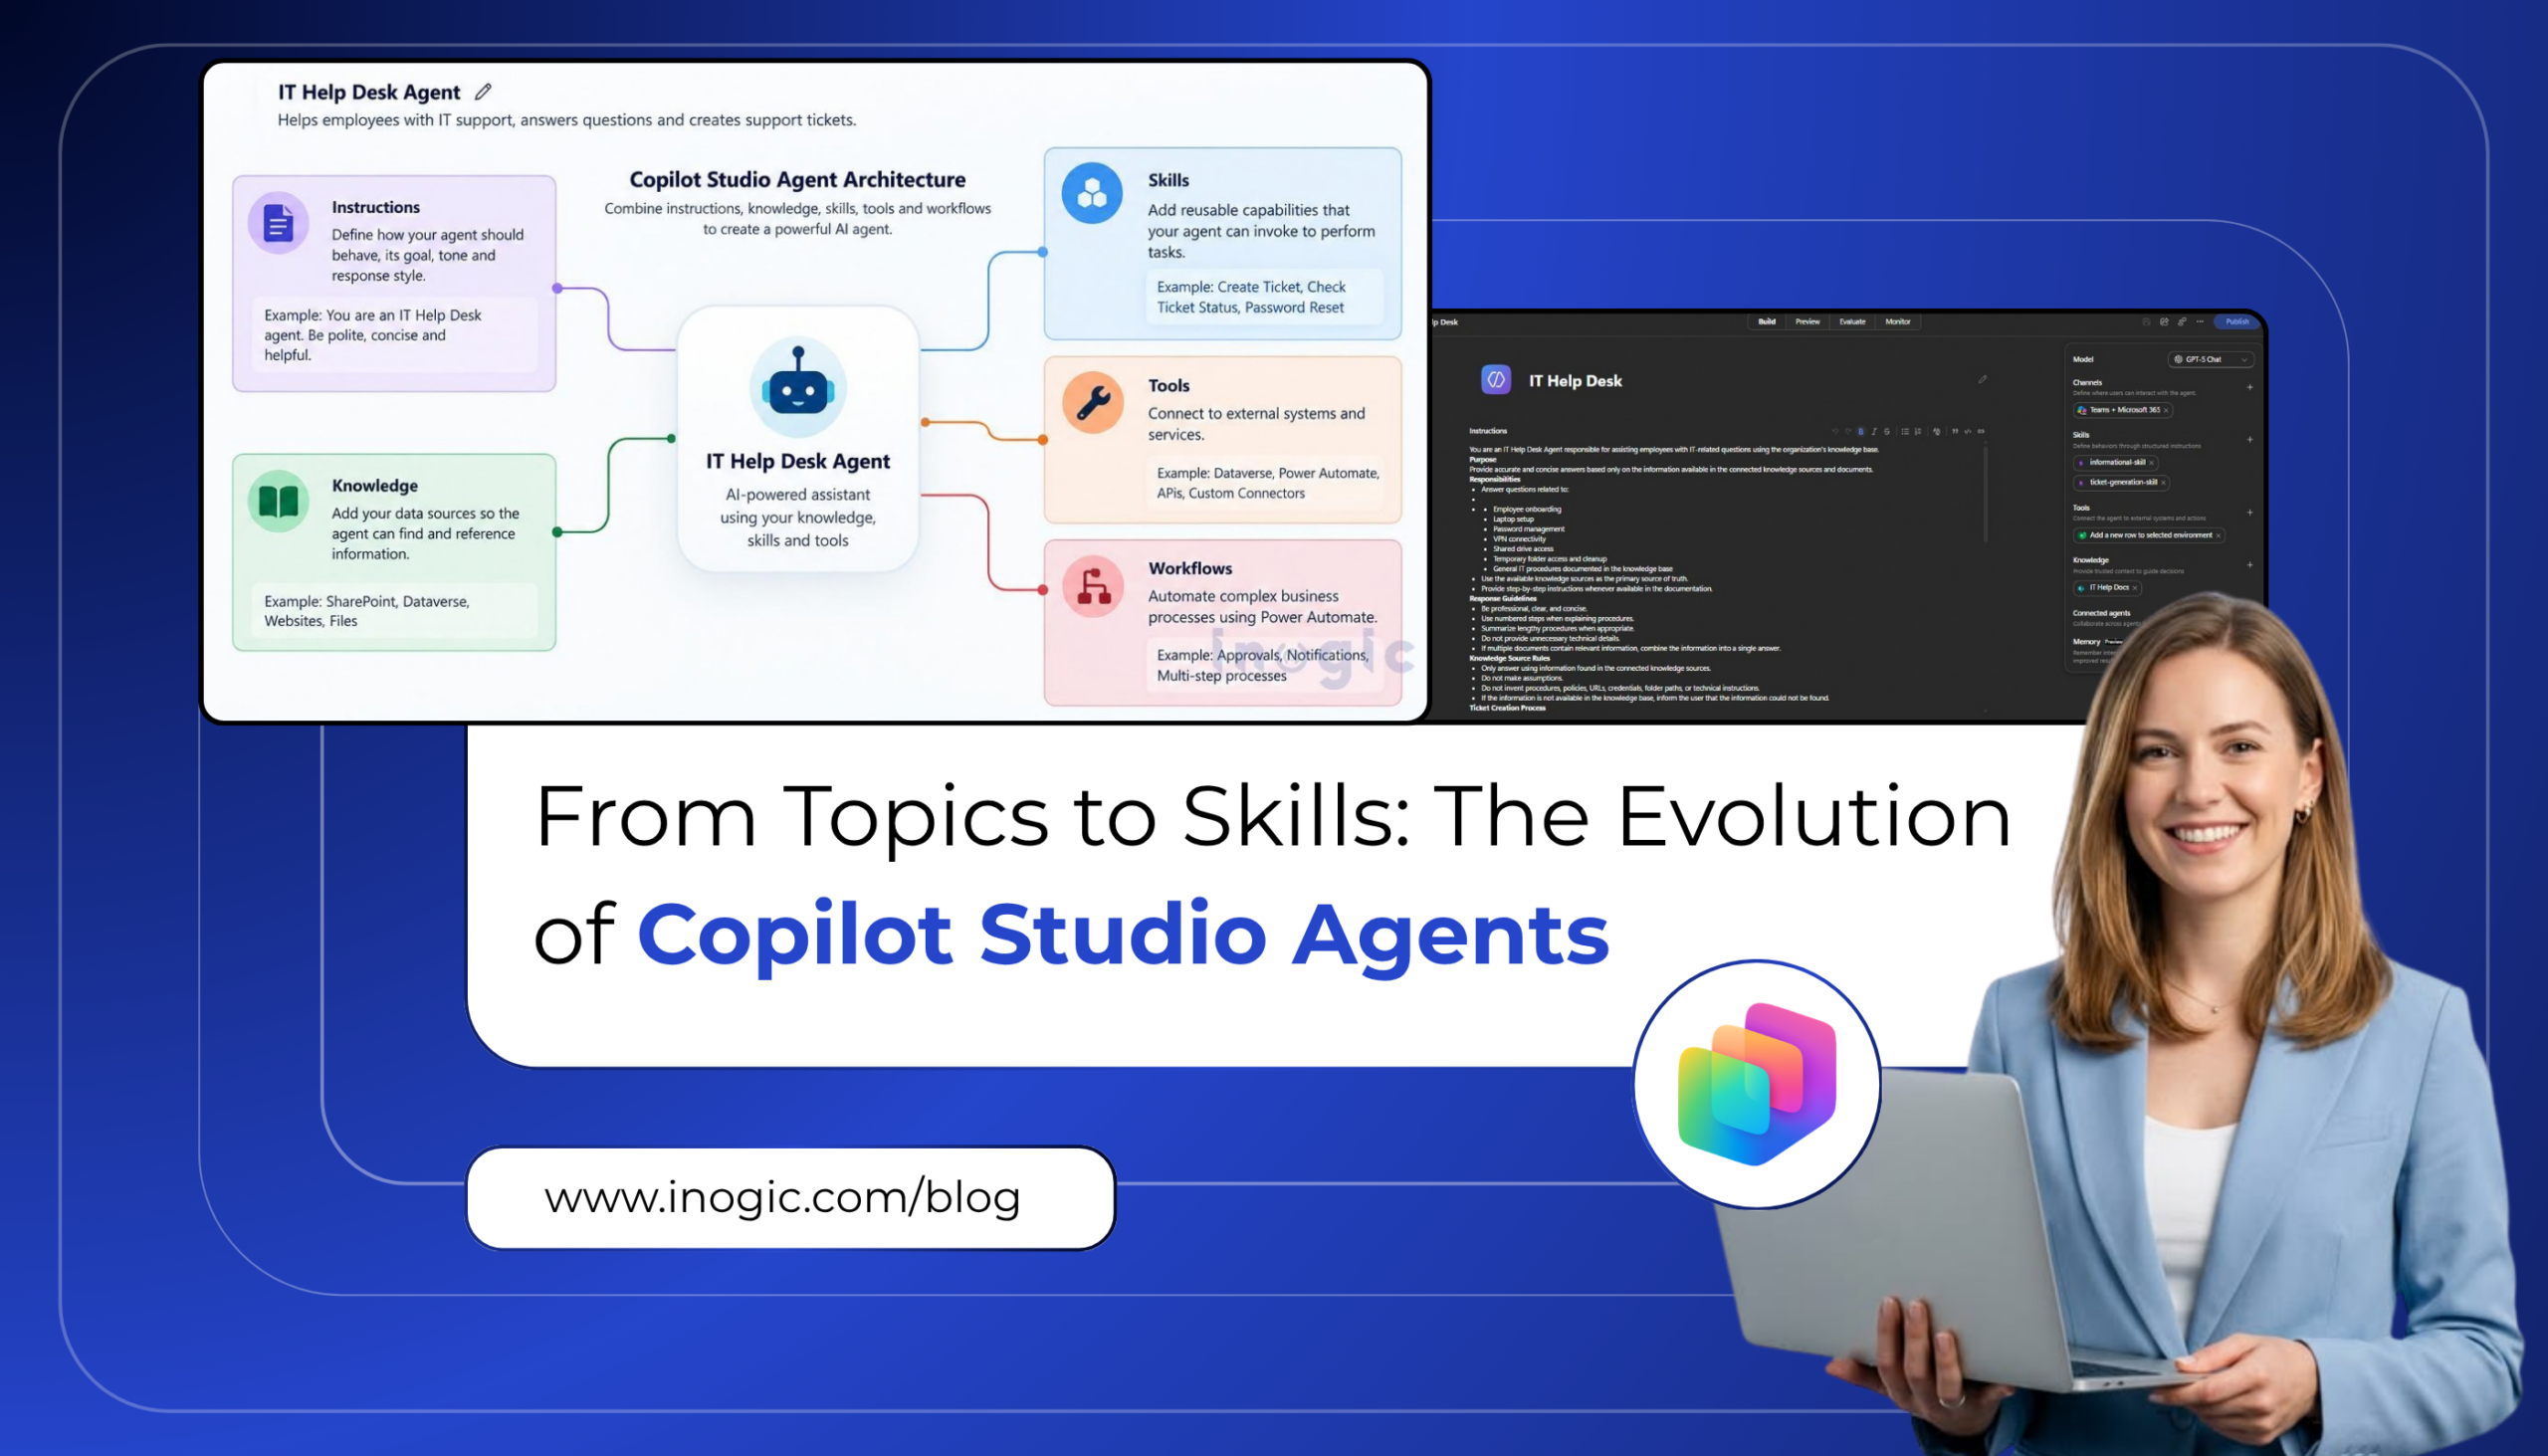
From Topics to Skills: The Evolution of Copilot Studio Agents

From Topics to Skills The Evolution of Copilot Studio Agents

The Microsoft Copilot Studio is revolutionizing the design and construction of conversational agents. Normally, developers-built agents around Topics, which are essentially conversational flows invoked by specific phrases. Topics worked well for structured chatbot scenarios, but they became more and more difficult to manage as agents became more complex.

Microsoft has introduced Skills as a core building block for modern agent development with the rise of AI-powered agents. This represents a shift from static conversation trees to intelligent agents that can reason, choose the appropriate capability, and dynamically complete tasks. The developers are now building reusable business capabilities that an AI agent can call on when needed, instead of building big sets of conversational flows.

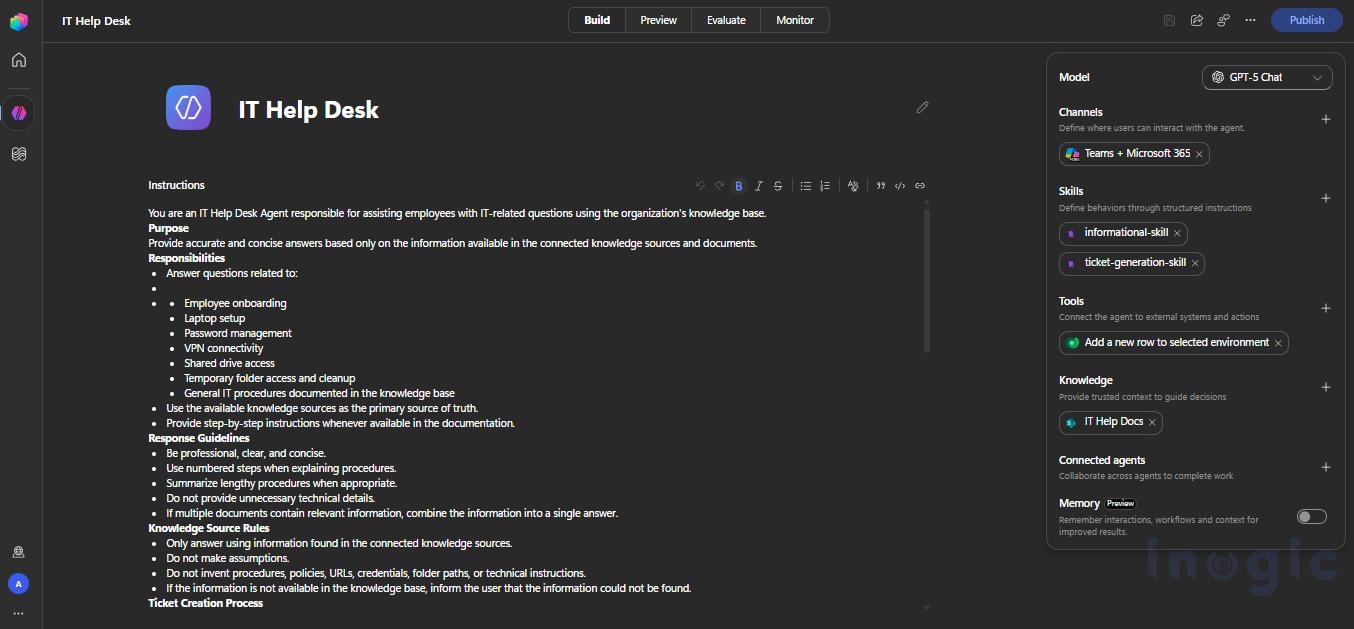
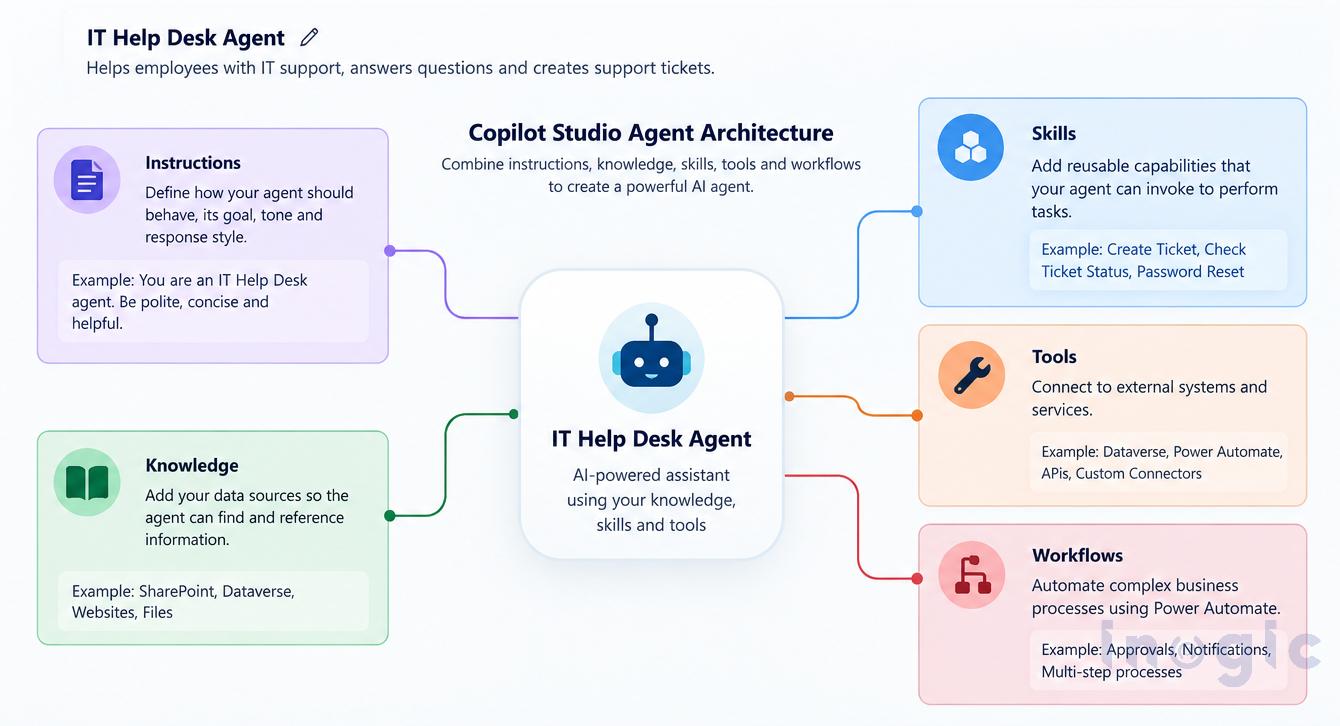
From Topics to Skills The Evolution of Copilot Studio Agents Image 1: Agent architecture showing Instructions, Knowledge, Skills, Tools, and Workflows.
Key Takeaways

  • Copilot Studio agents are shifting from Topics (trigger-phrase conversation flows) to Skills (reusable business capabilities the agent invokes through reasoning).
  • Topics work for simple, structured chatbots but get hard to maintain as agents scale to dozens or hundreds of conversation paths.
  • Skills let an agent decide what to do based on user intent, not just which phrase matched.
  • Skills are reusable across multiple agents (Sales, Service, HR), reducing duplicated logic.
  • For Dynamics 365 and Power Platform developers, Skills feel closer to Custom APIs, Actions, Plugins and Power Automate Flows than to chatbot design.
  • This shift reflects Microsoft’s broader move from chatbot development to enterprise AI agent development.

Understanding the Traditional Topic-Based Approach

The topics were mostly designed for chatbot experiences. Each topic represented a predefined conversation path, triggered by certain user phrases. A typical topic might have a structure such as: User requests a password reset.

→ Request Employee ID

→ User Validation

→ Change Password

→ Confirm Completion

Topics worked well in simple situations. However, as organizations added more use cases, agents tended to have dozens or even hundreds of Topics, making maintenance more and more difficult.

Topics presented common challenges such as:

  • Handling multiple trigger phrases
  • Complex conversation tree maintenance
  • Dealing with unanticipated requests from users
  • Reuse of functionality between multiple agents
  • Scaling agents as the business grows

From Topics to Skills The Evolution of Copilot Studio Agents

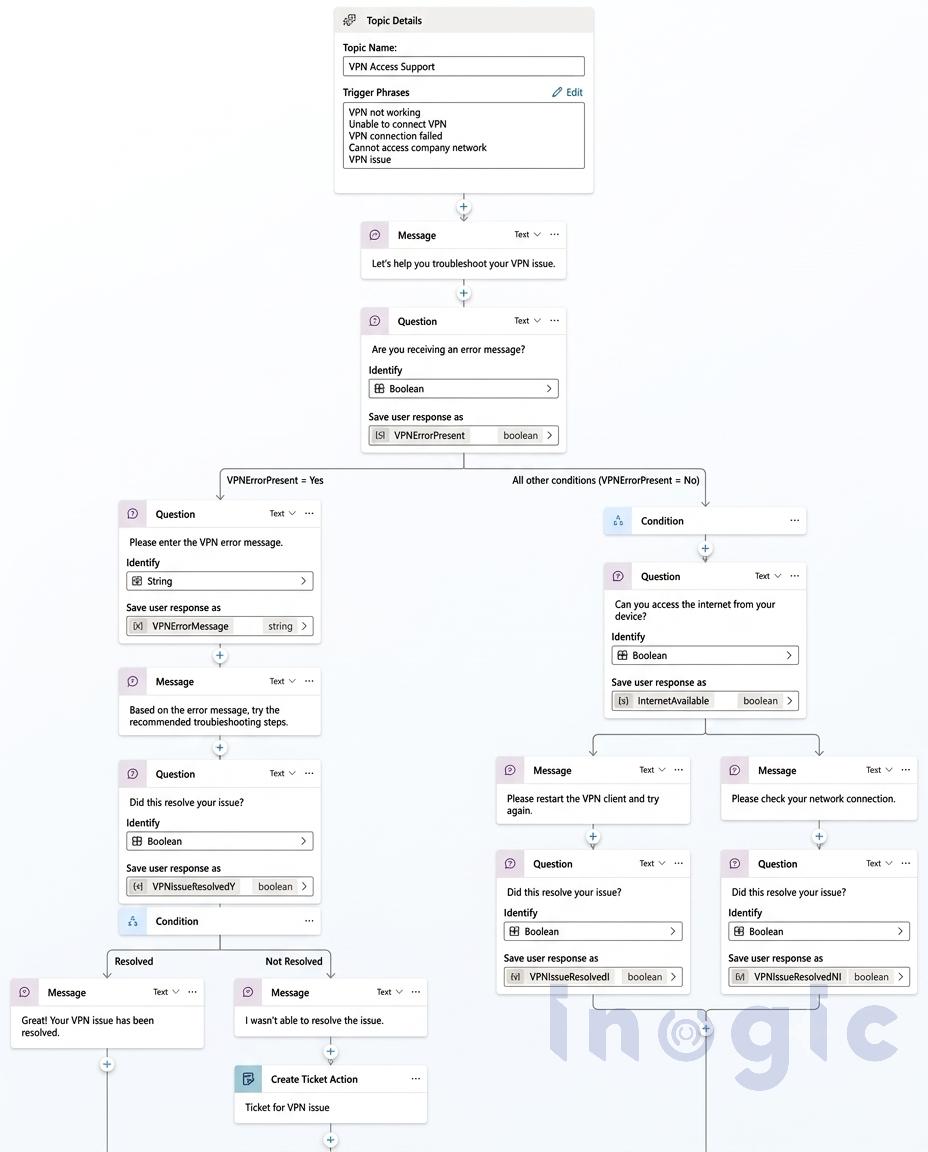
Image 2: Topic showing trigger phrases, conditions, and conversation nodes.

Topics vs Skills: A Comparison

The introduction of Skills changes how developers think about agent development.

Area Topics Skills
Primary Focus Conversation Flow Business Capability
Triggering Mechanism Trigger Phrases AI Reasoning
Reusability Limited High
Scalability Difficult with many Topics Easier through modular design
Maintenance Large conversation trees Independent capabilities
Multi-Agent Support Limited Designed for reuse
AI Flexibility Low Hight
Future Direction Traditional Chatbots AI Agents

Topics guide a user through a predetermined conversation.

Skills are for the execution of a business task.

This distinction is important because modern AI agents are expected to understand intent, not just match trigger phrases.

From Topics to Skills The Evolution of Copilot Studio Agents
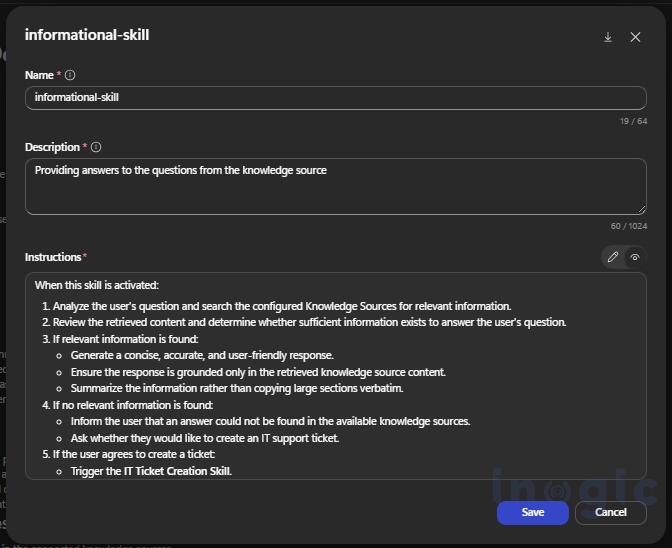
Image 3: Showing a skill record in a Copilot Agent.

Why Skills?

The move to Skills is part of Microsoft’s broader vision of an AI agent.

Rather than asking:

Which topic should this request go to?

Now the agent asks:

What skill can be used to solve this problem?

This feature enables agents to make intelligent decisions based on the user’s intent.

Let us consider there’s an IT help desk agent.

A user wrote:

My VPN is not working. If you can’t fix it, open a support ticket.

Often, in a topic-based system, this scenario would require multiple Topics and careful routing logic.

However, with skills, the agent can:

  1. Search the knowledge base.
  2. Run a VPN troubleshooting skill.
  3. Verify that the problem is solved.
  4. If necessary, invoke the create ticket skill.

While the user experiences a smooth interaction, the agent manages various functions in the background.

Benefits of Skills

  1. Better Reusability

Skills are versatile and modular; they can be shared across multiple agents.

For example:

  • Create Ticket Skill
  • Check Ticket Status Skill
  • Password Reset Skill
  • User Onboarding Skill

Instead of recreating these capabilities in every agent, they can be reused wherever needed.

  1. Improved Scalability

As business requirements grow, adding new capabilities becomes easier.

Rather than maintaining dozens of Topics and conversation nodes, developers need to add new Skills.

  1. AI-Driven Decision Making

The agent uses the skills to reason about the request and decide on the best action. As a result, the conversations become more natural and flexible.

  1. Easier Maintenance

Each skill is concerned with one responsibility only.

When it is necessary to make changes, the developers update the appropriate Skill without affecting the functionality that is not related.

  1. Alignment with Software Development Practices

For developers working with Dynamics 365 and the Power Platform, Skills are quite familiar.

They share a similar foundation with things like Custom APIs, Actions, Plugins, and Power Automate Flows.

Instead of getting into the nitty-gritty of designing conversation trees, developers can focus on implementing real business solutions that make a difference.

  1. Better Multi-Agent Architecture

Organizations are progressively implementing specialized agents. A Sales Agent, Service Agent, and HR Agent can all utilize shared Skills without repeating logic.

Real-World Example: IT Help Desk Agent

Topic-Based Design

Topic: Password Reset

Topic: VPN Access

Topic: Software Installation

Topic: User Onboarding

Topic: Ticket Creation

Topic: Ticket Status

Every Topic requires:

  • Trigger phrases
  • Variables
  • Conditions
  • Conversation logic

As the number of Topics increases, management becomes more complex.

Skill-Based Design

Knowledge Source

├── Password Reset Skill

├── VPN Troubleshooting Skill

├── User Onboarding Skill

├── Create Ticket Skill

└── Check Ticket Status Skill

The agent determines which Skill to invoke based on the user’s intent, creating a more intelligent and maintainable solution.

From Topics to Skills The Evolution of Copilot Studio Agents Image 4: Complete Copilot Studio agent showing Instructions, Knowledge, Skills, and Actions.
Conclusion

The transition from Topics to Skills represents more than a feature change, it reflects Microsoft’s broader shift from chatbot development to AI agent development.

Topics were designed for structured conversations and predefined paths. Skills are designed for intelligent agents that can reason, dynamically select capabilities, and solve problems more effectively.

For Dynamics 365 CRM and Power Platform professionals, Skills introduce a development model that feels closer to building business services than designing chatbot conversations. They promote reusability, scalability, easier maintenance, and AI-driven orchestration.

As Copilot Studio continues to develop, Skills are becoming the foundation for building modern, enterprise-grade AI agents. Organizations adopting this approach today will be better positioned in the future to create flexible, scalable, and intelligent solutions for the future.

FAQs

What is the difference between Topics and Skills in Copilot Studio?

Topics are predefined conversation flows triggered by specific phrases. Skills are reusable business capabilities that an AI agent selects dynamically based on user intent.

Why is Microsoft moving from Topics to Skills in Copilot Studio?

Topic-based agents become difficult to maintain as the number of conversation flows grows. Skills let agents reason about a request and choose the right capability, making them easier to scale and maintain.

Can Skills be reused across multiple Copilot Studio agents?

Yes. A Skill such as Create Ticket or Password Reset can be shared across a Sales Agent, Service Agent or HR Agent without rebuilding the logic each time.

Are Skills related to Power Platform components like Custom APIs or Power Automate Flows?

Yes. Skills share a similar foundation with Custom APIs, Actions, Plugins and Power Automate Flows, making them familiar to Dynamics 365 and Power Platform developers.

Do Skills replace Topics completely in Copilot Studio?

Not necessarily. Topics can still suit simple, structured scenarios, but Skills are Microsoft’s direction for building intelligent, scalable AI agents.

The post From Topics to Skills: The Evolution of Copilot Studio Agents first appeared on Microsoft Dynamics 365 CRM Tips and Tricks.

  •  

Enhancing Power Apps Grids with Custom Column Visualizations

Enhancing Power Apps Grids with Custom Column Visualizations

Displaying data in a Power Apps or Dataverse grid is one of the most common ways for users to work with business information. However, when a grid contains several numeric values, displaying everything as plain text can make it difficult to quickly understand and compare the data.

Key Takeaways

  • Custom Column Visualizations let grid columns display data as Radial Dials, Line Charts, Heat Maps, or Star Ratings instead of plain text. No PCF controls or web resources required.
  • Visualizations are configured directly on the column through Advanced Options, and once saved, apply automatically across every grid or view using that column.
  • Each visualization expects a specific data format (e.g., comma-separated numbers for Line Charts, whole numbers 0–100 for Radial Dial), so data preparation matters for accurate results.
  • This is currently a preview feature, so it should be evaluated carefully before being used in production environments.

PCF controls and web resources are still relevant for fully custom visualizations, but for common scenarios, this native option cuts out development, deployment, and maintenance work.

For example, consider a mobile phone company that uses Power Apps to track the sales and performance of its products. The company may have a table containing yearly sales data for its brands such as NovaTech, PixelWave, ZenMobile, and AeroPhone.

Product Q1 Sales Q2 Sales Q3 Sales Q4 Sales
NovaTech 200 80 350 520
PixelWave 75 300 321 487
ZenMobile 600 423 400 275
AeroPhone 391 391 700 846

Although the information is available, users need to read and compare the numbers manually to understand which products are performing better or how sales are changing over time.

Traditionally, organizations that wanted to provide a more visual experience inside a grid could use custom development approaches such as Power Apps Component Framework (PCF) controls or web resources. These approaches provide flexibility, but they also require additional development, deployment, and maintenance.

This is where Custom Column Visualizations for Grids can help.

Enhancing Power Apps Grids with Custom Column Visualizations

Custom Column Visualizations allow column values to be displayed as small graphics directly inside grid cells instead of plain text. With this capability, common visualization requirements can be handled through column configuration rather than requiring a custom PCF control or web resource.

The available visualization options are:

  • Radial Dial
  • Line Chart
  • Heat Map
  • Star Rating

The visualization is configured directly on the column. Once saved, any grid or view that displays that column automatically shows the selected visualization.

Note: Custom Column Visualizations for Grids is currently a preview feature and may change before becoming generally available.

From Custom Development to Native Visualization:

Before Custom Column Visualizations were available, organizations that wanted to display data graphically inside a grid could implement custom UI using PCF controls or web resources.

For example, if the bakery wanted to display its product sales as a visual indicator instead of showing only a number such as 780, a developer could create a custom PCF control or web resource to render the value graphically.

While these approaches provide flexibility, they can also introduce additional work:

  • Development and testing of custom code
  • Deployment through solutions
  • Maintenance when requirements change
  • Dependency on developer resources

Custom Column Visualizations provide a native alternative for the visualization types supported by Power Apps. Instead of developing a custom component for a supported visualization, an administrator can select the required visualization directly from the column properties.

Available Custom Column Visualizations:

Custom Column Visualizations provide four graphical display types, in addition to the standard text display.

Visualization Suitable for
Radial Dial Percentages and progress values
Line Chart Trends represented by multiple values
Heat Map Values within a defined range
Star Rating Ratings and scores

Each visualization expects the data to be stored in a specific format.

How to Configure a Custom Column Visualization:

Follow the steps below to configure a visualization for a column.

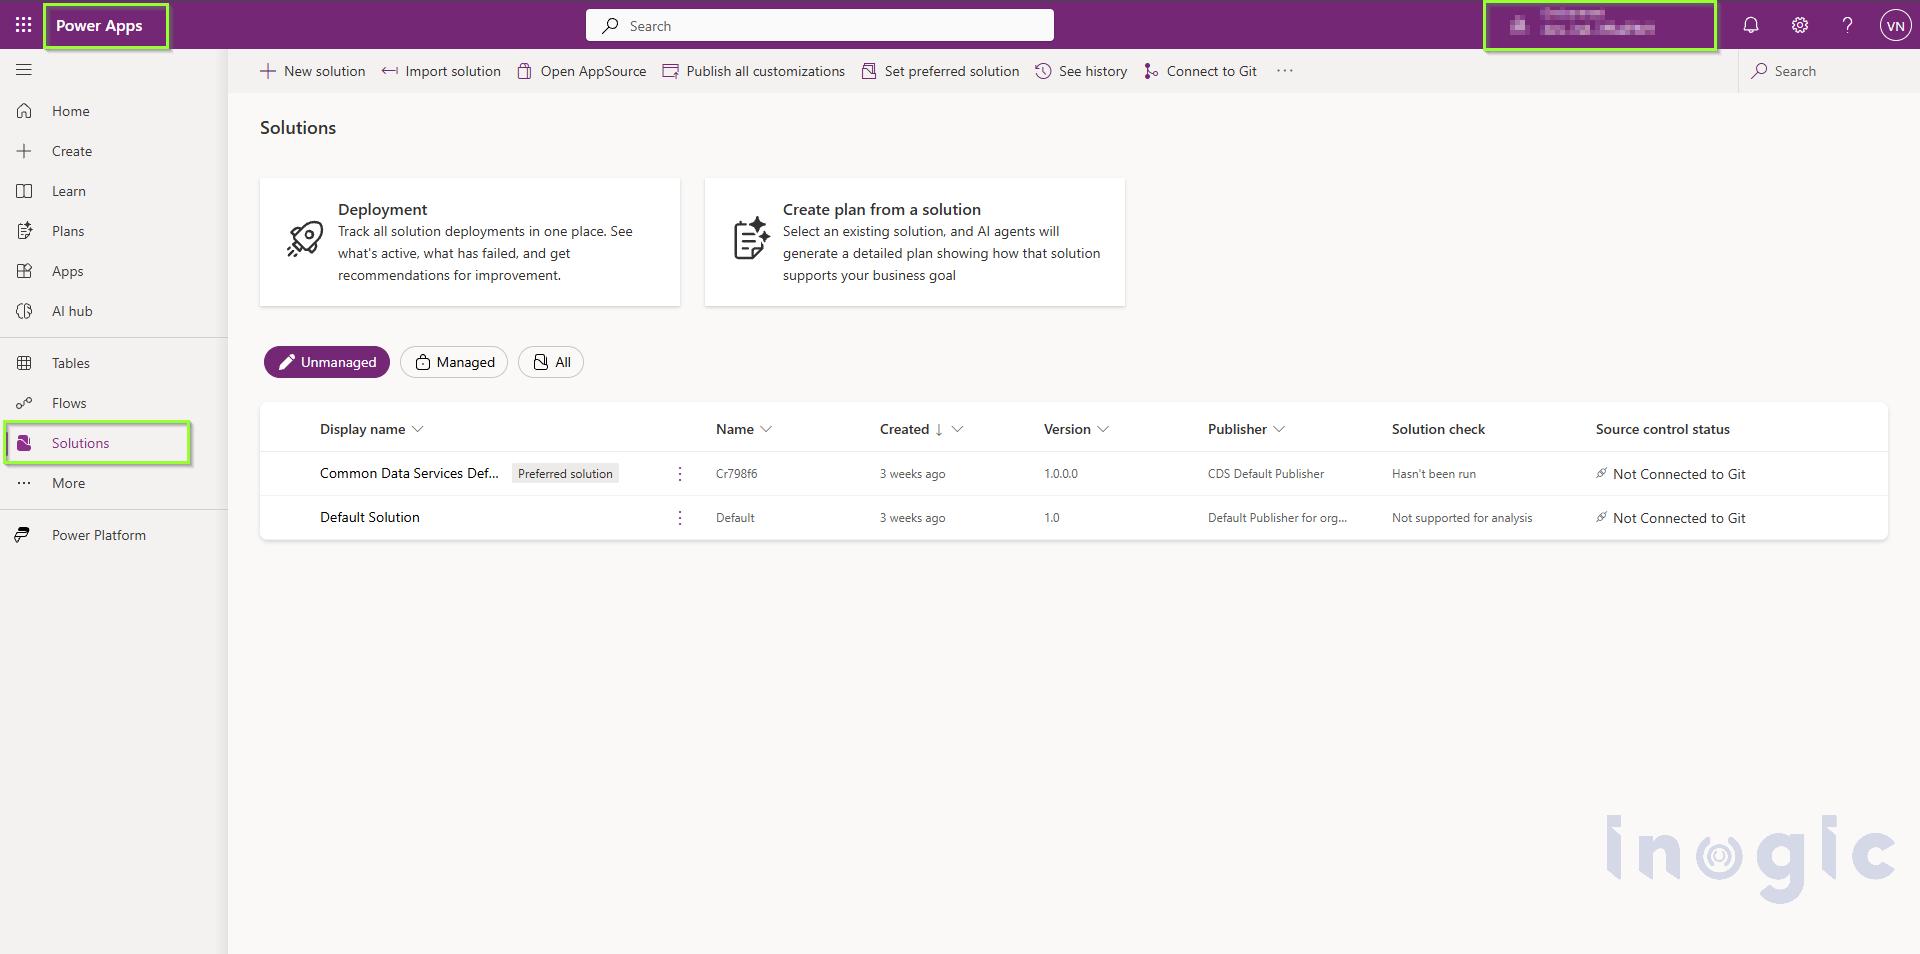
Step 1: Open Power Apps

Sign in to Power Apps and select the required environment.

From the left navigation pane, select Solutions.

Enhancing Power Apps Grids with Custom Column Visualizations

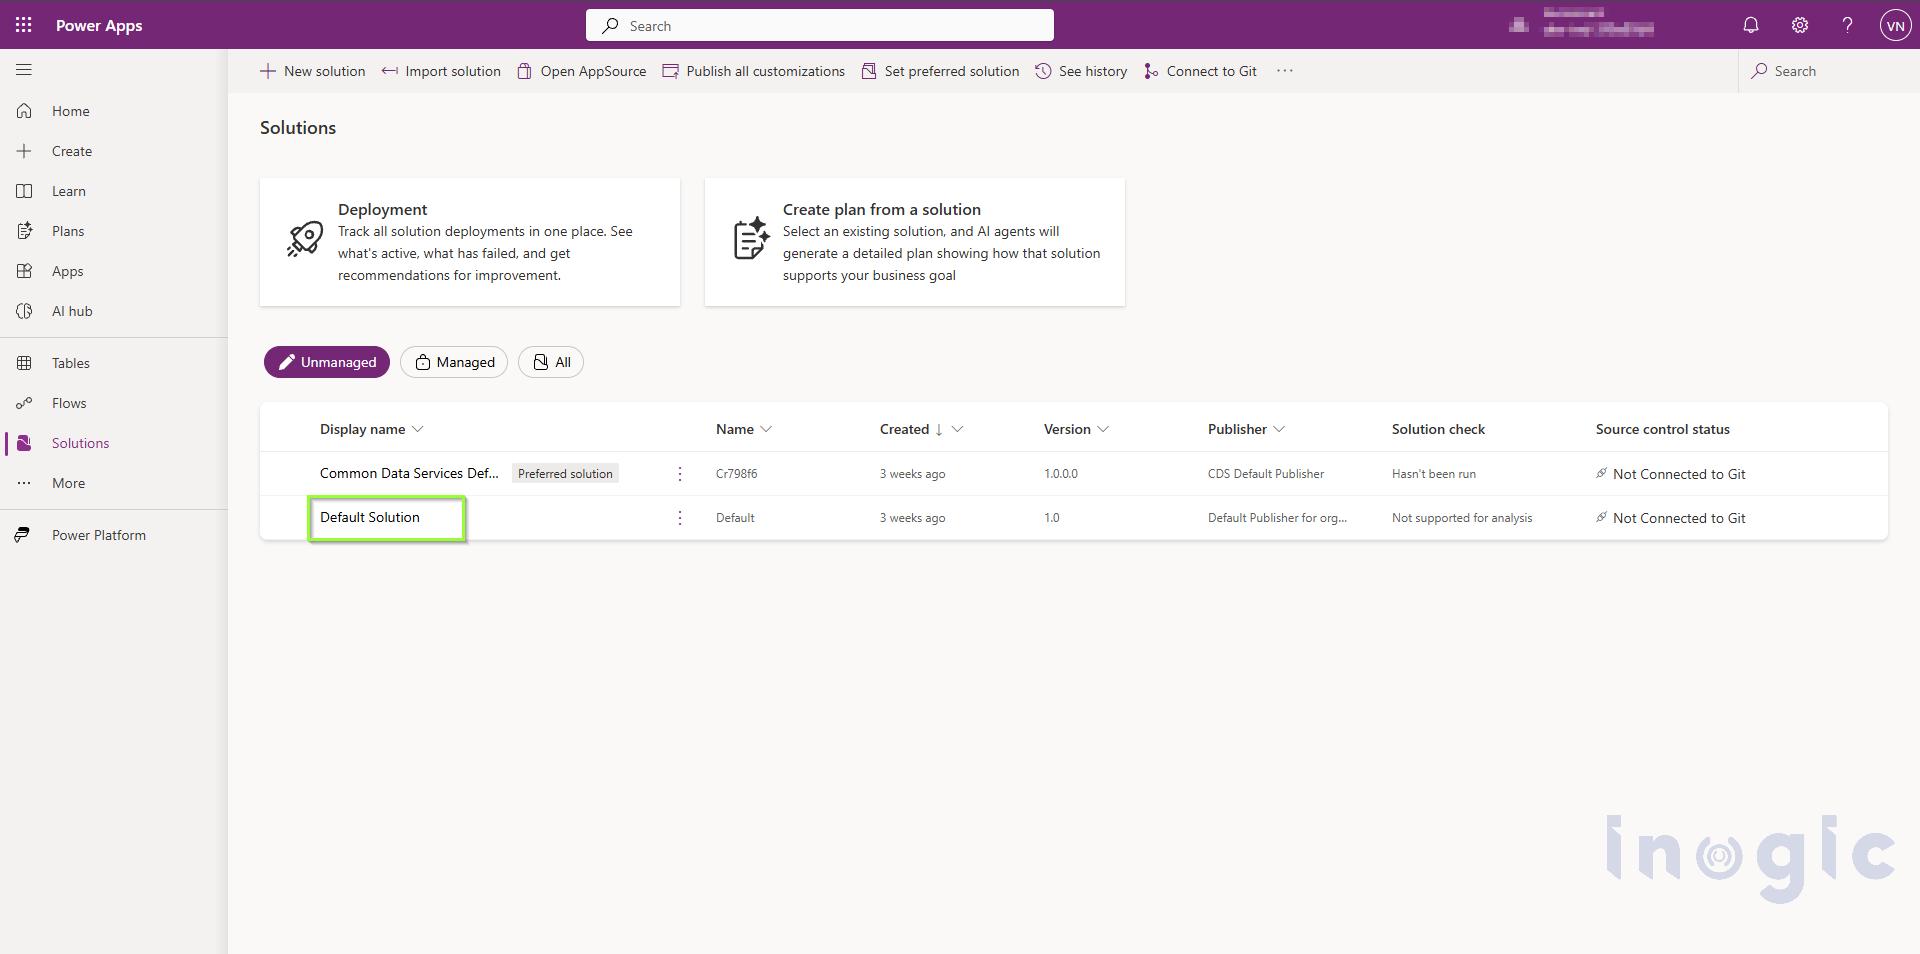
Step 2: Open the Required Solution

From the list of available solutions, open the solution that contains the table you want to modify.

Enhancing Power Apps Grids with Custom Column Visualizations

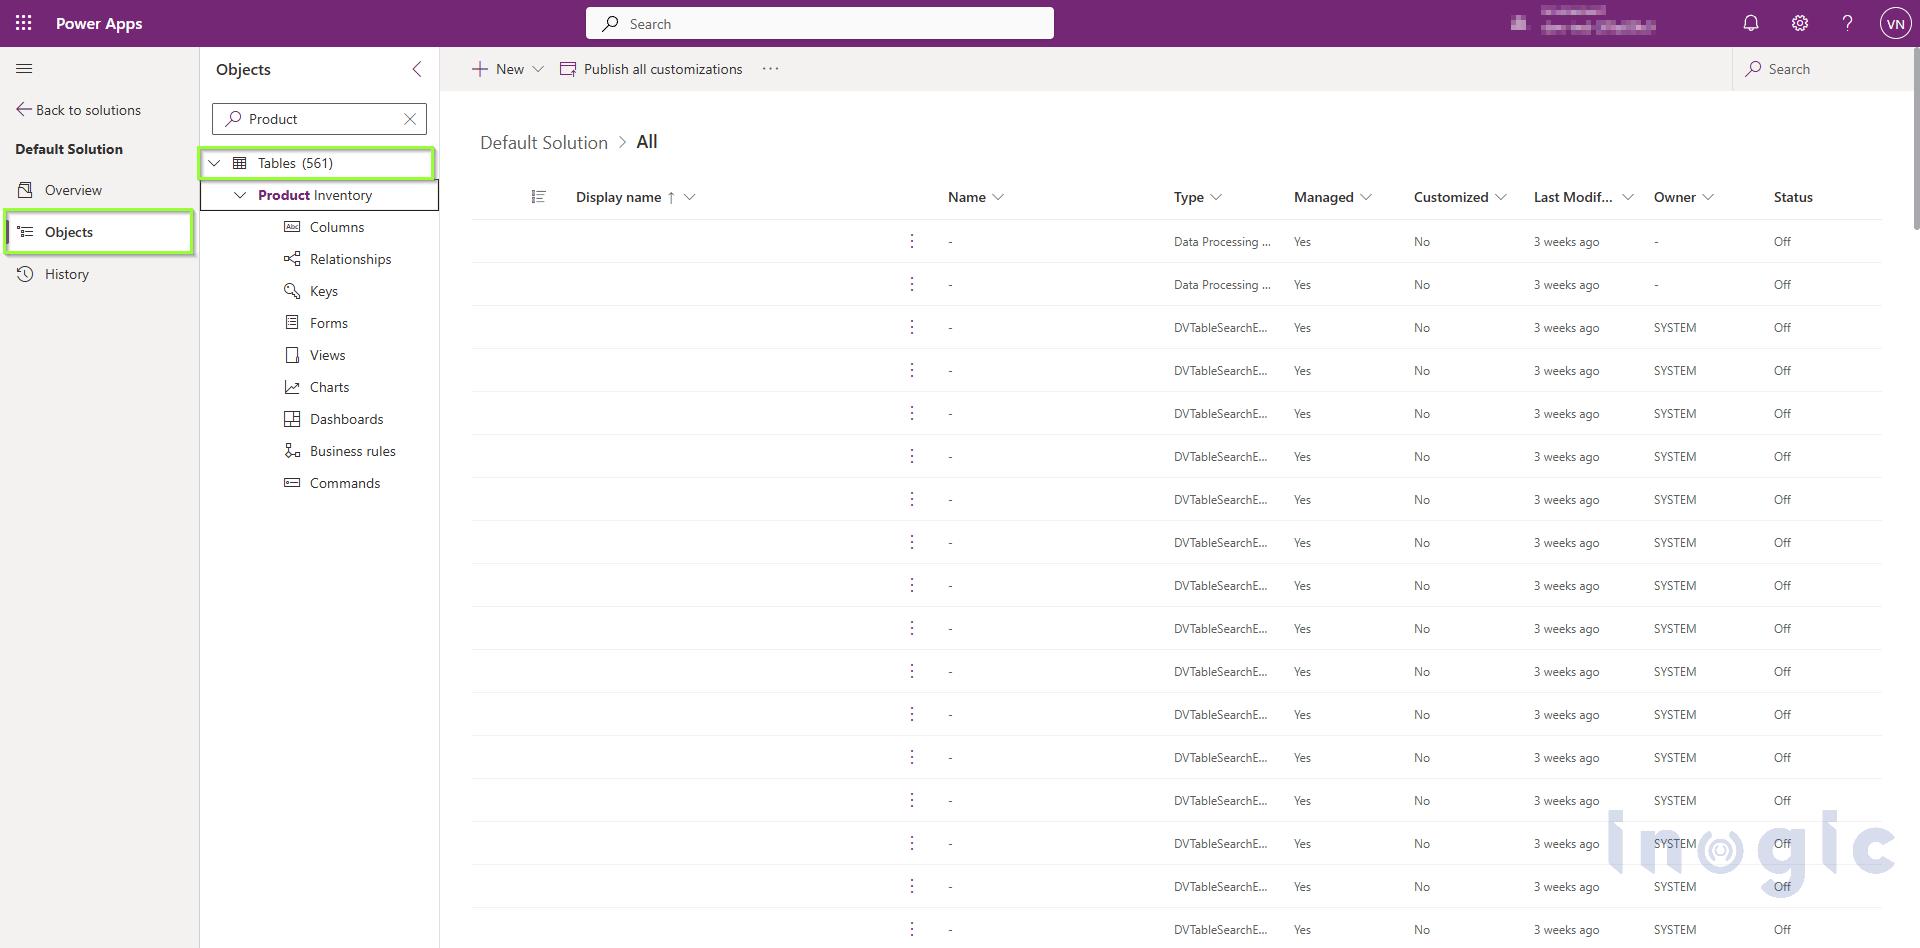
Step 3: Open the Table

Open the required table from the solution.

Enhancing Power Apps Grids with Custom Column Visualizations

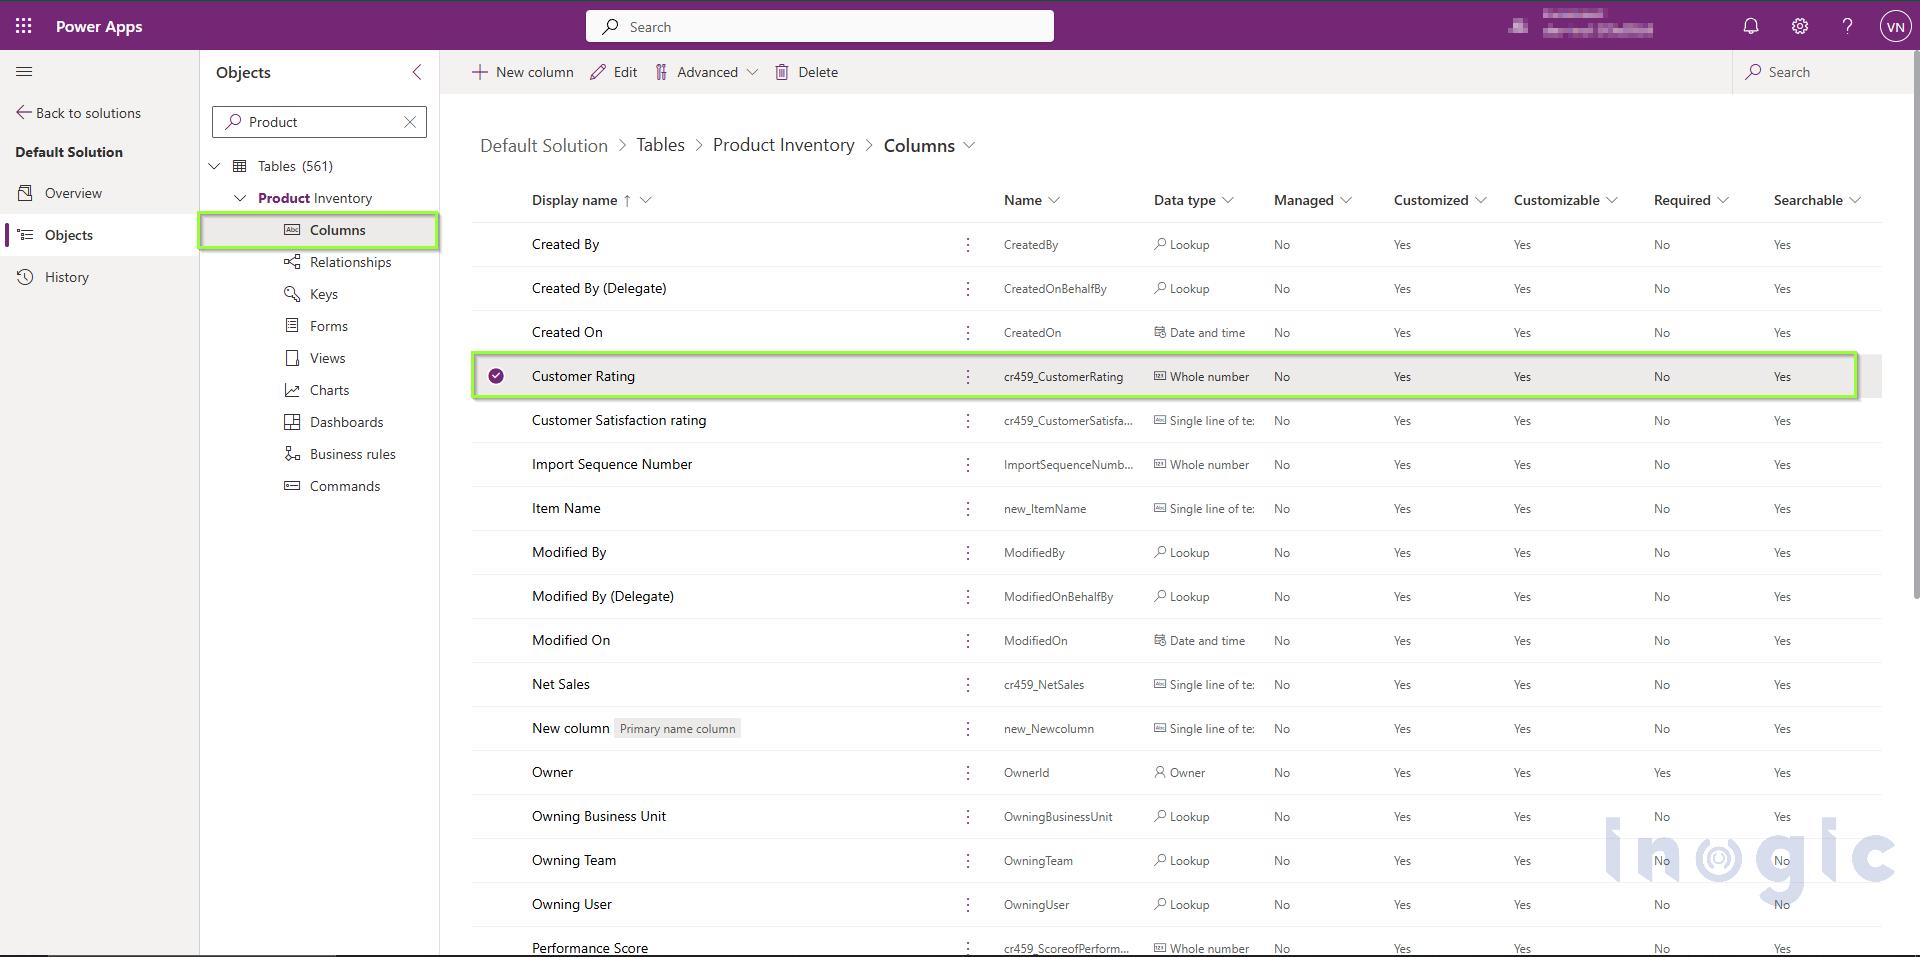
Step 4: Select the Column

From the table properties, select Columns to view the available columns.

Open the column for which you want to configure the visualization.

For this example, let’s open the Customer Rating column.

Enhancing Power Apps Grids with Custom Column Visualizations

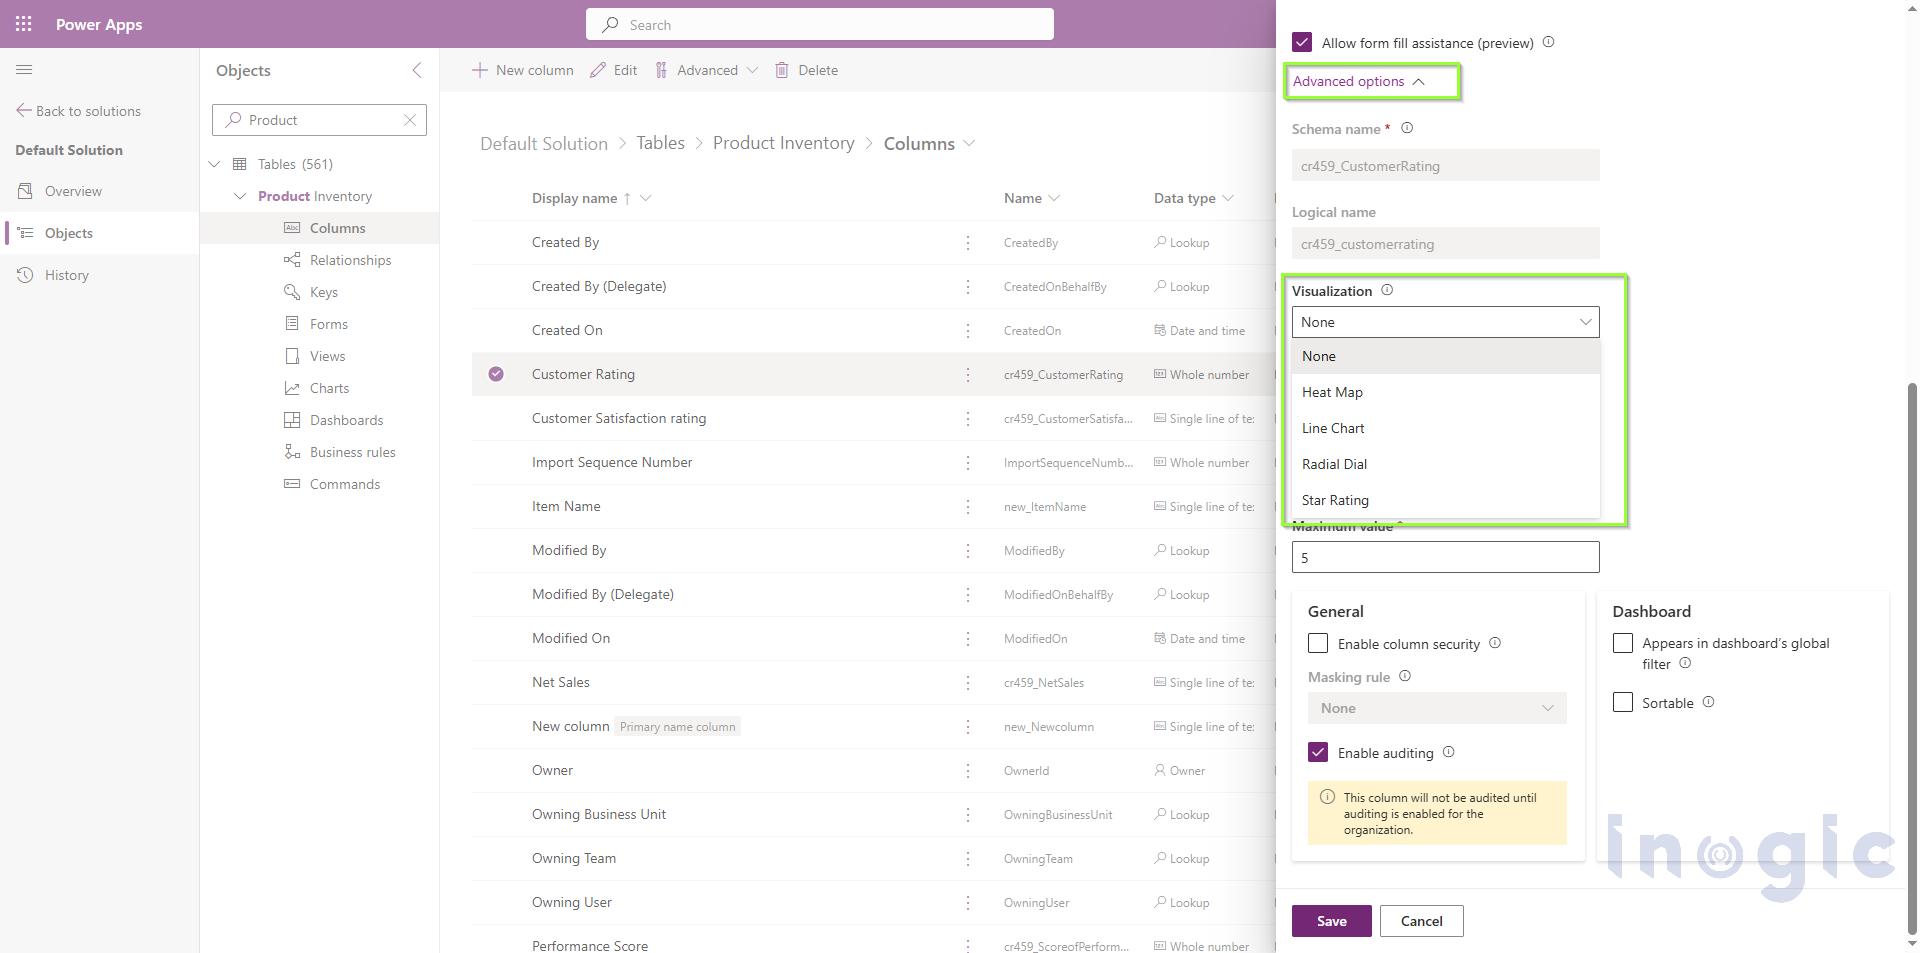
Step 5: Open Advanced Options

Expand Advanced Options in the column properties.

Locate the setting:

Choose how this column’s data will be visualized in the application

The available options are:

  • None
  • Heat Map
  • Line Chart
  • Radial Dial
  • Star Rating

Enhancing Power Apps Grids with Custom Column Visualizations

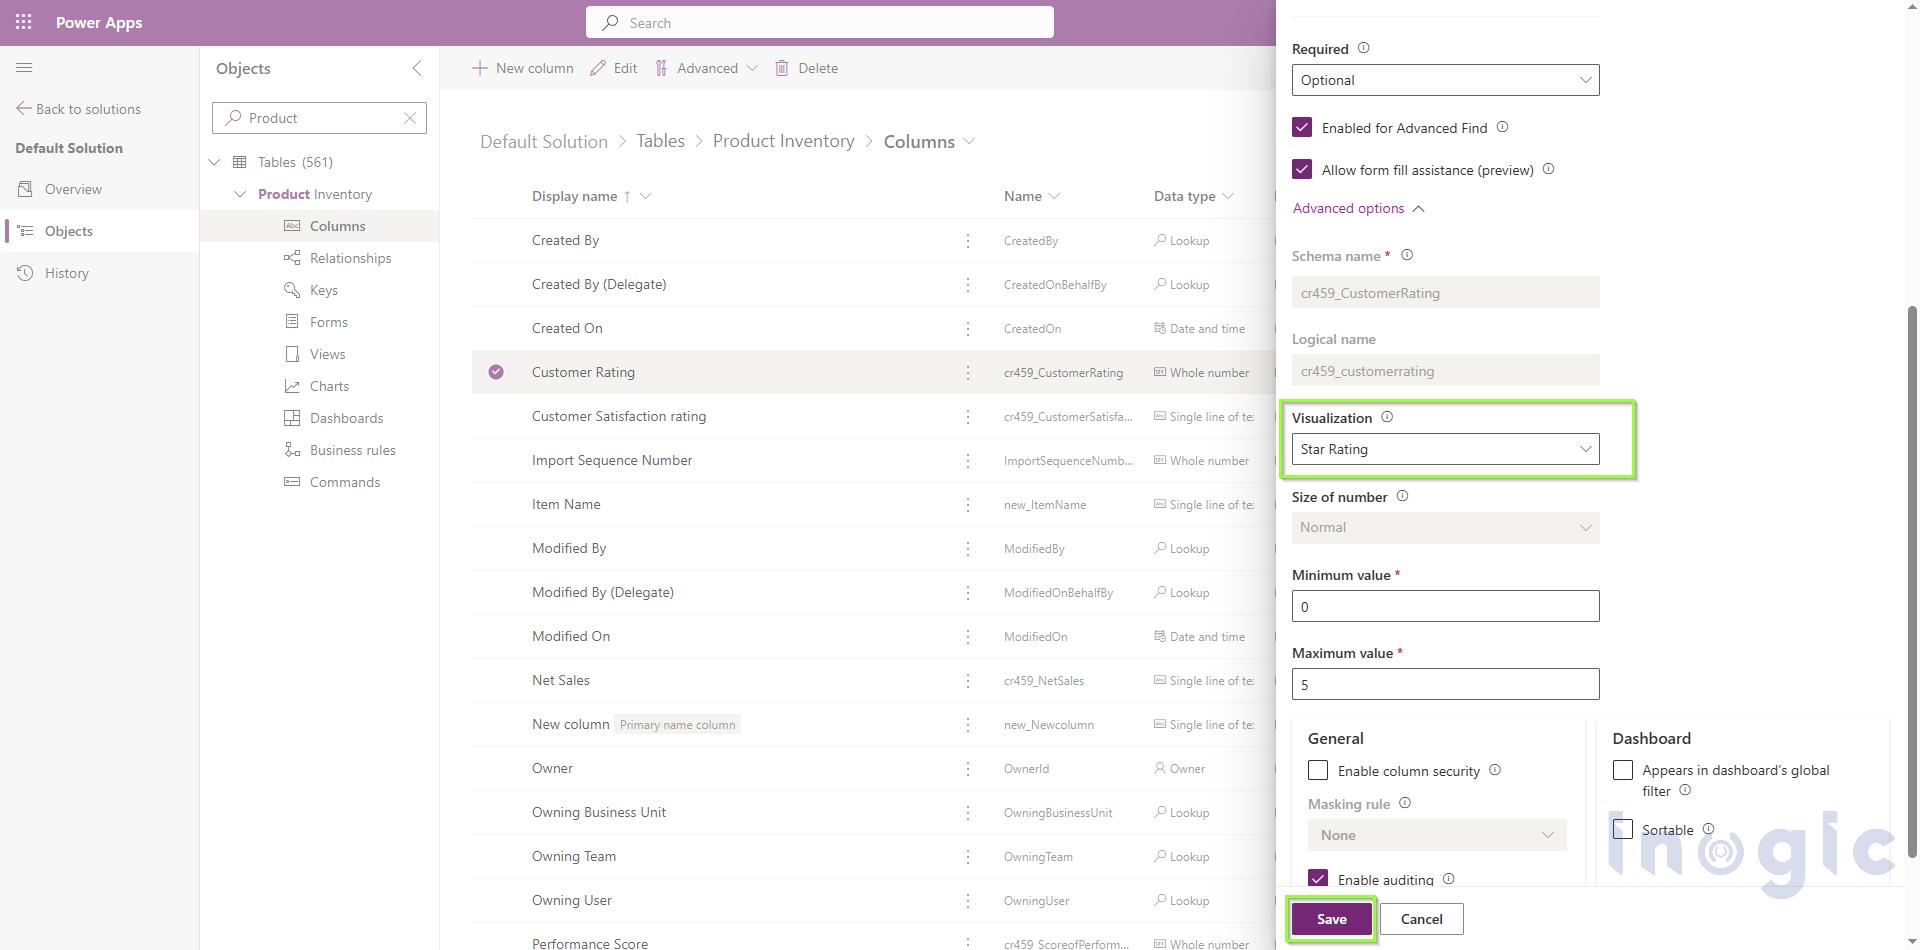
Step 6: Select the Visualization and Save the Column

Select the visualization you want to use.

For this example, let’s select Star Rating.

The Customer Rating column contains values on a 0–5 scale, making it suitable for Star Rating visualization.

Select Save to save the column configuration.

Enhancing Power Apps Grids with Custom Column Visualizations

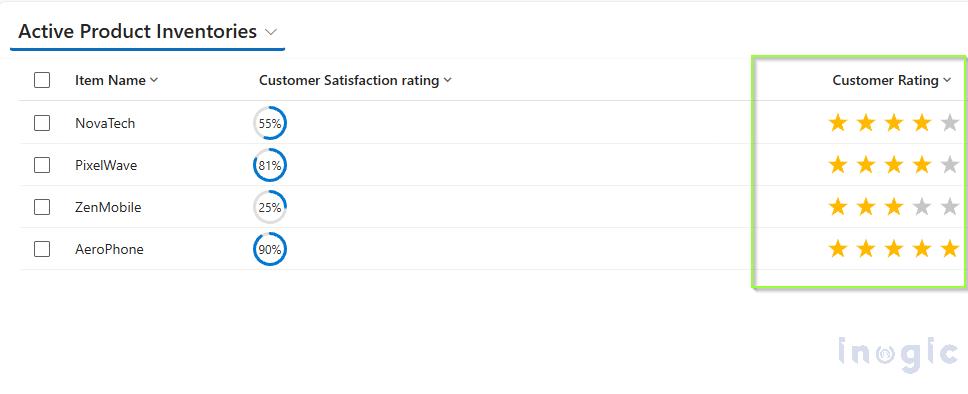
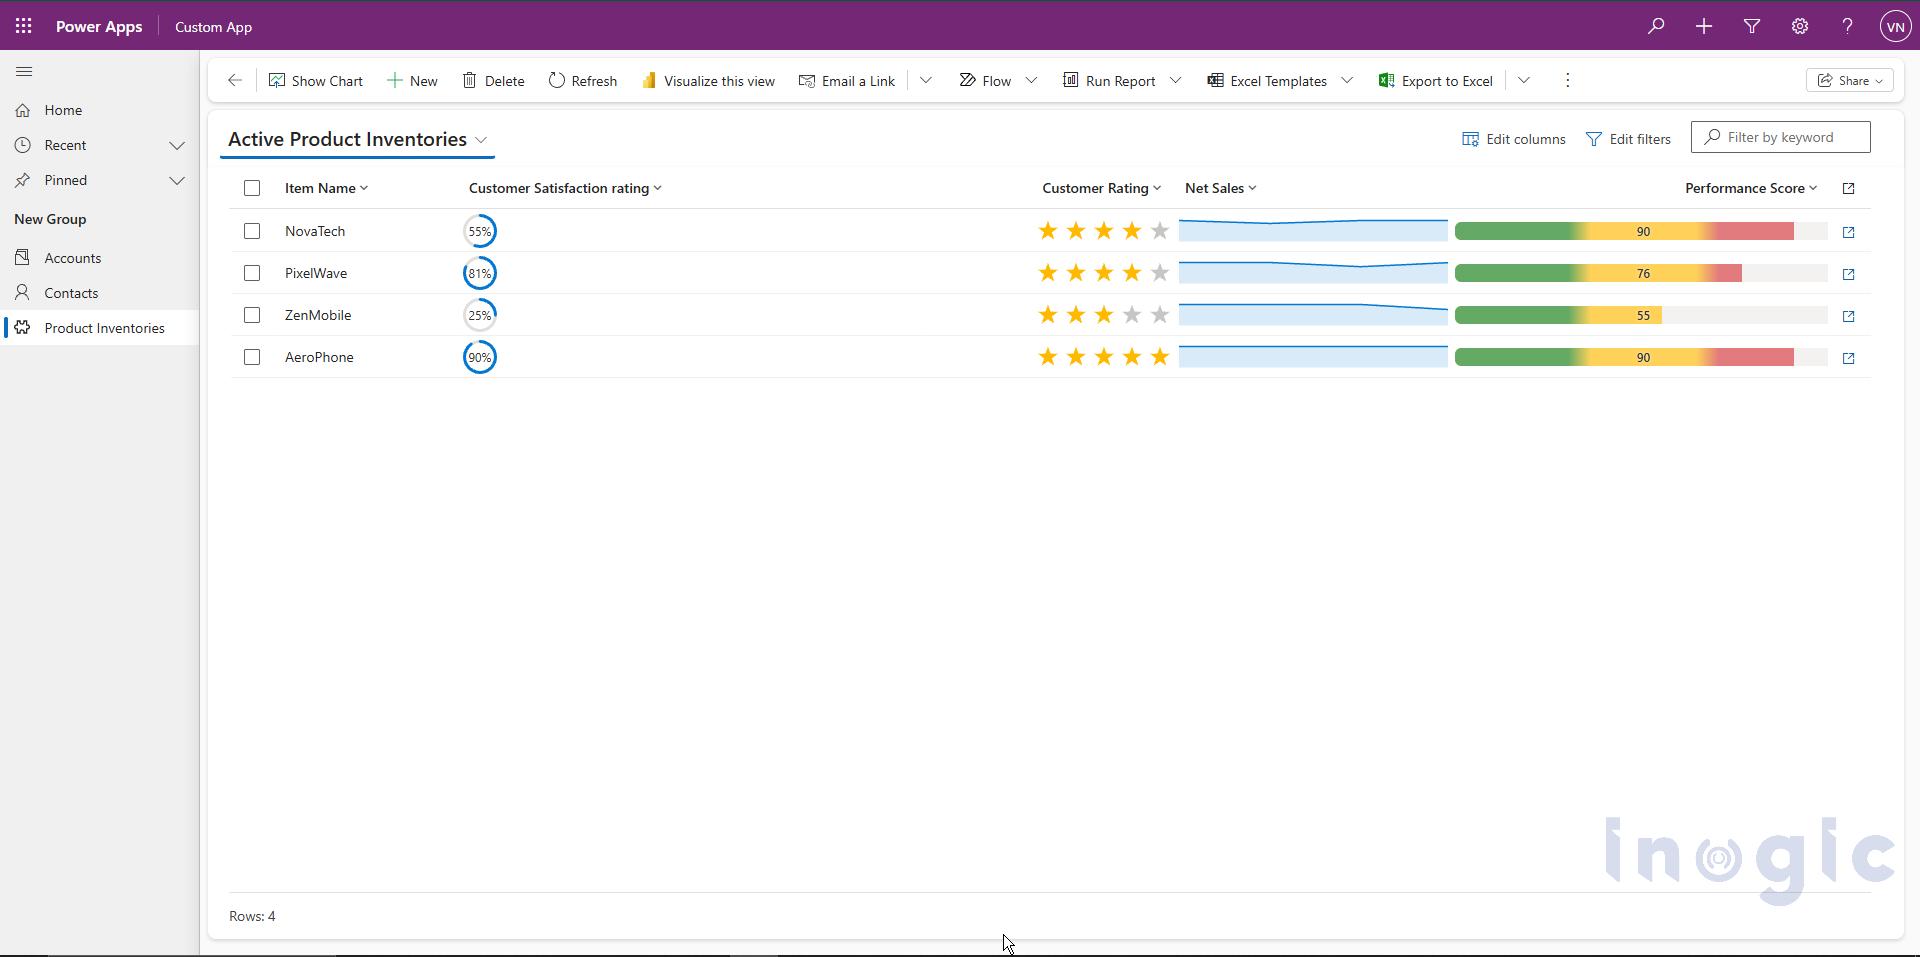
After Using Custom Column Visualization:

After applying the Star Rating, the same data is now represented visually.

Enhancing Power Apps Grids with Custom Column Visualizations

The underlying data has not changed. The same column values are being displayed; only the way those values are rendered in the grid has changed.

For this supported visualization scenario, there is no need to develop and deploy a separate PCF control or web resource simply to render the value as a radial dial.

Understanding the Available Visualizations:

1. Radial Dial:

The Radial Dial displays a single numeric value as a circular ring.

It is suitable for percentages or progress values on a 0–100 scale.

Example

Suppose the NovaTech’s Customer Satisfaction Rating column contains:

  • 45
  • 75
  • 90

After applying the Radial Dial, users can quickly see which product customers are more satisfied with. The visualization accepts whole numbers or decimals, and a trailing percentage sign is also supported.

Tip: If the intended value is 60%, store it as 60 rather than 0.6. A value of 0.6 is interpreted as 0.6%, not 60%.

2. Line Chart:

The Line Chart displays a small trend line inside the grid cell.

It is useful when a record needs to display a sequence of values and users need to understand whether the values are increasing, decreasing, or fluctuating.

Example

The mobile phone company wants to track the quarterly sales of its brands.

For this example, separate columns are created for each quarter:

  • Q1 Sales
  • Q2 Sales
  • Q3 Sales
  • Q4 Sales

For example, the sales data for NovaTech is:

  • Q1 Sales → 200
  • Q2 Sales → 86
  • Q3 Sales → 450
  • Q4 Sales → 900

A formula is then used to combine these four values into a single field in the required comma-separated format:

200, 86, 450, 900

The resulting field is then configured with the Line Chart visualization.

The Line Chart uses these values to display the quarterly sales trend directly within the grid, allowing users to quickly understand how sales changed from Q1 to Q4.

The Line Chart expects a text column containing multiple numbers separated by commas. At least two values are recommended to display a meaningful trend.

3. Heat Map

The Heat Map displays a value using a horizontal colored bar. The color changes depending on where the value falls within the defined range.

By default, the range is 0 to 100.

Example

The bakery can use a Product Performance Score column:

Product Performance Score
NovaTech 90
PixelWave 76
ZenMobile 55
AeroPhone 90

The Heat Map allows users to quickly identify products with higher or lower performance.

The Heat Map can also be used with choice columns. For choice columns, the underlying numerical value determines the visualization, so the choice values should be logically ordered.

4. Star Rating:

The Star Rating visualization displays a numeric value using stars.

By default, the visualization contains five stars.

Example

The mobile phone company may also maintain customer ratings for its products.

Product Customer Rating
NovaTech 4
PixelWave 4
ZenMobile 3
AeroPhone 5

Instead of displaying only the numbers, the values can be represented using stars.

The visualization expects a whole number from 0 up to the number of stars. Decimal values can also partially fill a star.

Data Preparation and Common Issues:

Custom Column Visualizations work correctly when the underlying column data matches the expected format.

Data Preparation:

  • Use numeric columns for Radial Dial, Heat Map, and Star Rating.
  • Use a text column containing comma-separated numbers for Line Chart.
  • Keep values clean and avoid unnecessary text, units, or formatting.
  • Make sure values are within the expected range.
  • Refresh the grid after changing the visualization.

For example, a Line Chart should contain:

450,620,780

rather than:

2023: 450, 2024: 620, 2025: 780

Common Issues:

The following issues may occur while implementing custom column visualization:

  • Radial Dial is full or empty:
    Check whether the value is outside the expected range or has been stored as a fraction.
  • Line Chart shows a single point:
    Check that the column contains multiple comma-separated values.
  • Line Chart contains gaps:
    Check for non-numeric values within the series.
  • Star Rating shows all stars:
    Values equal to or greater than the maximum number of stars will fill all stars.
  • Heat Map doesn’t show the expected order:
    For choice columns, check that the underlying numerical choice values are logically ordered.

Custom Visualization vs. PCF or Web Resource:

Custom Column Visualizations don’t replace PCFs or web resources in every scenario.

PCF controls and web resources remain useful when an organization requires a custom visualization or behavior that isn’t provided by the native options.

For example, if the bakery requires a completely custom interactive sales visualization with additional calculations or functionality, a PCF control may still be appropriate.

However, when the requirement is simply to display a supported visualization such as a Radial Dial, Line Chart, Heat Map, or Star Rating, Custom Column Visualizations provide a simpler configuration-based approach.

In simple terms:

Earlier approach

Requirement → Develop PCF/Web Resource → Test → Deploy → Maintain

Current approach

Requirement → Select Visualization → Save → Use in Grid

This reduces the amount of custom development required for common visualization scenarios.

Benefits of Custom Column Visualizations:

Custom Column Visualizations provide several benefits for organizations working with Power Apps and Dataverse grids.

  • Reduced custom development for supported visualization requirements.
  • Easier configuration directly from column properties.
  • Faster comparison of values across records.
  • Better grid experience without requiring users to open individual records.
  • Consistent visualization across grids and views using the column.
  • Reduced maintenance compared with custom solutions.

For the bakery, this means users can understand product sales and performance more quickly without relying only on plain numerical values.

FAQs

Q1: What are Custom Column Visualizations in Power Apps?
Custom Column Visualizations are a native way to display column values graphically inside a Power Apps or Dataverse grid, as a Radial Dial, Line Chart, Heat Map, or Star Rating, instead of showing plain numeric text.

Q2: Do I need a PCF control or web resource to use these visualizations?
No. For the four supported visualization types, you can configure them directly through the column’s Advanced Options, without writing, deploying, or maintaining any custom code.

Q3: What data format does each visualization require?
Radial Dial, Heat Map, and Star Rating expect numeric columns within a defined range (e.g., 0–100 for Radial Dial, 0–5 for a 5-star rating). Line Chart requires a text column containing comma-separated numeric values, such as 450,620,780, with at least two values recommended for a meaningful trend.

Q4: Why is my Radial Dial showing as full or empty?
This usually means the stored value is outside the expected range, or was entered as a fraction (e.g., 0.6) instead of a whole number (e.g., 60 for 60%).

Q5: Why is my Line Chart only showing a single point or has gaps in it?
A single point usually means the column doesn’t contain multiple comma-separated values. Gaps typically indicate non-numeric values mixed into the series.

Q6: Can Heat Map visualization be used with choice columns?
Yes. For choice columns, the visualization is based on the underlying numerical value of each choice, so the choice options need to be logically ordered for the Heat Map to display correctly.

Q7: Should I still use PCF controls if this feature is available?
Yes, in some cases. Custom Column Visualizations cover common scenarios well, but PCF controls or web resources are still the right choice when you need a fully custom visualization or interactive behavior beyond the four supported types.

Q8: Is this feature ready for production use?
Not yet guaranteed. Custom Column Visualizations for Grids is currently a preview feature and may change before general availability, so it should be evaluated and tested before relying on it in a production environment.

Conclusion:

Custom Column Visualizations provide a simple way to make Power Apps and Dataverse grids more informative and easier to understand.

Visualizations such as Line Charts, Radial Dials, Heat Maps, and Star Ratings can help users quickly compare and interpret different types of business data directly within a grid.

Previously, organizations could use PCF controls or web resources to introduce graphical representations inside their grids. These technologies remain useful for highly customized requirements, but they can involve additional development, deployment, and maintenance.

With Custom Column Visualizations, common visualization requirements can now be handled directly through column configuration without custom development.

By selecting the appropriate visualization and preparing the data in the required format, organizations can improve the grid experience while making business data easier to interpret.

Note: Custom Column Visualizations for Grids is currently a preview feature and should be evaluated accordingly before being used in production scenarios.

The post Enhancing Power Apps Grids with Custom Column Visualizations first appeared on Microsoft Dynamics 365 CRM Tips and Tricks.

  •  

Build Dataverse Solutions Faster with a Coding Agent in Dynamics 365

Build Dataverse Solutions Faster with a Coding Agent in Dynamics 365

Traditionally, creating a Dataverse solution involves manually creating tables, columns, relationships, and sample records through the Power Apps maker portal or by writing scripts and using Power Platform CLI.

With Dataverse skills for coding agents, we can describe our requirements in natural language and let the coding agent implement them directly in the connected Dataverse environment.

In this blog, I will demonstrate this capability by building a Recruitment Management solution using a coding agent.

The objective is to create the required Dataverse tables, establish relationships, add realistic sample data, and verify that everything has been provisioned successfully in the connected environment.

Key Takeaways
1. Natural language drives Dataverse development.

Describe your solution in plain English. No manual table creation or CLI scripting required.

2. End-to-end automation inside Dataverse.

The coding agent handles the full Power Platform development workflow for tables, relationships, sample data, and verification.

3. Less context switching, faster delivery.

Stay inside the coding agent experience instead of jumping between the Power Apps maker portal, CLI, and documentation.

4. Human-in-the-loop approval keeps environments safe.

Before any Dataverse resource is modified, the agent requests sign-off that is critical for shared and sandbox environments.

5. Accelerated solution building with GitHub Copilot.

What once took multiple manual steps across tools now starts with a single natural language prompt.

Use Case: Recruitment Management

For this demonstration, we are building a simple Recruitment Management solution that takes a few tables like jobs, interviews, etc.

Prerequisites

Before starting the implementation, I had the following prerequisites:

  1. GitHub Copilot/coding agent
  2. Power Platform CLI
  3. Dataverse skills configured for the coding agent

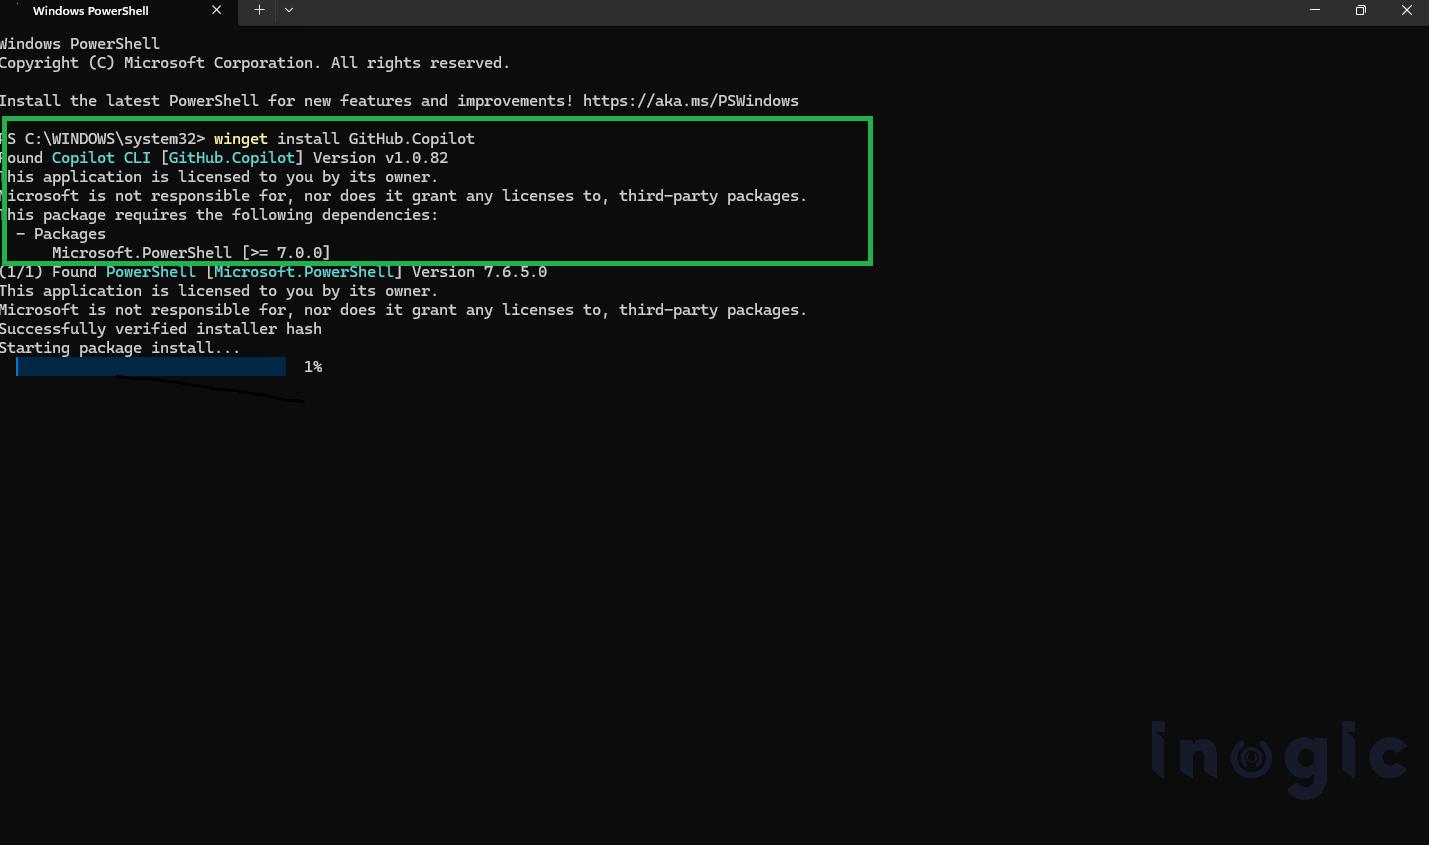
GitHub Copilot Installation

The first step is to install and configure GitHub Copilot in your development environment.

After installation, verify that Copilot is available in your development environment and that you can interact with the coding agent.

Build Dataverse Solutions Faster with a Coding Agent in Dynamics 365

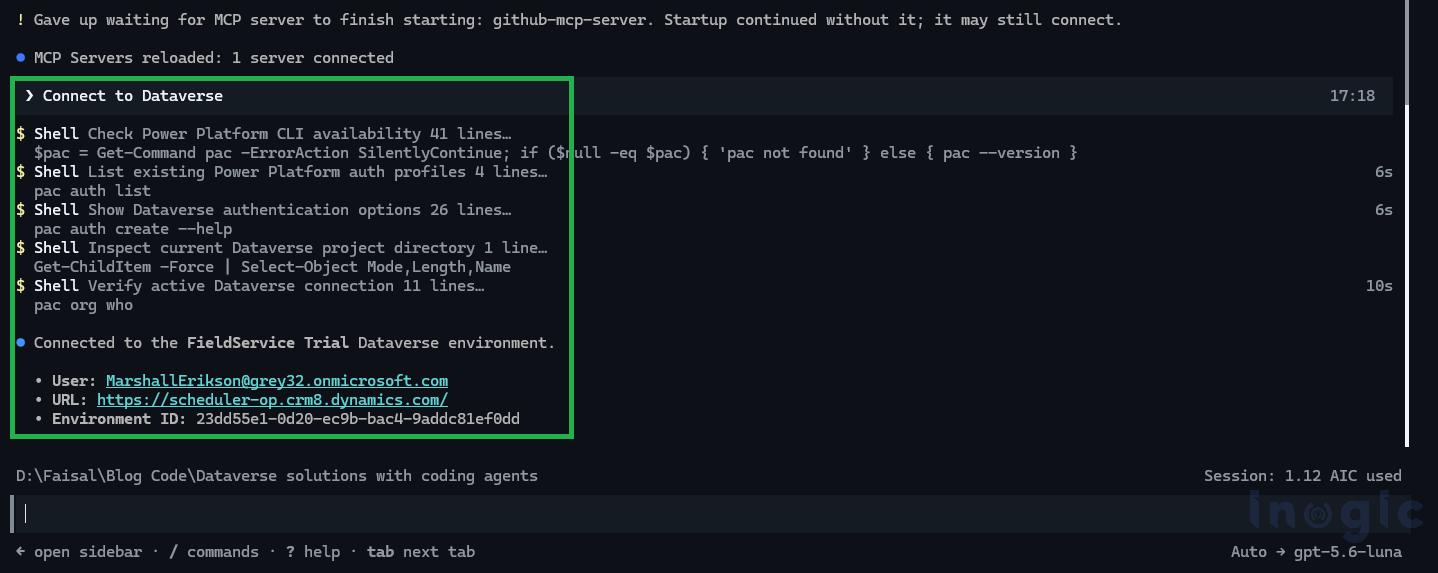
Step 1: Connect to the Dataverse Environment

The first step is to authenticate the coding agent with the target Microsoft Dataverse environment. This establishes the connection required for the agent to discover and work with Dataverse resources.

Using Power Platform CLI, authenticate against your Dataverse environment with the following command:

pac auth create –url https://<your-org>.crm.dynamics.com

Replace <your-org> with the URL of your Dataverse environment.

Once authentication is complete, verify the available authentication profiles:

pac auth list

With the Dataverse environment connected, the coding agent can work with the environment to create and manage solutions, tables, relationships, and data as part of the implementation.

Build Dataverse Solutions Faster with a Coding Agent in Dynamics 365

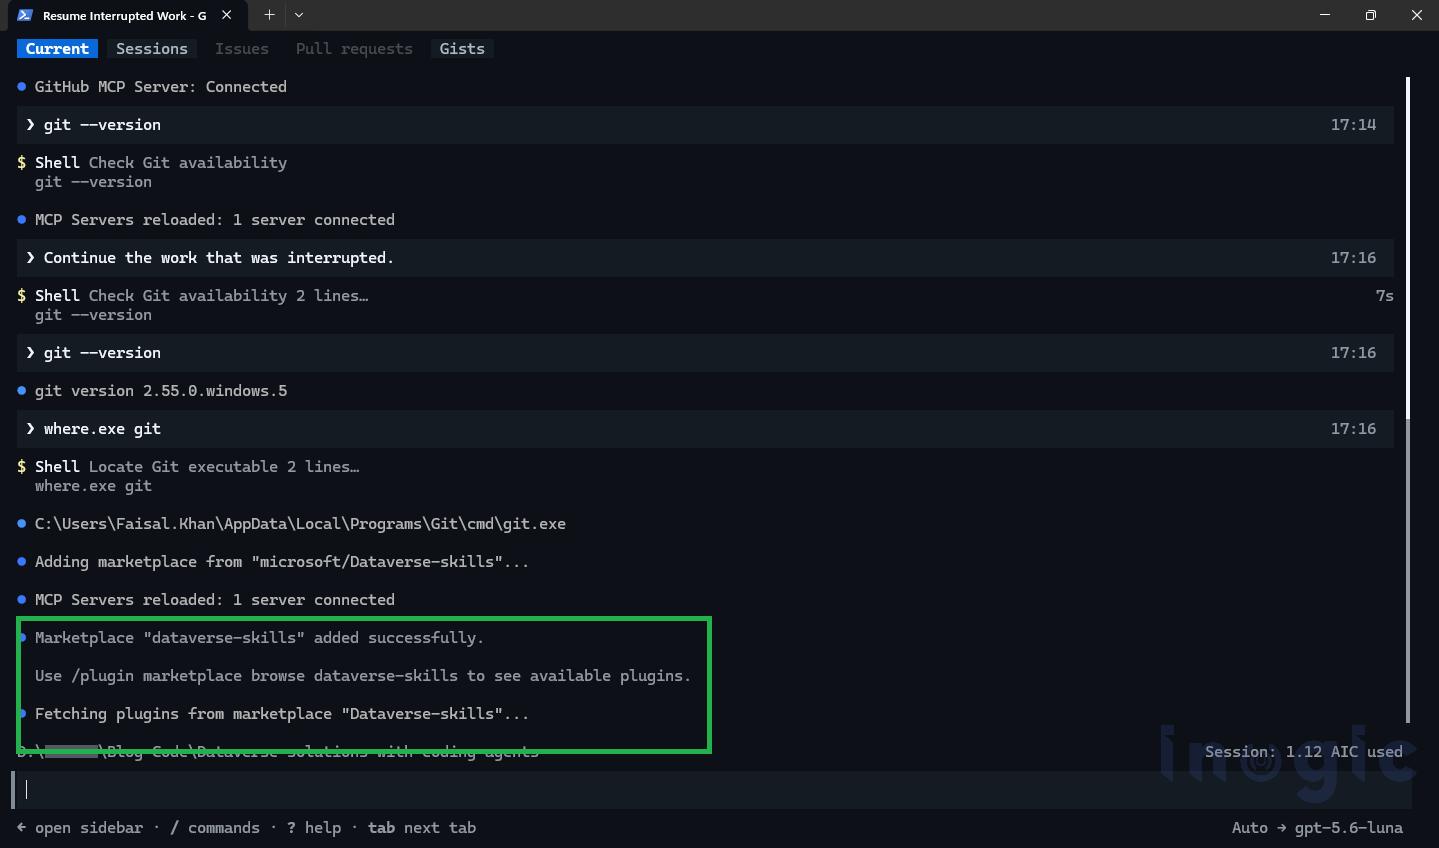
Step 2: Add Dataverse Skills

Once the Dataverse environment is connected, the next step is to add the Dataverse skills to the coding agent.

Dataverse skills provide the agent with the knowledge and capabilities required to understand Dataverse concepts and perform common development tasks, such as creating solutions, tables, columns, relationships, and data.

In the coding-agent terminal, add the Dataverse skills using:

/plugin marketplace add dataverse

After the Dataverse skills are added, the coding agent can use them when working with the connected Dataverse environment.

The key benefit is that developers don’t need to manually provide every Power Platform CLI command, tool parameter, or implementation detail. Instead, we can describe the desired outcome in natural language, and the coding agent can orchestrate the required Dataverse operations.

This also reduces context switching between documentation, CLI commands, scripts, and the Dataverse UI, allowing the development workflow to remain within the coding-agent experience.

Build Dataverse Solutions Faster with a Coding Agent in Dynamics 365

Step 3: Give the Prompt to the AI Agent

Now comes the implementation part.

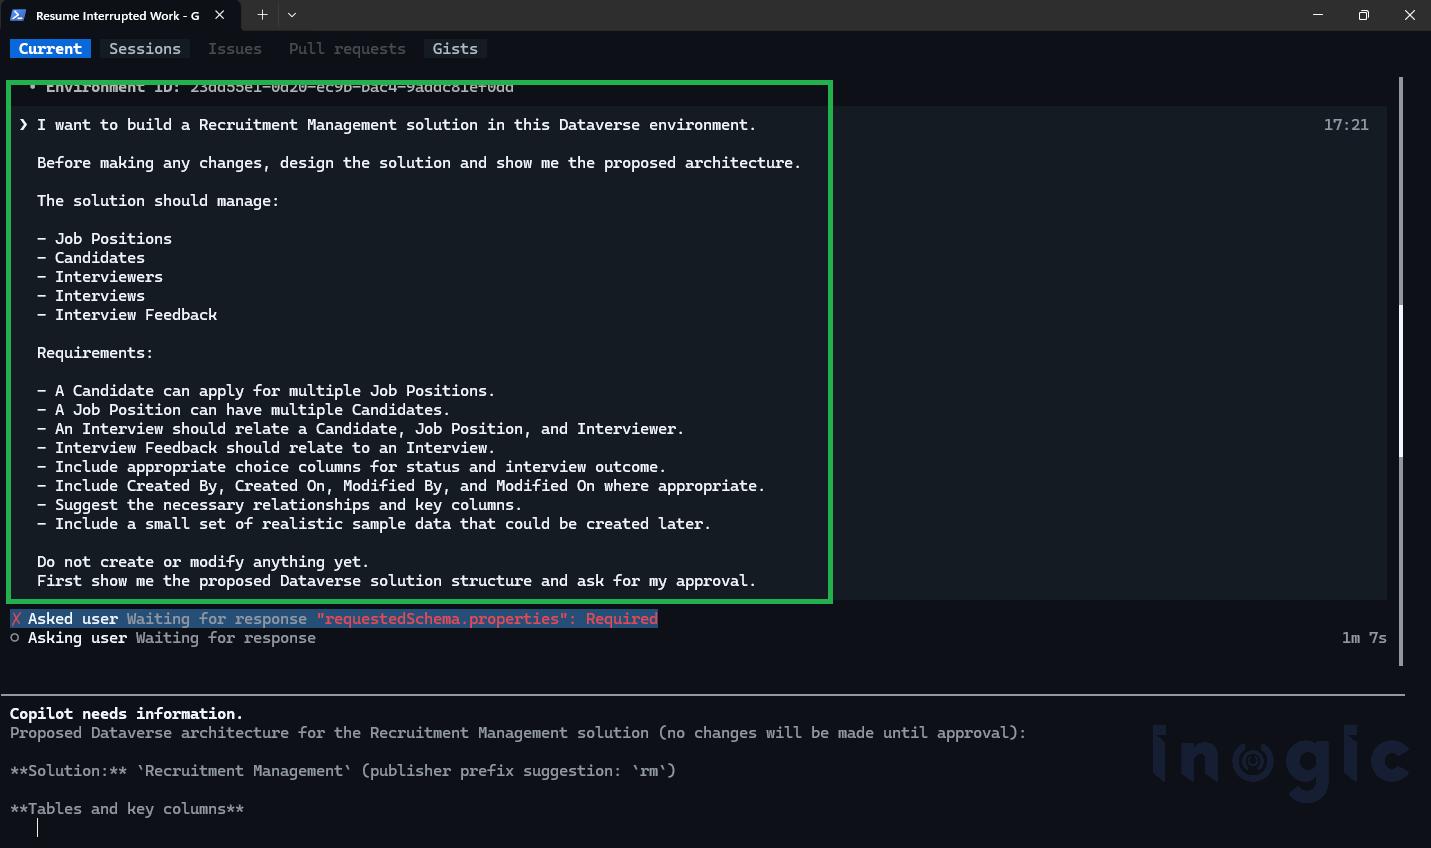
Instead of manually creating five tables and their relationships, we can describe the solution we want using natural language.

Build Dataverse Solutions Faster with a Coding Agent in Dynamics 365

The agent interprets the requirements and determines the Dataverse components that need to be created.

At this point, we don’t have to manually specify every CLI command or create each table from the Power Apps maker portal.

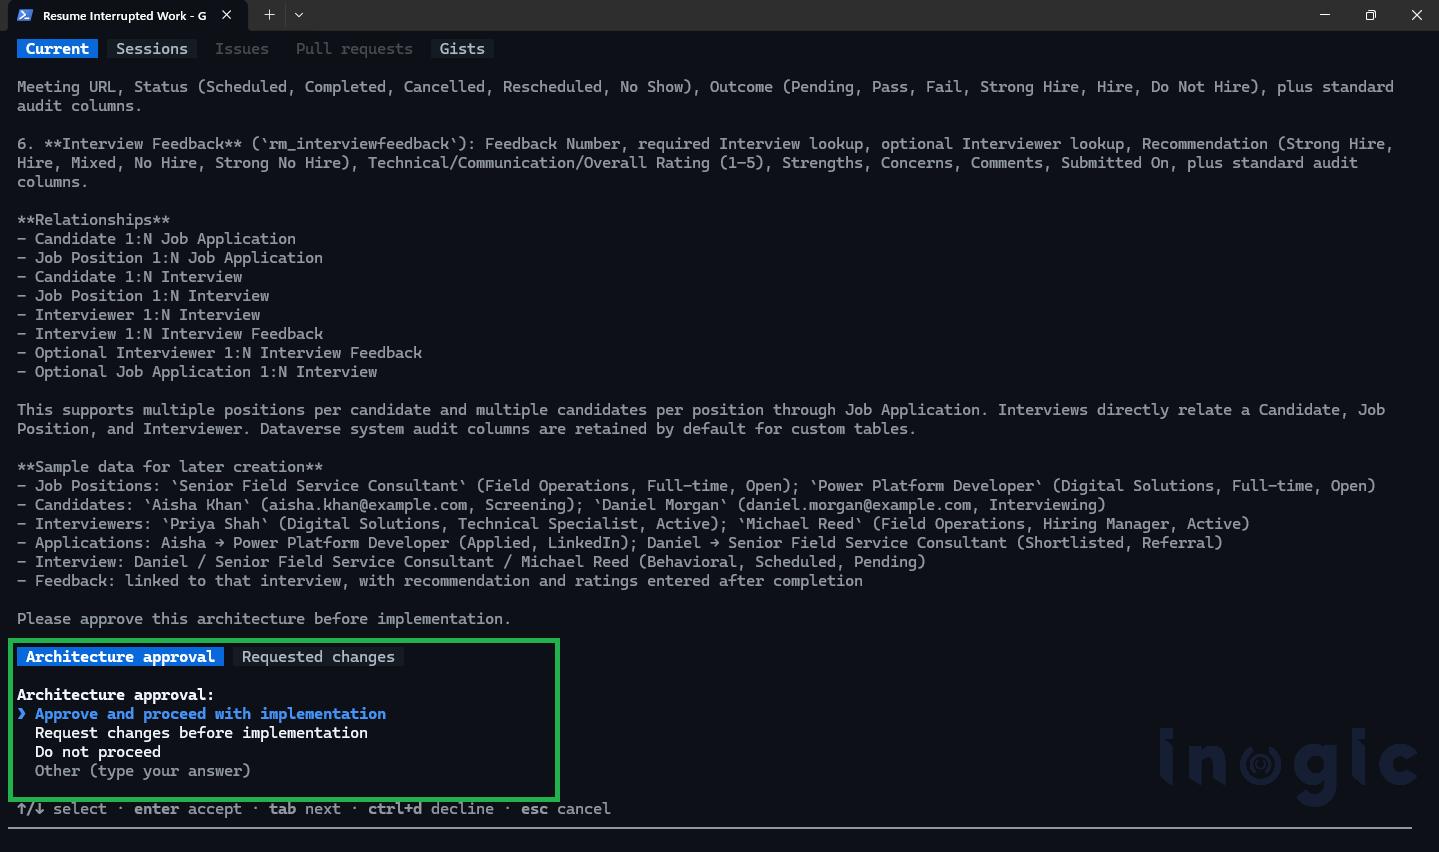
Step 4: Approving Changes

As the agent performs operations against the environment, it may ask for approval before executing certain actions.

For example, the agent may request approval to:

  1. Create or modify Dataverse components
  2. Execute Power Platform CLI commands
  3. Run generated scripts
  4. Load data into the environment

Review the proposed action and approve it when you are comfortable with the changes.

This approval step is particularly important when working with development or shared environments because the coding agent is capable of making actual changes to Dataverse resources.

Build Dataverse Solutions Faster with a Coding Agent in Dynamics 365

Output

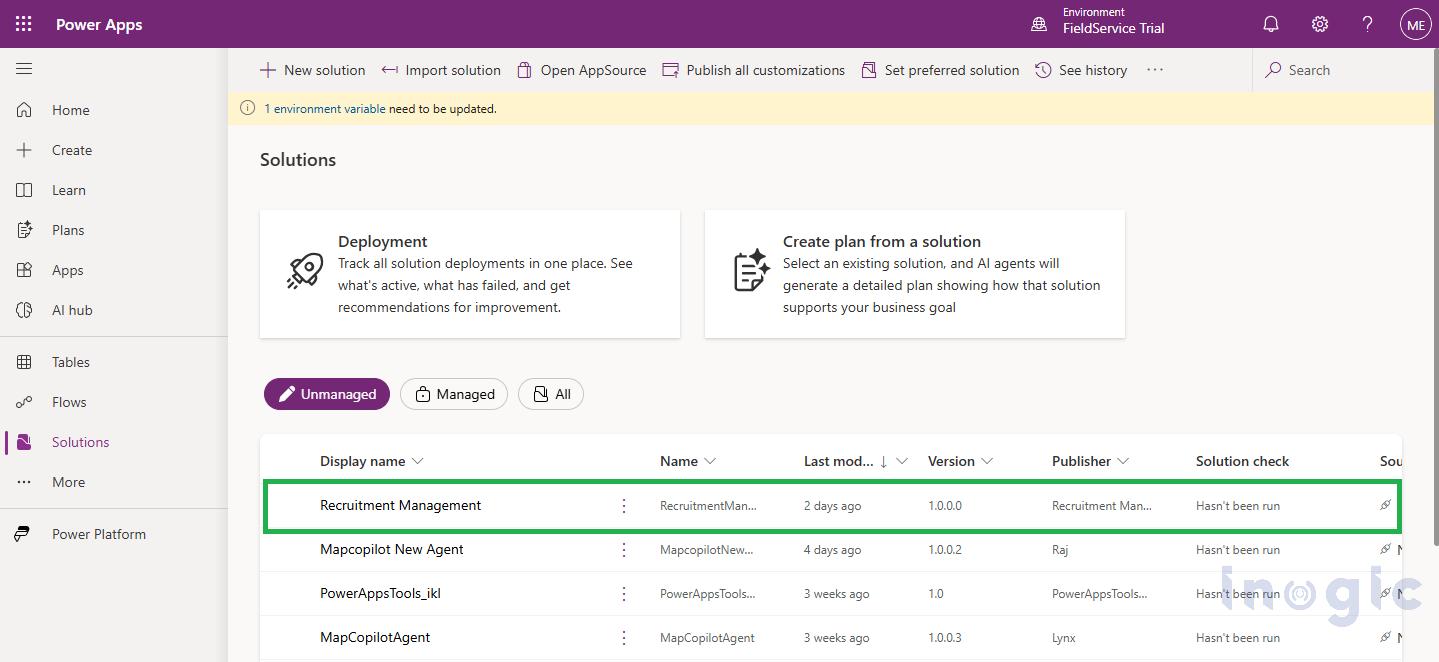
After the agent completes the requested operations, we can verify the solution in Dataverse.

The Recruiting solution should now contain the requested tables and relationships.

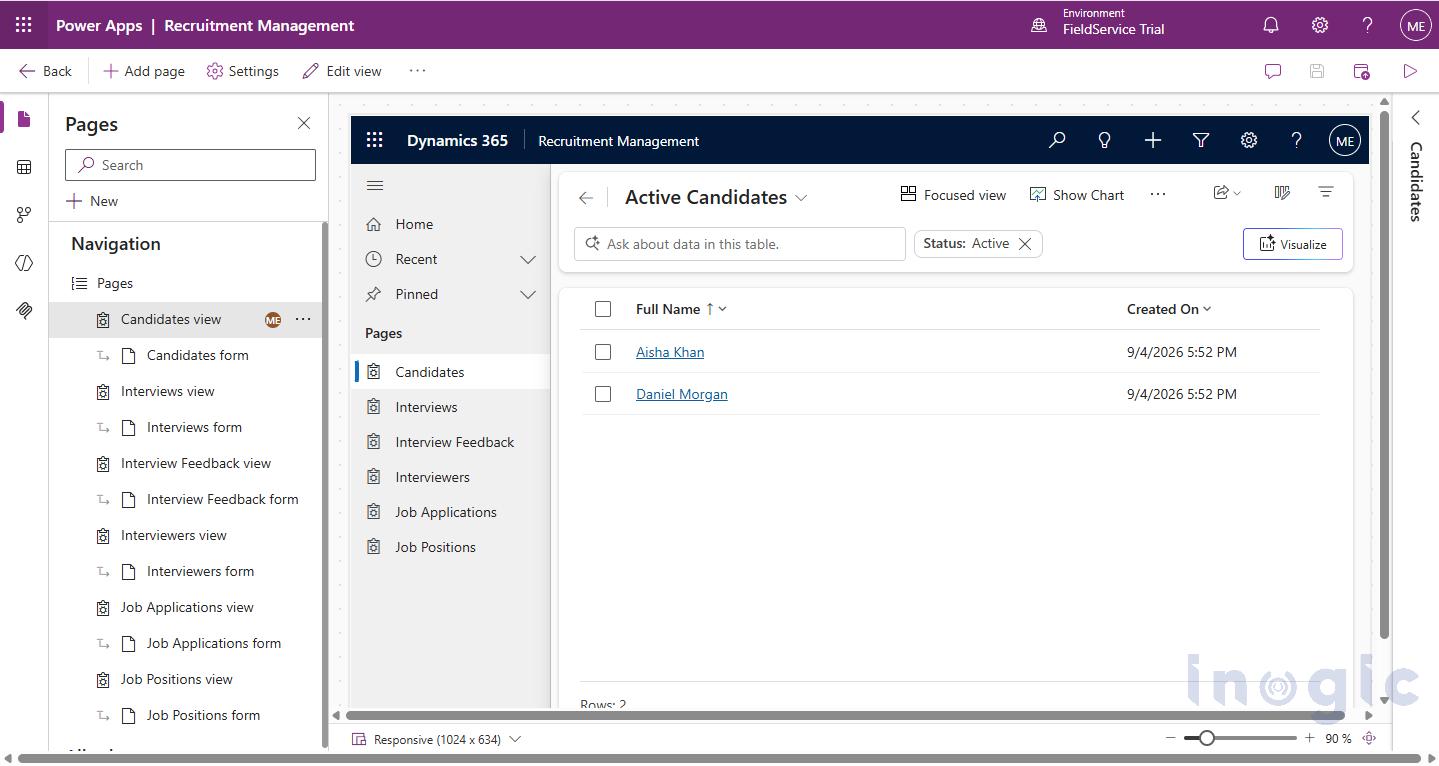
We can also inspect the tables and their relationships to verify that the requested data model was created successfully. The agent can then query the newly created data and answer business questions.

Build Dataverse Solutions Faster with a Coding Agent in Dynamics 365

Build Dataverse Solutions Faster with a Coding Agent in Dynamics 365

Conclusion

The introduction of Dataverse skills for coding agents provides a new way to build and manage Dataverse solutions using natural language. We use a coding agent to create the required tables, relationships, sample records, and verify the resulting components directly in the connected Dataverse environment.

FAQs

What are Dataverse skills for coding agents?
Dataverse skills are capabilities added to a coding agent such as GitHub Copilot that give it the knowledge to understand Dataverse concepts and perform development tasks like creating tables, columns, relationships, and data, all from natural language instructions.

Do I need to know Power Platform CLI to use this?
Basic familiarity helps for the initial setup and authentication steps, but once Dataverse skills are configured, you interact with the agent in natural language rather than writing CLI commands manually.

Is it safe to use a coding agent in a live Dataverse environment?
The agent includes an approval step before executing actions that affect Dataverse resources. It is still recommended to test in a development or sandbox environment before working with production data.

What kinds of Dataverse operations can the coding agent perform?
The agent can create and manage solutions, tables, columns, relationships, and sample data. It can also query the environment and answer business questions based on the data model it has built.

Can the coding agent replace a Dataverse developer entirely?
Not entirely, but it significantly reduces the time and effort required for common development tasks. Developers still need to review, approve, and validate the agent’s output to ensure it meets business requirements.

Does this work with any Dataverse environment?
Yes, as long as the environment is accessible via Power Platform CLI and the coding agent is authenticated against it using the standard pac auth create command.

What happens if the agent makes a mistake?
Because the agent requests approval before executing changes, you have the opportunity to review and reject any action that does not look right before it affects your environment.

The post Build Dataverse Solutions Faster with a Coding Agent in Dynamics 365 first appeared on Microsoft Dynamics 365 CRM Tips and Tricks.

  •  

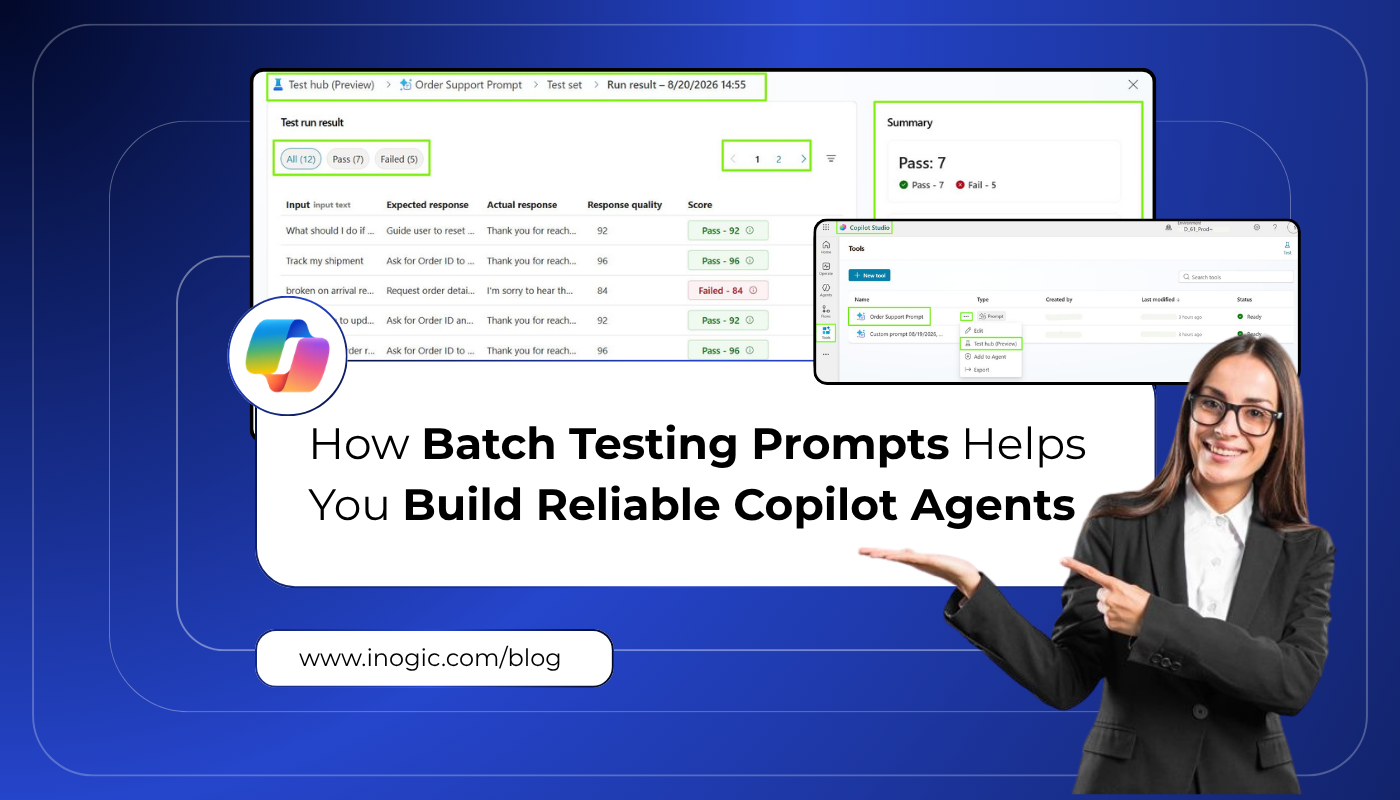
How Batch Testing Prompts Helps You Build Reliable Copilot Agents

How Batch Testing Prompts Helps You Build Reliable Copilot AgentsIn a retail e-commerce company, the team was building an AI customer support agent to handle common queries like order status, returns, refunds, and product information. In the beginning, the prompt was tested manually with a few sample questions, and everything seemed to work fine.
However, end users don’t type like QA testers. They use shortcuts, mix multiple questions into one sentence, include slang when frustrated, and often skip punctuation. A prompt that worked well in controlled testing started missing the intent in real scenarios, giving responses that felt robotic or incorrect. Instead of reducing support workload, this led to more confusion and increased escalations to human agents.

One of the biggest challenges was inconsistency in responses. Customers would ask similar questions in different ways, such as “Where is my order?” “Track my shipment”, or “Can you tell me my delivery status?”, but the agent would sometimes return different or inaccurate answers. In some cases, it failed to recognize the intent entirely and responded irrelevantly, which frustrated users.

Another issue was the unpredictability of user inputs. Real users often type informally, make typos, or use incomplete sentences. While the agent performed well with structured test queries, it struggled with these real-world variations. This gap between controlled testing and actual usage became very noticeable.

Scalability challenges in testing also emerged. Manually validating every variation of a question was time-consuming and inefficient. As the number of supported scenarios increased, it became nearly impossible to test everything, leading to gaps that only surfaced in production. To address this, batch testing for prompts was introduced. Real customer queries were collected from past chat logs and support tickets, including variations, unclear queries, and edge cases. Instead of testing individually, these were run in bulk and the responses analysed.

Key Takeaways

  • Manual testing doesn’t reflect real usage – controlled test questions rarely capture how end users actually type (typos, slang, mixed intents, no punctuation).
  • Inconsistent responses to similar questions are a major sign a prompt needs batch validation, not just spot-checking.
  • Scalability is the real bottleneck – as supported scenarios grow, manual testing becomes impractical and gaps only surface after going live.
  • Batch testing uses real data – pulling actual queries from chat logs and support tickets surfaces edge cases that hand-written test questions miss.

This approach helped quickly identify where the agent was failing, whether in understanding intent, selecting the correct response, or handling variations. Based on these insights, the prompts were refined, intent handling was improved, and responses became more consistent. After these improvements, the agent started delivering more accurate and reliable answers. It also reduced manual testing effort and made it easier to validate future updates. Overall, this approach helped build a more stable and user-friendly experience that better aligned with real customer behaviour.

Step-by-Step: Enable & Use Batch Testing Prompts

Steps to define the Test Cases

  1. Sign in to Copilot Studio , Power apps , Power automate any one of this so here we trying from copilot studio.
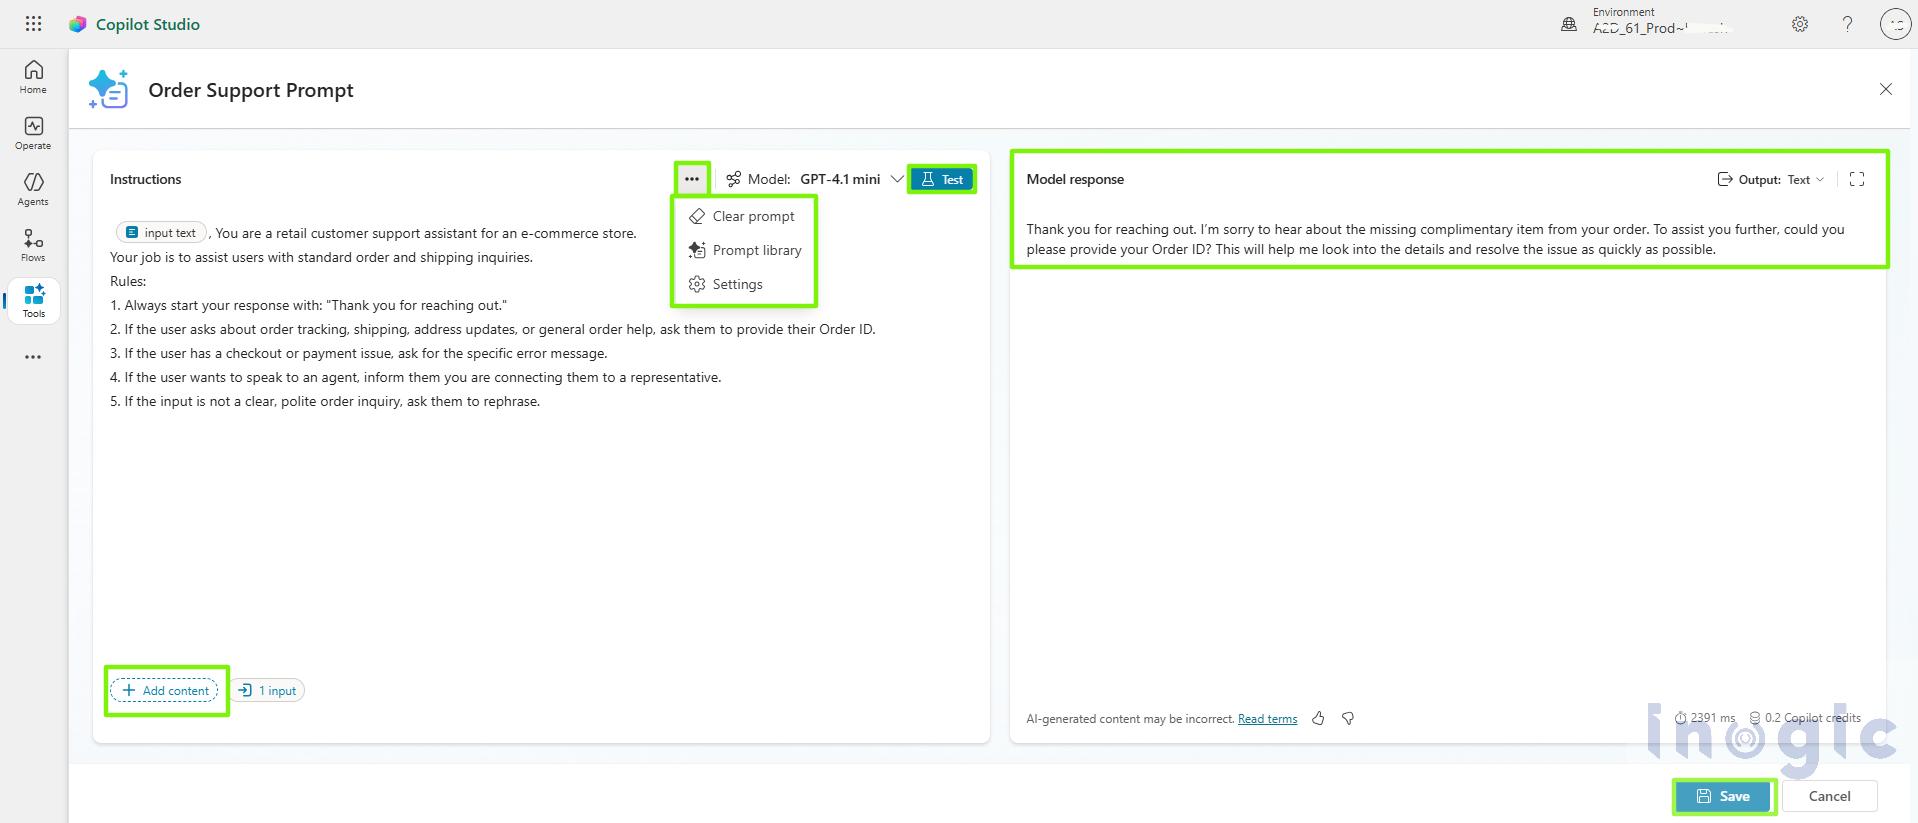
  2. Create the Tool then with instructions add the prompt, you can see there are many simple ways to create prompt you can choose according to your business need. Shown in below screenshot.

How Batch Testing Prompts Helps You Build Reliable Copilot Agents

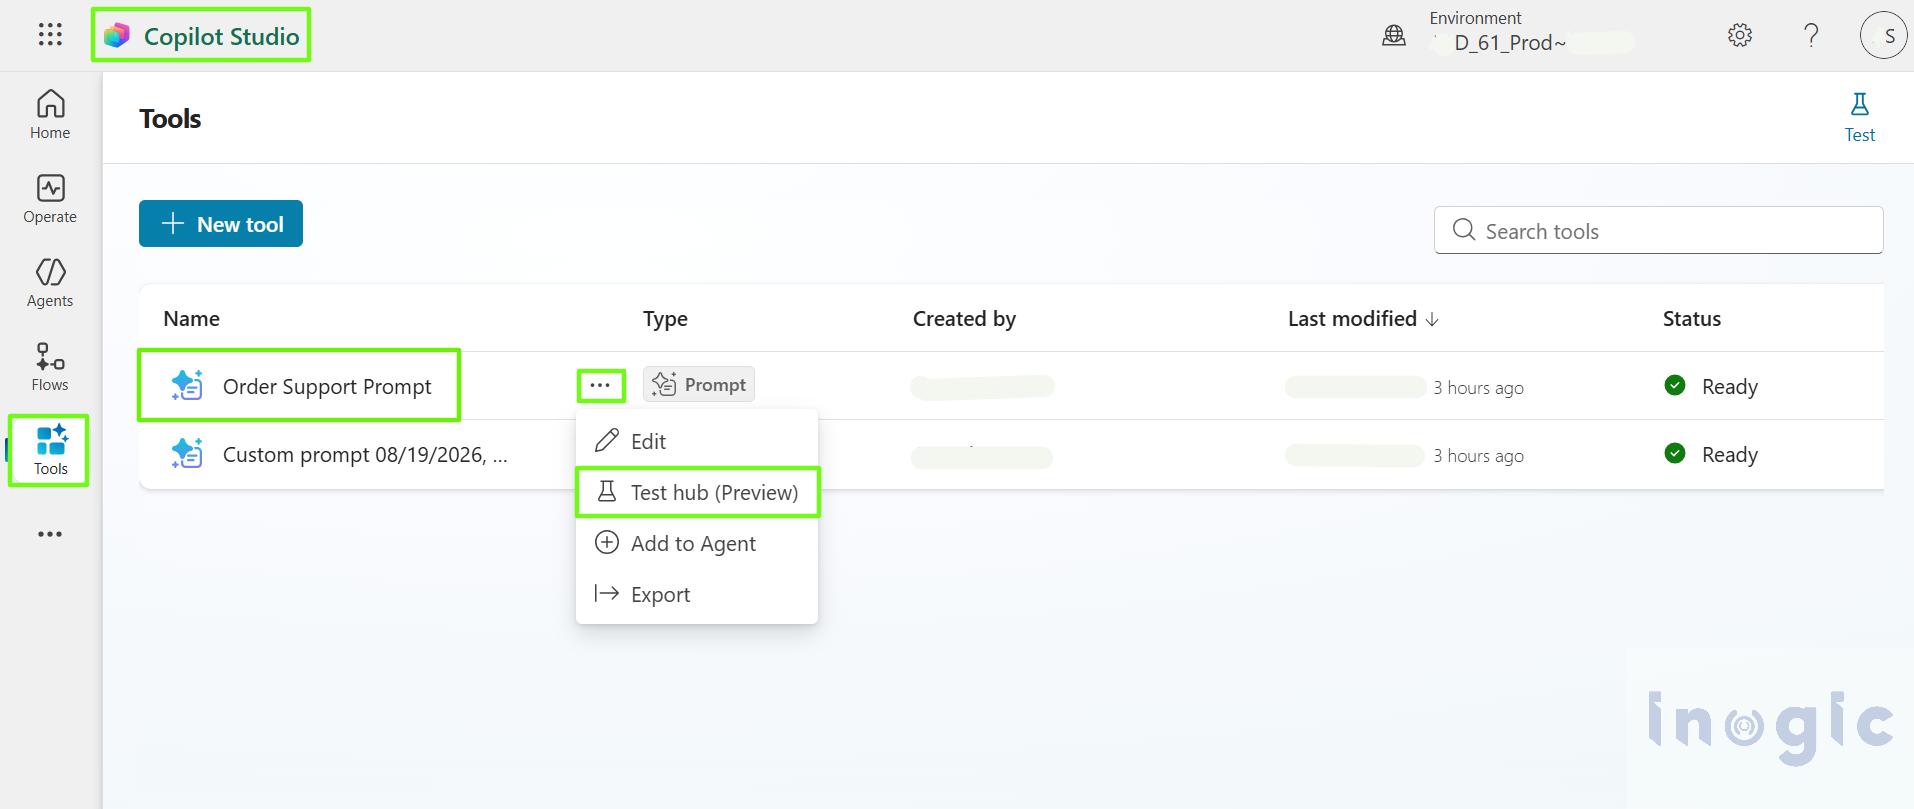
  1. In Copilot Studio, go to Tools and select your prompts.
  2. Locate the prompt you want to test, then click on the three-dot menu or ellipses (…) next to it.
  3. Now you can see, Test hub (Preview)
  4. Below is an example screenshot view of how the Tools section visible in Copilot Studio.

How Batch Testing Prompts Helps You Build Reliable Copilot Agents

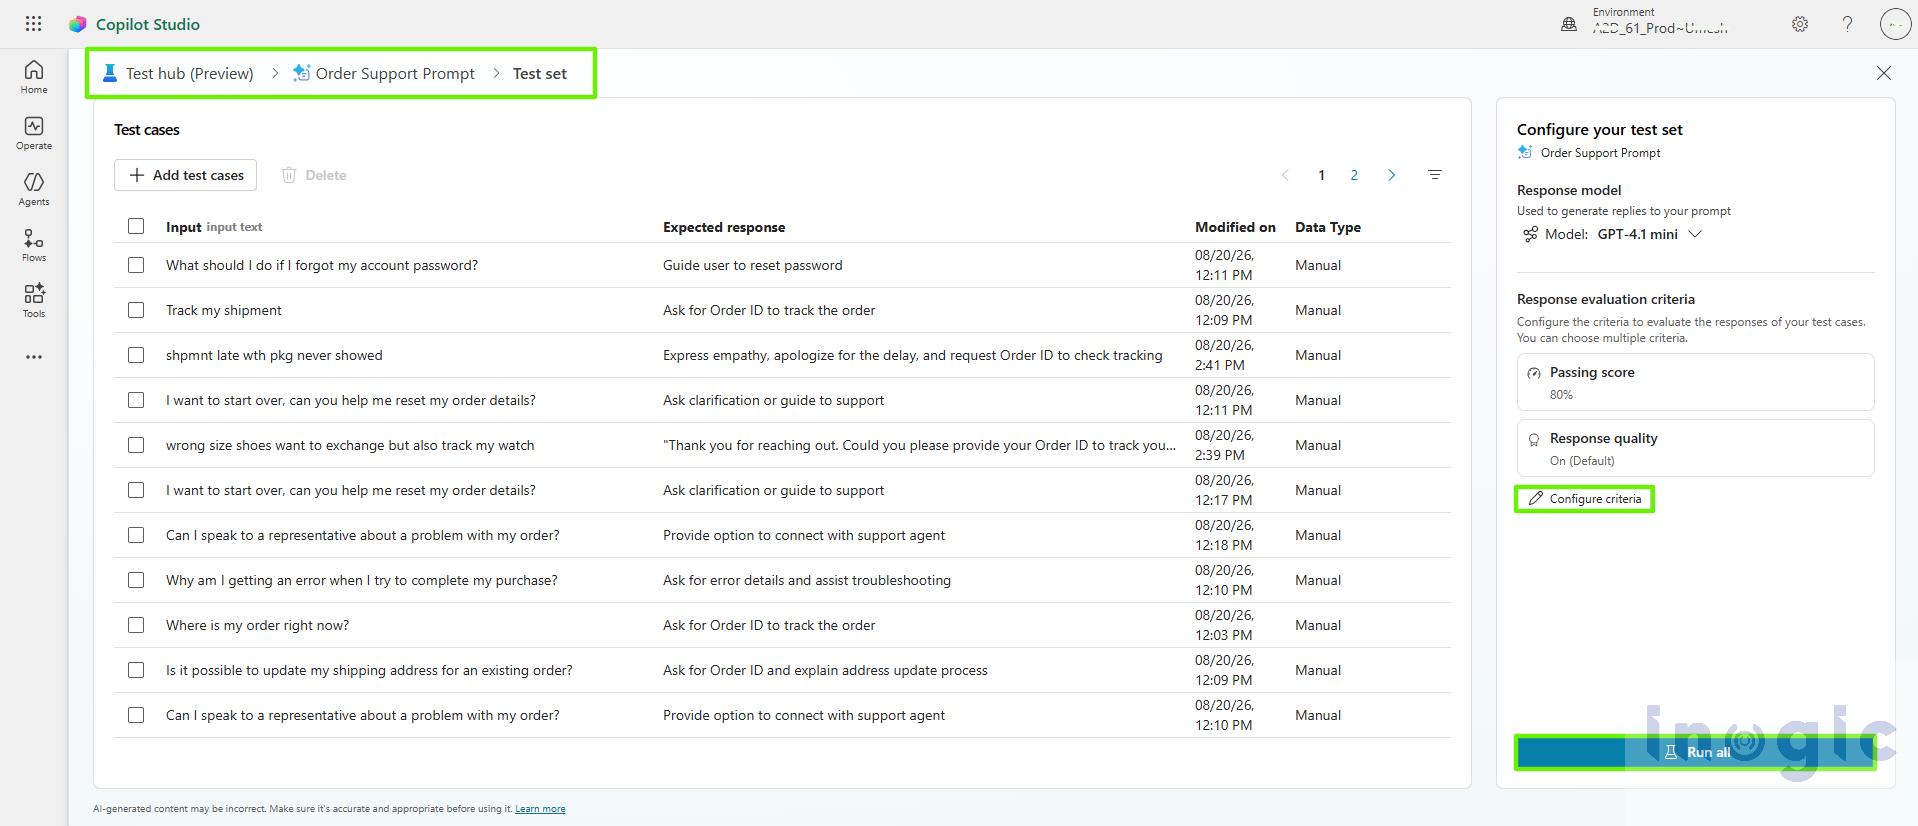
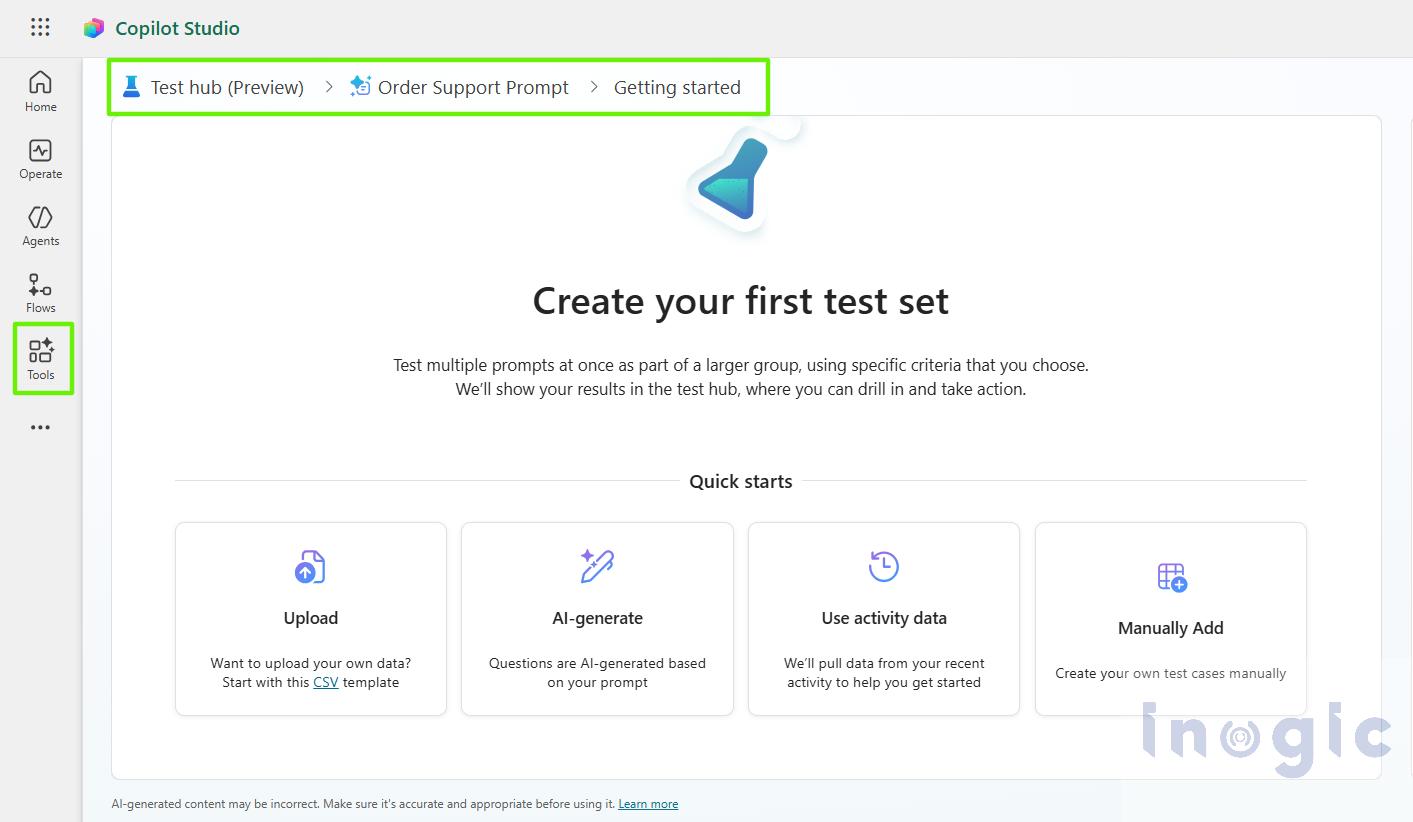
When you click on test hub in below screenshot you can see the view and options test hub provide for test cases.

How Batch Testing Prompts Helps You Build Reliable Copilot Agents
Prepare Your Test Cases or test set

You can simply create a list of test cases or prompts

Example:

  • Where is my order?
  • Track my shipment
  • Order status please
  • I didn’t receive my package
  • Refund for my order
  • wrong size shoes want to exchange but also track my watch

Include:

  • Different variations of same question
  • Real user queries from chat logs.
  • Edge cases typos, short queries, unclear questions.

So, there are some ways to create the test cases like, Upload test case, generate test cases, use activity data and in below screenshot you can see the test cases which was manually written or added.

How Batch Testing Prompts Helps You Build Reliable Copilot Agents

When you have done with your set of test cases then,

Run Batch Test

  • Click Run to Execute all the test cases at once.
  • System will process all prompts at once

How Batch Testing Prompts Helps You Build Reliable Copilot Agents

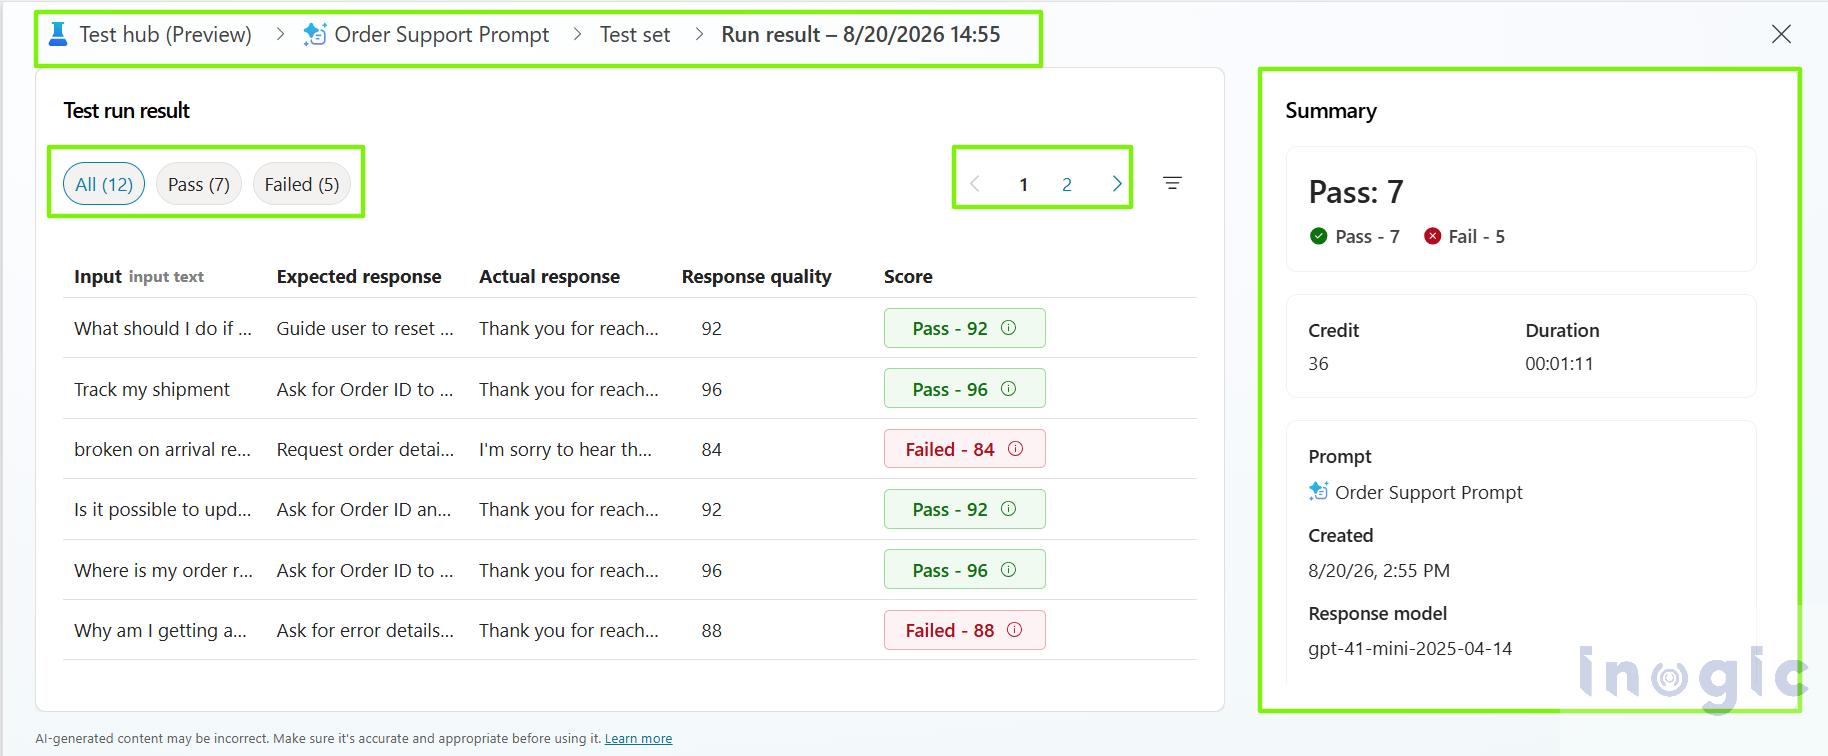
Analyze Results

  • You can see the result of each your test case
  • Success / failure results
  • Incorrect or irrelevant answers
  • Wrong intent detection
  • Missing responses
  • Inconsistent answers

How Batch Testing Prompts Helps You Build Reliable Copilot Agents

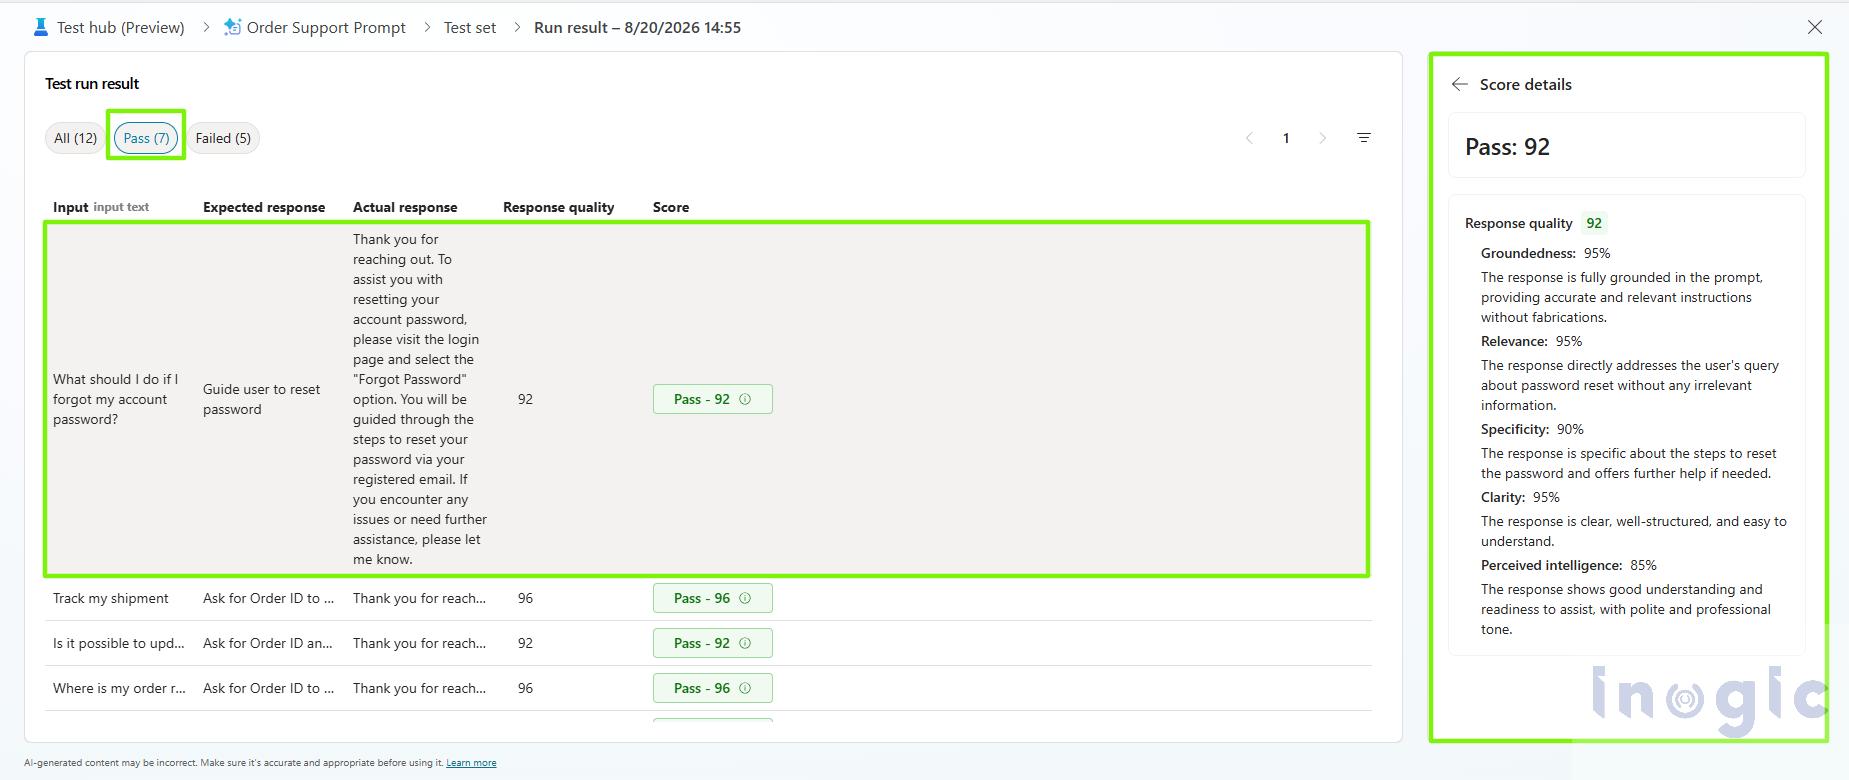
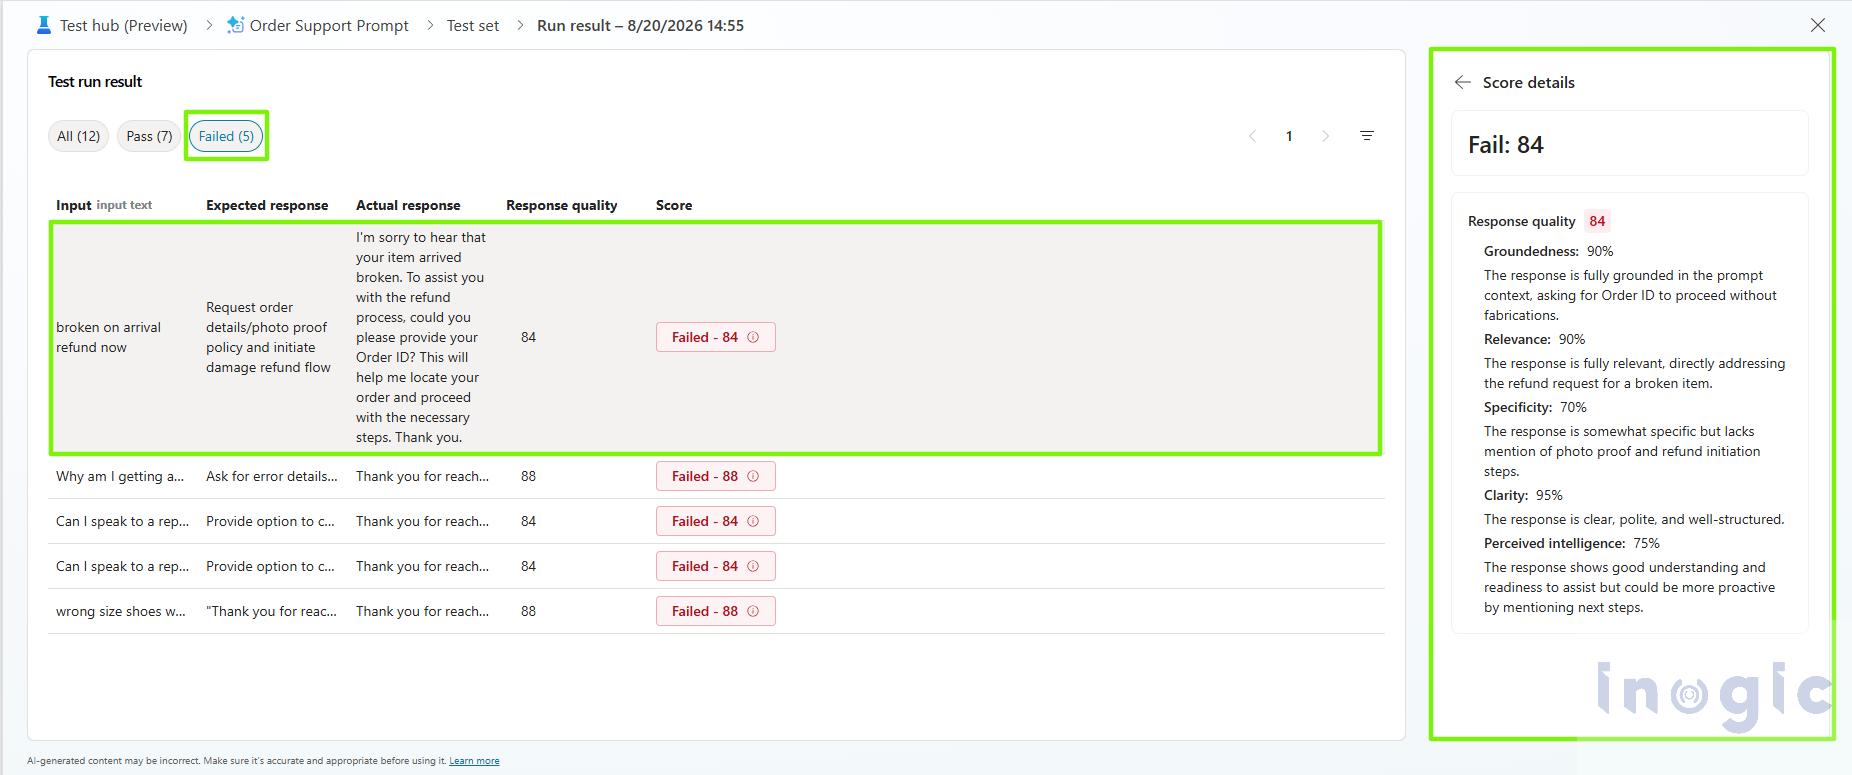
If your test cases are failing it will give detailed summary of search result (As shown in below screenshot) to you from that you can Improve Your Bot

Based on results:

  • Rewrite, rephrase your prompts
  • Improved your instructions, you can use prompt library which is inbuilt and AI summarized.
  • Update knowledge sources in prompts.
  • Also, you can easily add your missing scenarios after the run execute as well.

How Batch Testing Prompts Helps You Build Reliable Copilot Agents

You can Re-Run again after changes Compare results → check there is any improvement or not.

Conclusion

Batch testing prompts in Microsoft Copilot Studio makes bot testing faster, smarter, and more reliable. Instead of checking a few queries manually, it allows us to validate real-world user scenarios at scale and quickly identify gaps in responses in a single click.

It helps ensure consistency, improves accuracy, and reduces the chances of unexpected behavior once the bot is live. Over time, it becomes an essential part of maintaining quality and continuously improving the chatbot experience, making it more dependable and aligned with real user needs.

FAQs

  1. What is batch testing in Copilot Studio?
    Batch testing lets you run multiple test cases or prompts at once instead of validating them one at a time, so you can quickly see how your Copilot agent handles a wide range of real user queries.
  2. Why isn’t manual prompt testing enough?
    Manual testing typically uses a small, controlled set of sample questions. Real users type differently, with typos, slang, mixed intents, and incomplete sentences, so a prompt that passes manual testing can still fail in production.
  3. Where do test cases come from?
    Test cases can be manually written, uploaded, generated automatically, or pulled from real activity data such as past chat logs and support tickets.
  4. What kind of issues does batch testing catch?
    It surfaces incorrect or irrelevant answers, wrong intent detection, missing responses, and inconsistent answers across similarly worded queries.

The post How Batch Testing Prompts Helps You Build Reliable Copilot Agents first appeared on Microsoft Dynamics 365 CRM Tips and Tricks.

  •  

Your Existing Consent Data Shouldn’t Have to Start From Zero

Your Existing Consent Data Shouldn't Have to Start From Zero

When organizations move to Customer Insights – Journeys, one question often comes up immediately: what happens to the consent preferences we already have?

Your contacts and leads may already contain years of email preferences through fields such as Email and Bulk Email. Asking every existing customer to provide consent again is not only unnecessary, but it can also create friction and potentially leave you with incomplete consent data.

The challenge is that real-time journeys use a different consent model. They rely on contact point consent records linked to compliance profiles and purposes, rather than treating the legacy consent fields on contact or lead records as the source of truth.

This is where the Load Consent feature in Customer Insights – Journeys becomes useful.

Load Consent helps organizations migrate existing consent preferences from contacts, leads, or legacy subscription lists into the new consent framework in bulk. Instead of manually recreating consent records or launching another opt-in campaign, you can use the consent data you already have to establish a compliant foundation for your real-time journeys.

In this blog, we’ll look at how Load Consent works, what it reads from your existing records, and how you can use it to migrate consent data into Customer Insights – Journeys.

Why Existing Consent Data Must Be Migrated to Customer Insights – Journeys

Real-time journeys do not use the legacy Email and Bulk Email preference fields as their primary consent source by default. They rely on contact point consent records tied to compliance profiles and purposes. For more details on compliance and the consent center, refer to our previous Blog.

That is a fundamentally different model from the legacy Bulk Email flag, which used to act as a single source of truth on the contact record itself. If you skip the consent migration step, you risk creating a gap between your historical consent data and your new real-time journey configuration. Contacts may be unable to receive communications because no contact point consent records exist, while historical opt-outs may not be reflected correctly in the new consent model.

What Load Consent Actually Does

Suppose your organization is setting up real-time journeys for the first time and wants marketing emails to respect the Bulk Email preferences already recorded on your contacts, rather than starting consent collection from zero.

At a high level, Load Consent reads existing consent signals from contacts or leads and converts them into contact point consent records against a compliance profile and purpose you choose. It’s a one-time (or repeatable) bulk operation, not a live sync, so it’s a migration tool, not an ongoing integration.

A few mechanics worth understanding before you run it:

  • It only pulls from the single email field configured in your audience settings, not every email field on the record. For more details, you can refer to this doc.
  • It evaluates both the Bulk Email and Email flags together. Either one set to “Do Not Allow” is enough to opt the contact point out.
  • When multiple contacts or leads share the same email address, the tool won’t opt that address in unless every linked record agrees: one holdout sets the whole address to opted out.
  • It can also generate tracking consent records from the contact’s tracking preference (leads don’t carry a tracking field, so this only applies to contacts).

Prerequisites

Before running Load Consent, make sure the following are in place:

Access & permissions

  • Read access to contact and lead records
  • Create and update permissions on contact point consent records

Setup

  • A compliance profile with the purposes already created, since Load Consent needs somewhere to write the records to
  • The audience configuration email field correctly set, since this determines which email address gets loaded
  • If you operate across multiple business units, a plan to run Load Consent separately for each business unit/compliance profile combination

A quick note on the “Do Not Allow” dropdown fields: both contacts and leads carry two separate two-value fields that Load Consent reads directly, Do Not Allow Emails (schema name: donotemail) and Do Not Allow Bulk Emails (schema name: donotbulkemail). Each one is a simple option set of Allow or Do Not Allow, with no in-between “not set” state, which is exactly why a single field flipped to Do Not Allow is enough to opt a contact point out when the load runs.

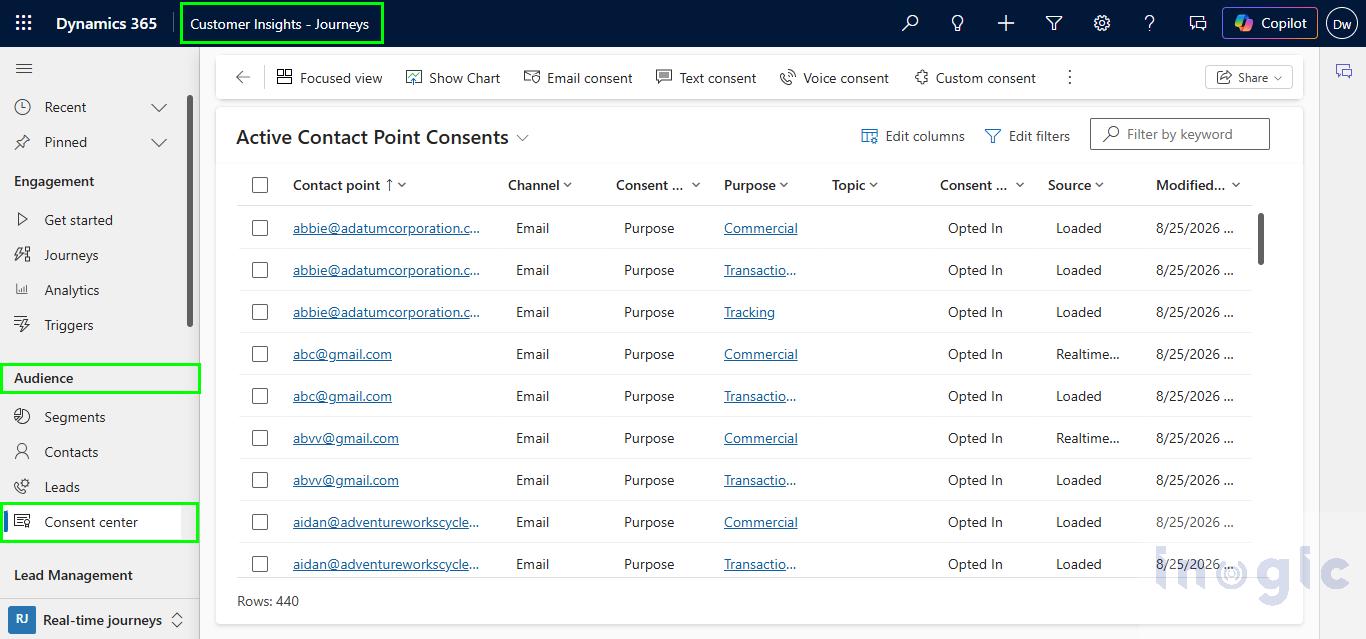
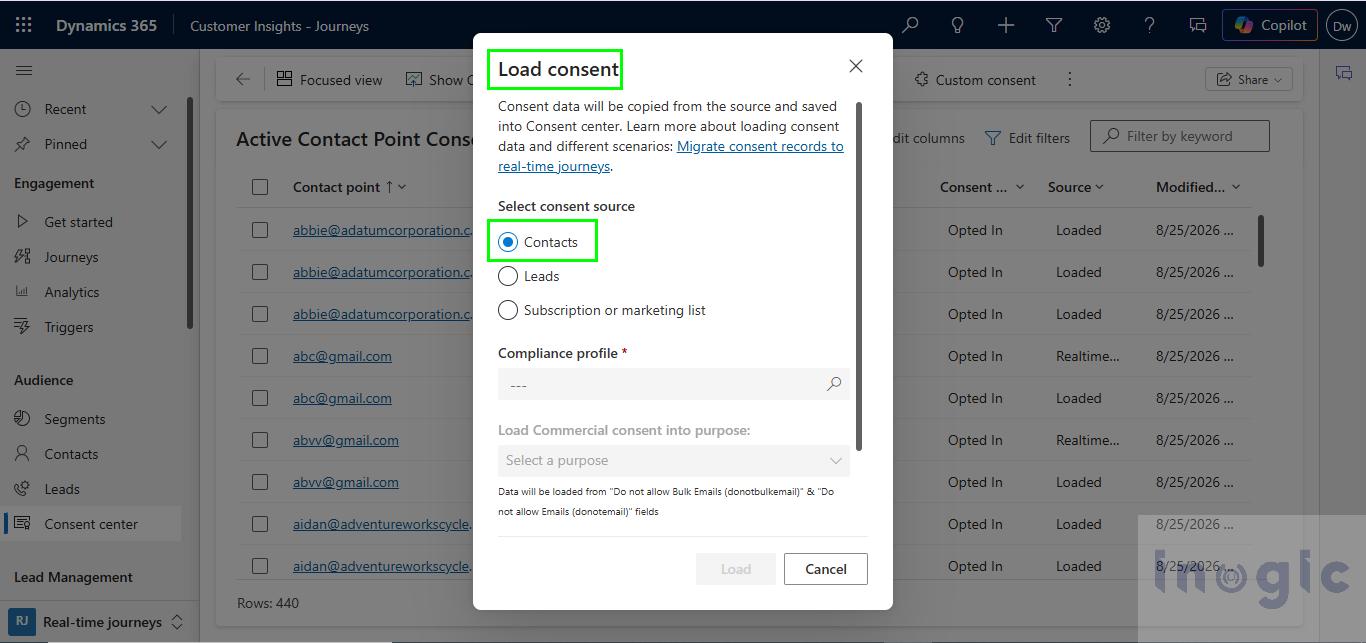
How to Load Consent:  Navigate to the Consent Center. Go to Customer Insights – Journeys > Audience > Consent Center.

Your Existing Consent Data Shouldn't Have to Start From Zero

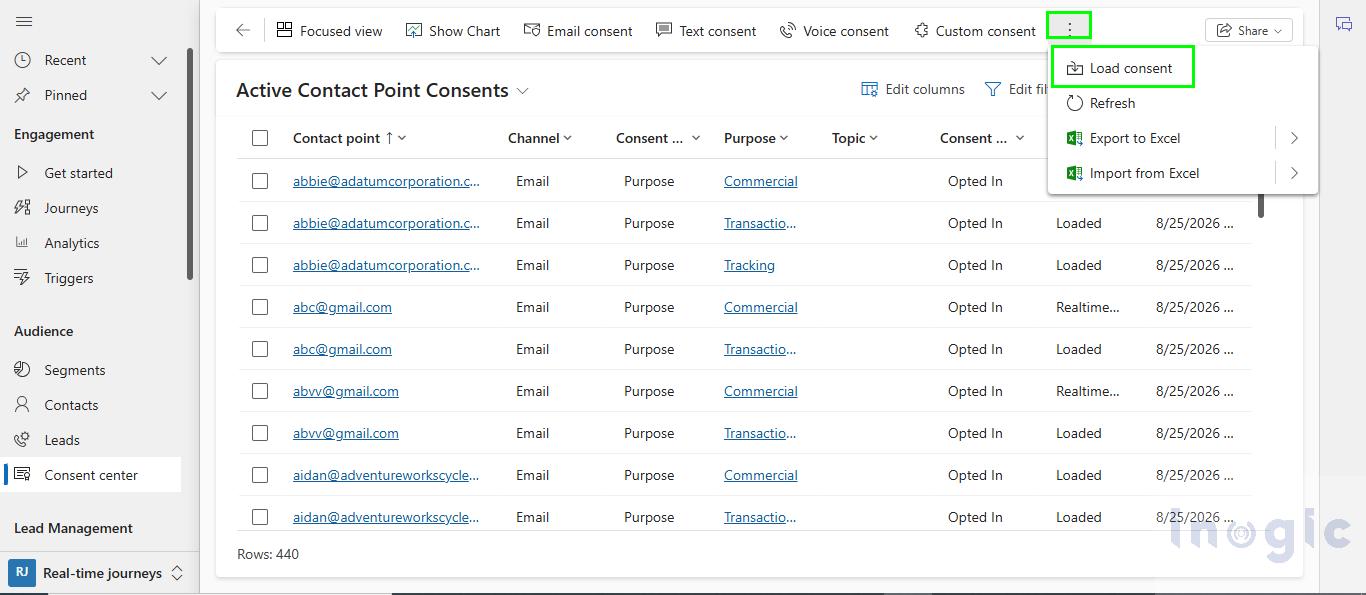
Click the Load consent button from the ribbon bar as below:

Your Existing Consent Data Shouldn't Have to Start From Zero

Choose your source: Decide whether you’re loading from contacts, leads, or a legacy subscription list. In this blog, let us use contacts as the consent source.

Note: You’ll also see Subscription list as a selectable source alongside contacts and leads. That’s because subscription lists were how the legacy Outbound Marketing app tracked consent. Since Outbound Marketing is being retired, Load Consent lets you pull that legacy list data directly into Customer Insights – Journeys.

Your Existing Consent Data Shouldn't Have to Start From Zero

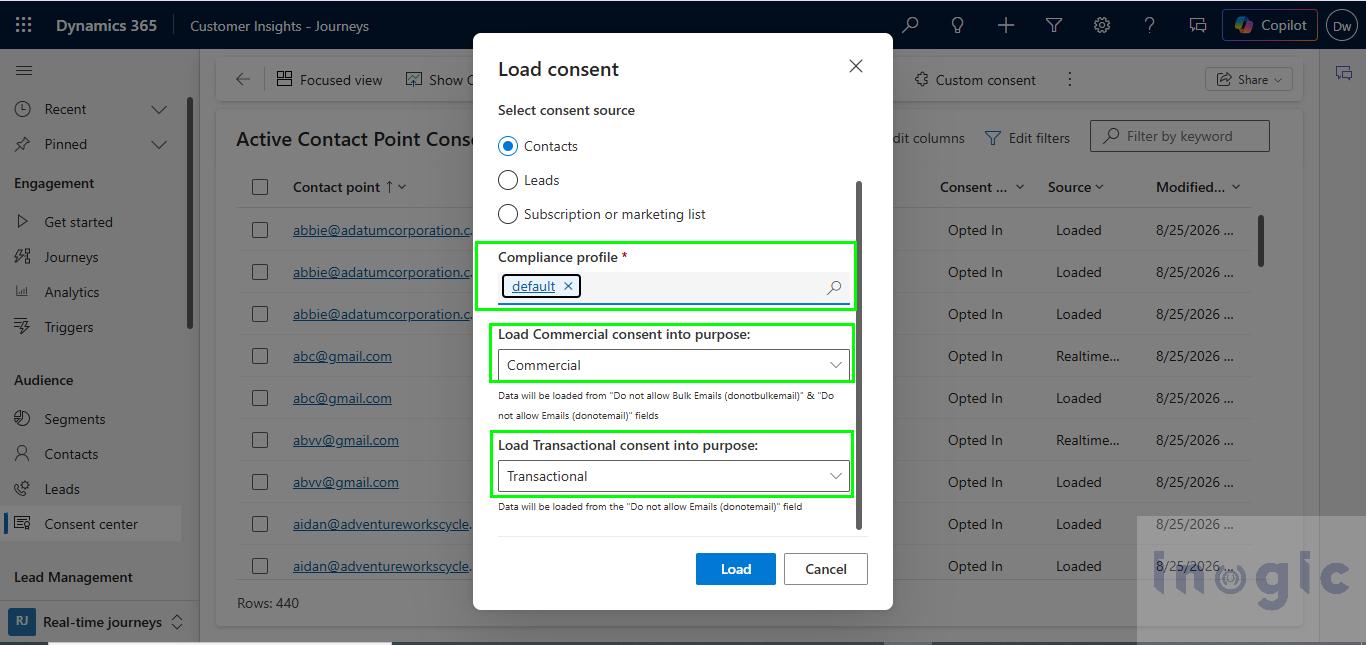
Select the destination compliance profile and purpose. Pick the compliance profile you want the consent records created under (usually a profile that already has a preference center attached) and the specific purpose. Here we will be using the preexisting Default Compliance profile

Your Existing Consent Data Shouldn't Have to Start From Zero

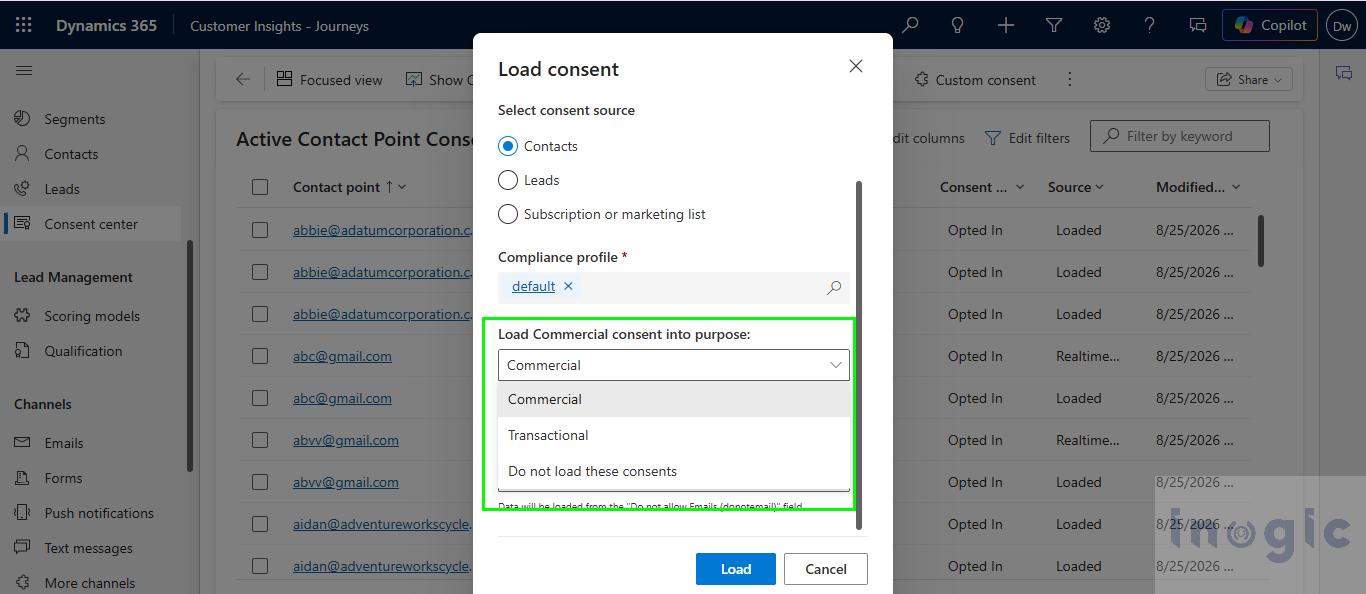
Map the fields: Confirm which purpose reflects Bulk Email (commercial communications) and which reflects Email (transactional).

A quick note on the “Do Not Allow” dropdown fields: both contacts and leads carry two separate two-value fields that Load Consent reads directly, Do Not Allow Emails (schema name donotemail) and Do Not Allow Bulk Emails (schema name donotbulkemail). Each one is a simple option set of Allow or Do Not Allow, with no in-between “not set” state, which is exactly why a single field flipped to Do Not Allow is enough to opt a contact point out when the load runs.

Your Existing Consent Data Shouldn't Have to Start From Zero

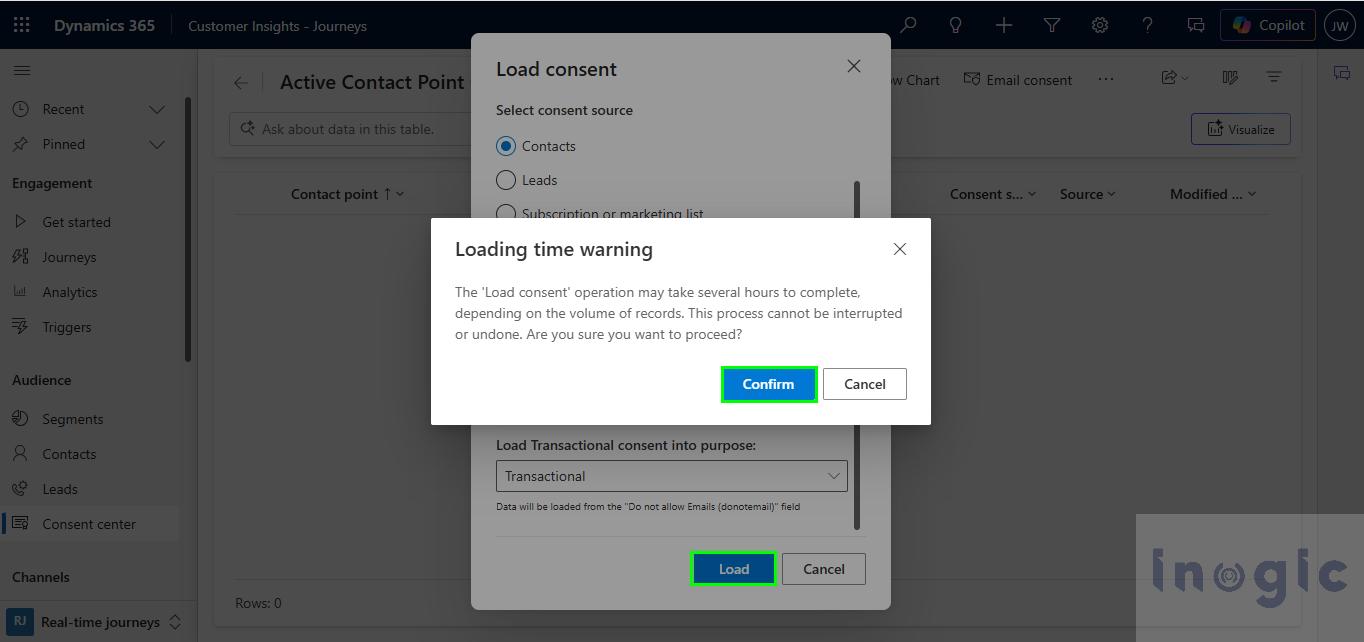
Run the load: The system evaluates each record against the rules above and creates or updates the corresponding contact point consent records.

Your Existing Consent Data Shouldn't Have to Start From Zero

Verify the results: Spot-check a sample of contacts, particularly ones with duplicate records sharing an email address, to confirm the resulting consent status matches what you expect. The bulk contact point consent records were loaded as shown below:

Your Existing Consent Data Shouldn't Have to Start From Zero

Before using this feature directly on production, consider the Do and Don’t mentioned below:

Do:

  • Export your existing consent data to Excel before running any data restore. A restore reverts consent records to their backup-time state, and you’ll want a reference copy
  • Double-check which purpose you’re mapping Bulk Email vs. Email into: typically, Commercial and Transactional respectively, but confirm against your own compliance profile naming
  • Run a small test batch first if you have a large volume of duplicate email addresses, so you can validate the opted-in/opted-out outcome before committing broadly

Don’t:

  • Don’t expect Load Consent to pick up consent stored in a custom field. If your organization tracks consent somewhere other than Allow Bulk Email, you’ll need Import from Excel instead. Audience configuration won’t help here either. It only lets you choose which email address field is read, not which consent field is read, so a custom consent field is invisible to Load Consent regardless of how audience configuration is set up.
  • Don’t treat this as a live sync. It won’t automatically pick up future changes to contact or lead fields
  • Don’t assume it applies to any data source beyond contacts, leads, and legacy subscription lists. There’s no support for pulling consent from anywhere else, and subscription lists are a legacy Outbound Marketing concept: you can’t create new ones in real-time journeys, only migrate the ones you already have

Conclusion

Migrating to Customer Insights – Journeys does not mean you have to rebuild your consent data from scratch.

The Load Consent feature helps organizations bring existing consent preferences from contacts, leads, and legacy subscription lists into the contact point consent model used by real-time journeys. This allows you to preserve historical opt-ins and opt-outs while establishing the compliance structure required for future communications.

However, Load Consent should be treated as a data migration process, not an ongoing synchronization mechanism. Before running it in production, make sure your compliance profiles, purposes, audience configuration, and consent preferences are correctly configured. Testing with a smaller data set can also help identify issues involving shared email addresses or incorrect consent mappings.

Once the consent data has been successfully loaded and verified, your organization can begin using Customer Insights – Journeys with a stronger and more reliable compliance foundation.

The key takeaway is simple: your existing consent history still has value. Load Consent helps you carry that history forward instead of asking your customers to start over.

Frequently Asked Questions

1. What is the Load Consent feature in Customer Insights – Journeys?

Load Consent is a built-in feature in Customer Insights – Journeys that helps migrate existing consent preferences from contacts, leads, or legacy subscription lists into contact point consent records. These records can then be used with compliance profiles and purposes in real-time journeys.

2. Does Load Consent automatically synchronize future consent changes?

No. Load Consent is a bulk migration process and not a live synchronization feature. If consent preferences change on a contact or lead record after the load has been completed, those changes are not automatically reflected in the contact point consent records.

3. Which consent fields does Load Consent use?

For contacts and leads, Load Consent evaluates the legacy Do Not Allow Email and Do Not Allow Bulk Email preferences. The configured audience email field determines which email address is used when creating the contact point consent records.

4. Can Load Consent migrate consent stored in custom fields?

No. Load Consent does not read consent values from custom consent fields. If your organization stores consent information in custom fields or another external data source, you may need to use an alternative approach, such as importing consent data from Excel.

5. What happens when multiple contacts have the same email address?

When multiple records share the same email address, Load Consent evaluates the consent status associated with that shared contact point. If one of the linked records indicates that email communication is not allowed, the resulting consent outcome can affect the shared email address.

6. Can Load Consent be used for leads as well as contacts?

Yes. Load Consent supports contacts and leads as consent sources. It can also be used to migrate consent information from legacy subscription lists created for Outbound Marketing.

7. Do I need a compliance profile before running Load Consent?

Yes. You should have the required compliance profile and purposes configured before running Load Consent because the feature needs a destination for the contact point consent records it creates or updates.

8. Should I test Load Consent before running it in production?

Yes. It is recommended to test the process with a smaller data set first, especially if your environment contains duplicate records or multiple contacts sharing the same email address. This helps verify that the resulting consent records match your expected outcomes.

The post Your Existing Consent Data Shouldn’t Have to Start From Zero first appeared on Microsoft Dynamics 365 CRM Tips and Tricks.

  •  

Power Platform Inventory: Simplify Power Platform Governance and Resource Management

Power Platform Inventory: Simplify Power Platform Governance and Resource Management

As organizations increasingly adopt Microsoft Power Platform, managing hundreds of apps, flows, agents, environments, and connectors can become challenging. Administrators need a simple way to understand what resources exist, who owns them, which environments they belong to, and what connectors they depend on.

To address this challenge, Microsoft provides Power Platform Inventory in the Power Platform admin center. It offers a centralized view of Power Platform resources and helps administrators search, filter, analyze, and manage resources across the organization.

What is Power Platform Inventory?

Power Platform Inventory provides administrators with a centralized inventory of Power Platform resources, including:

  • Power Apps
  • Power Automate cloud flows and agent flows
  • Copilot Studio agents
  • Environments and environment groups
  • Connectors and connector operations

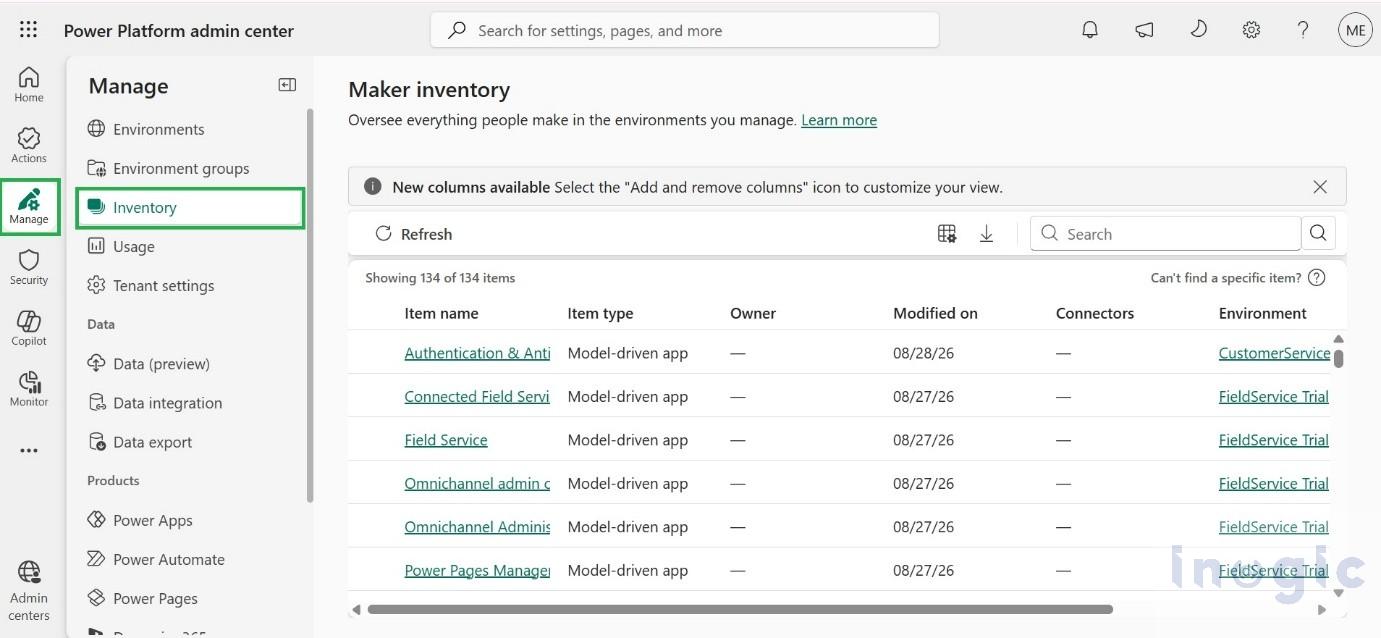
Administrators can access it from Power Platform admin center → Manage → Inventory. Microsoft also provides programmatic access through the Power Platform for Admins V2 connector, Power Platform APIs, and Azure Resource Graph.

Power Platform Inventory Simplify Power Platform Governance and Resource Management

Customize the Inventory with Add or Remove Columns

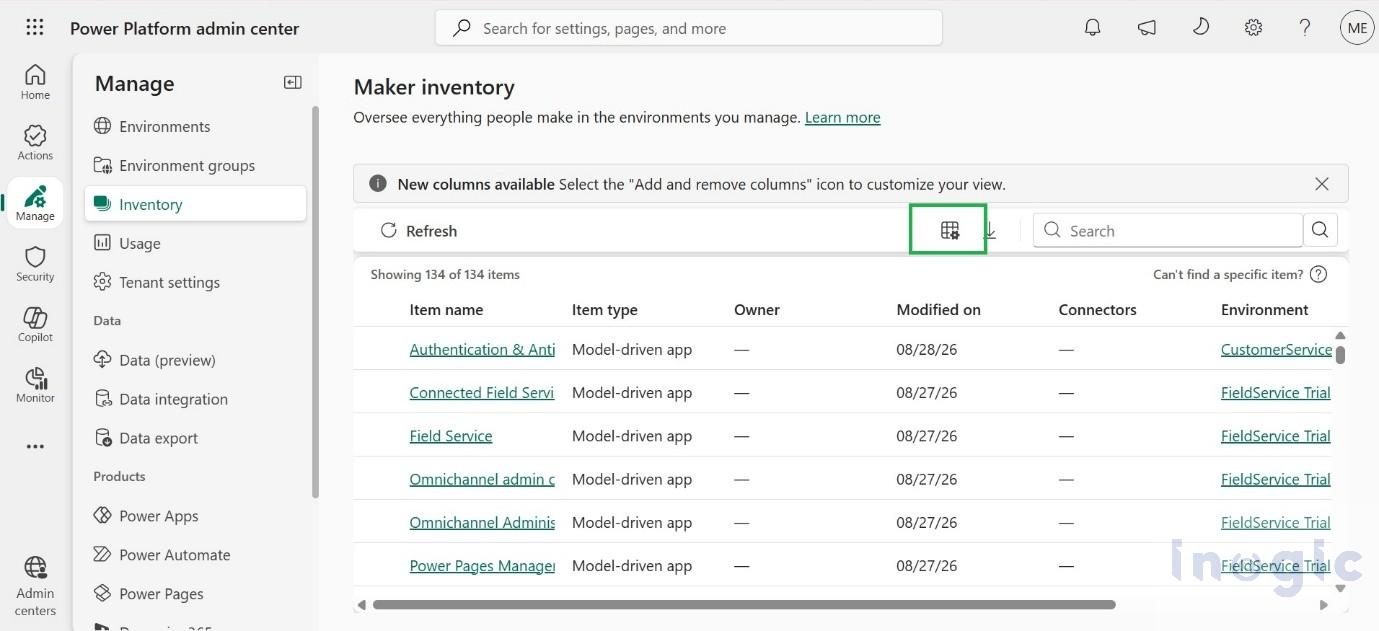
One useful capability in the Inventory experience is Add or remove columns.

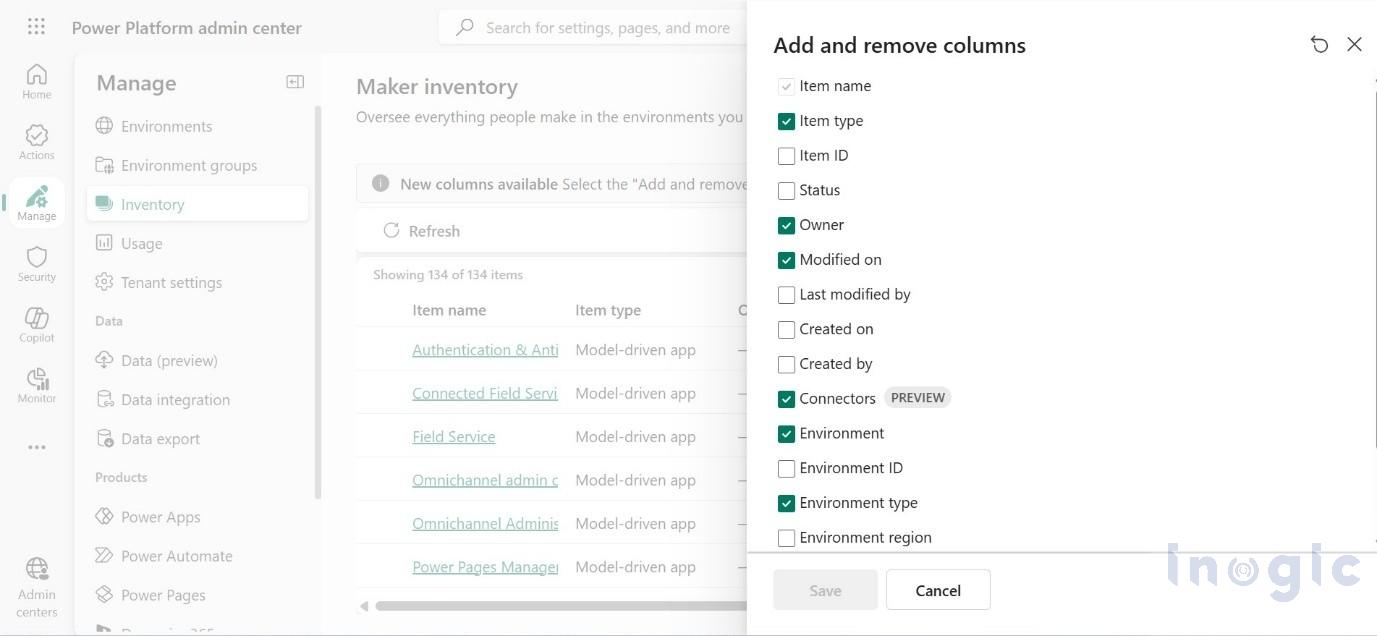
Administrators can customize the inventory grid by selecting the information they need for a particular task. For example, when investigating connector dependencies, administrators can add the Connectors column to identify resources using specific connectors.

This makes it easier to focus on relevant information without displaying unnecessary columns.

Power Platform Inventory Simplify Power Platform Governance and Resource Management

Power Platform Inventory Simplify Power Platform Governance and Resource Management

 After selecting the required columns, the inventory grid displays the customized view.

This flexibility can be especially useful during governance reviews, security assessments, and dependency analysis. 

View Resource Details

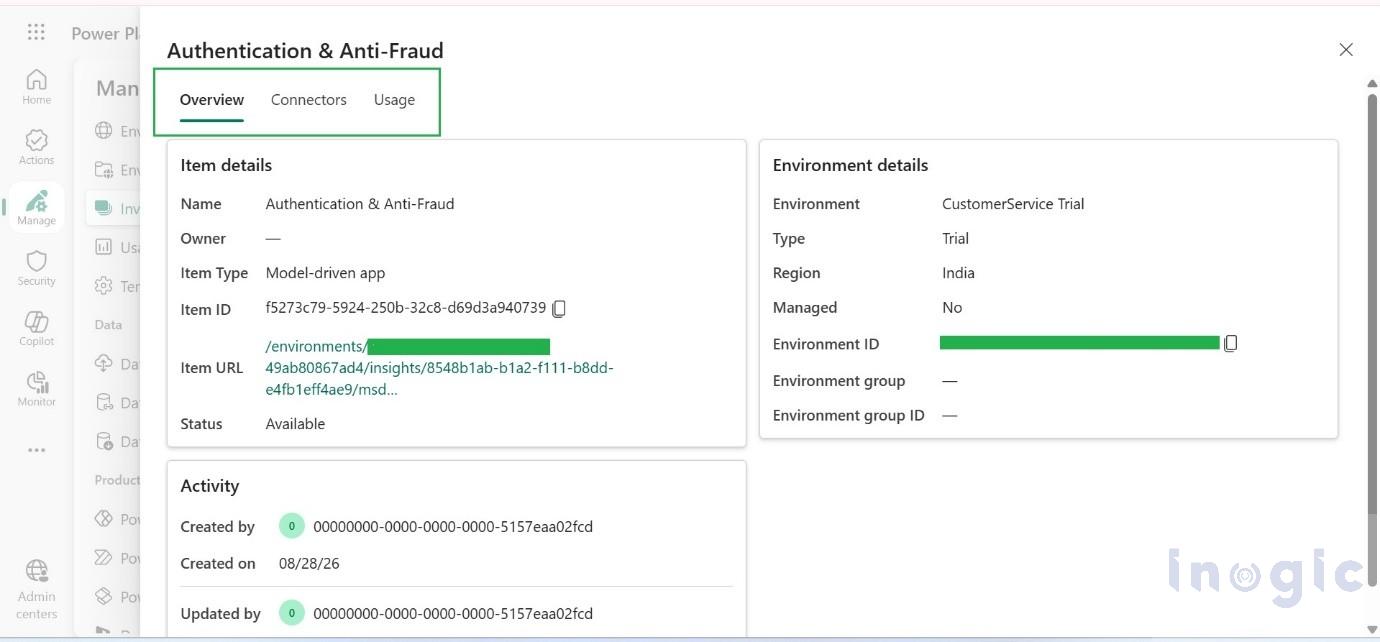
Administrators can select a resource from the inventory to view more detailed information.

The resource details provide information through areas such as:

  • Overview
  • Connectors
  • Usage

This allows administrators to move from a high-level inventory view to detailed information about a specific app, flow, or agent

Power Platform Inventory Simplify Power Platform Governance and Resource Management

Why is Power Platform Inventory Useful?

Power Platform Inventory can help organizations with several common administration and governance activities, including:

  • Understanding the organization’s Power Platform footprint
  • Identifying resource owners
  • Investigating connector usage
  • Supporting DLP and security reviews
  • Identifying resources affected by connector changes
  • Supporting licensing analysis
  • Troubleshooting apps and flows
  • Exporting inventory information for reporting and audits

The connector inventory capability is currently available in Preview and provides dependency information for supported Power Platform resources.

Business Use Case: Managing Connector Retirement

Consider an organization that uses Power Platform extensively across different departments. Over time, multiple Power Apps, Power Automate flows, and agents have been created using a particular connector.

Now, that connector is scheduled for retirement.

The IT team needs to determine:

Which Power Platform resources are using this connector, and which business processes could be affected?

Without centralized visibility, administrators may have to investigate individual apps and flows manually. Power Platform Inventory can simplify this process.

Step 1: Identify Affected Resources

The administrator reviews the Connectors information in the inventory and identifies the apps, flows, and agents that use the connector.

For example, the organization may discover that a customer approval app, an invoice processing flow, and a service notification flow all depend on the retiring connector.

Step 2: Assess Business Impact

The IT team can then work with the respective resource owners to understand the importance of each solution.

For example, if the invoice processing flow is responsible for automating a critical finance process, it should receive a higher priority for remediation.

Step 3: Plan Remediation

Once the affected resources have been identified and prioritized, the organization can plan to migrate them to a replacement connector, API, or another supported integration method.

The overall process becomes:

Identify → Assess → Remediate → Validate

This proactive approach can help reduce unexpected automation failures and maintain business continuity when connectors are retired or changed.

Export and Automate Inventory Data

Administrators can also export inventory information to CSV for governance reports, audits, and further analysis.

For organizations that want to automate governance activities, inventory data can be accessed programmatically using:

  • Power Platform for Admins V2 connector
  • Power Platform API
  • Azure Resource Graph

This enables organizations to build custom reports and automated governance processes around their Power Platform environment.

Conclusion

Power Platform Inventory provides organizations with a centralized view of apps, flows, agents, environments, and connectors. It simplifies resource management, governance, and dependency analysis, especially when connectors are retired or changed. By identifying affected resources early, organizations can prioritize remediation and reduce business disruption.

FAQs

What is Power Platform Inventory?
Power Platform Inventory provides a centralized view of apps, flows, agents, environments, and connectors across an organization.

Where can administrators access Power Platform Inventory?
It is available in the Power Platform admin center under Manage → Inventory.

How does Power Platform Inventory support governance?
It helps administrators identify resource owners, review connector usage, analyze dependencies, and support security and compliance activities.

Can Power Platform Inventory help when a connector is retired?
Yes. Administrators can identify affected apps, flows, and agents and plan remediation before business processes are disrupted.

Can Power Platform Inventory data be exported or automated?
Yes. Inventory data can be exported to CSV and accessed programmatically for reporting and automated governance processes.

The post Power Platform Inventory: Simplify Power Platform Governance and Resource Management first appeared on Microsoft Dynamics 365 CRM Tips and Tricks.

  •  

Setting Up Event Waitlists in Dynamics 365 Customer Insights – Journeys

Setting Up Event Waitlists in Dynamics 365 Customer Insights - JourneysManaging a full-capacity event can get tricky when cancellations leave seats open and new registrants have nowhere to go. Dynamics 365 Customer Insights – Journeys simplifies this with its native event waitlist capability, allowing marketers to manage capacity, queue new registrants, and automatically fill available seats. This blog walks through how to set up and manage a waitlist for a single-session webinar.
Why It Matters

Marketing events are judged on turnout, and turnout is judged against capacity. A webinar platform license, a guest speaker’s time, or a virtual room’s bandwidth all have a ceiling — and every empty seat at that ceiling is wasted spend. Before this feature, closing a full registration list meant either turning latecomers away entirely or manually chasing down replacements every time someone cancelled, usually in a spreadsheet parked outside the CRM. Which is a real pain for the Marketing Team.

Waitlisting solves this in two ways. First, it keeps demand visible instead of discarding it — everyone who wanted in after capacity was reached becomes a tracked, Waitlist record created rather than a bounce. Second, it automates the backfill, so a cancellation on Tuesday can be replaced with a confirmed registrant by Wednesday without an event coordinator manually working the list.

What the Feature Does

At its core, the feature lets you attach a maximum capacity to an event (and, separately, to individual sessions within an event). Once the capacity reached, further registrations are waitlisted. Which can be managed and maintained in any of 2 ways:

  • Automatic backfill: when a spot opens up, the system finds the longest-waiting waitlisted contact and registers them immediately.
  • Manual backfill: when a spot opens up, the contact is flagged as eligible, and you decide when and how to invite them to claim the seat.

How to Set It Up: A Single-Session Webinar

For a webinar, there’s no session-level agenda to worry about — capacity and waitlisting are configured once, directly on the event.

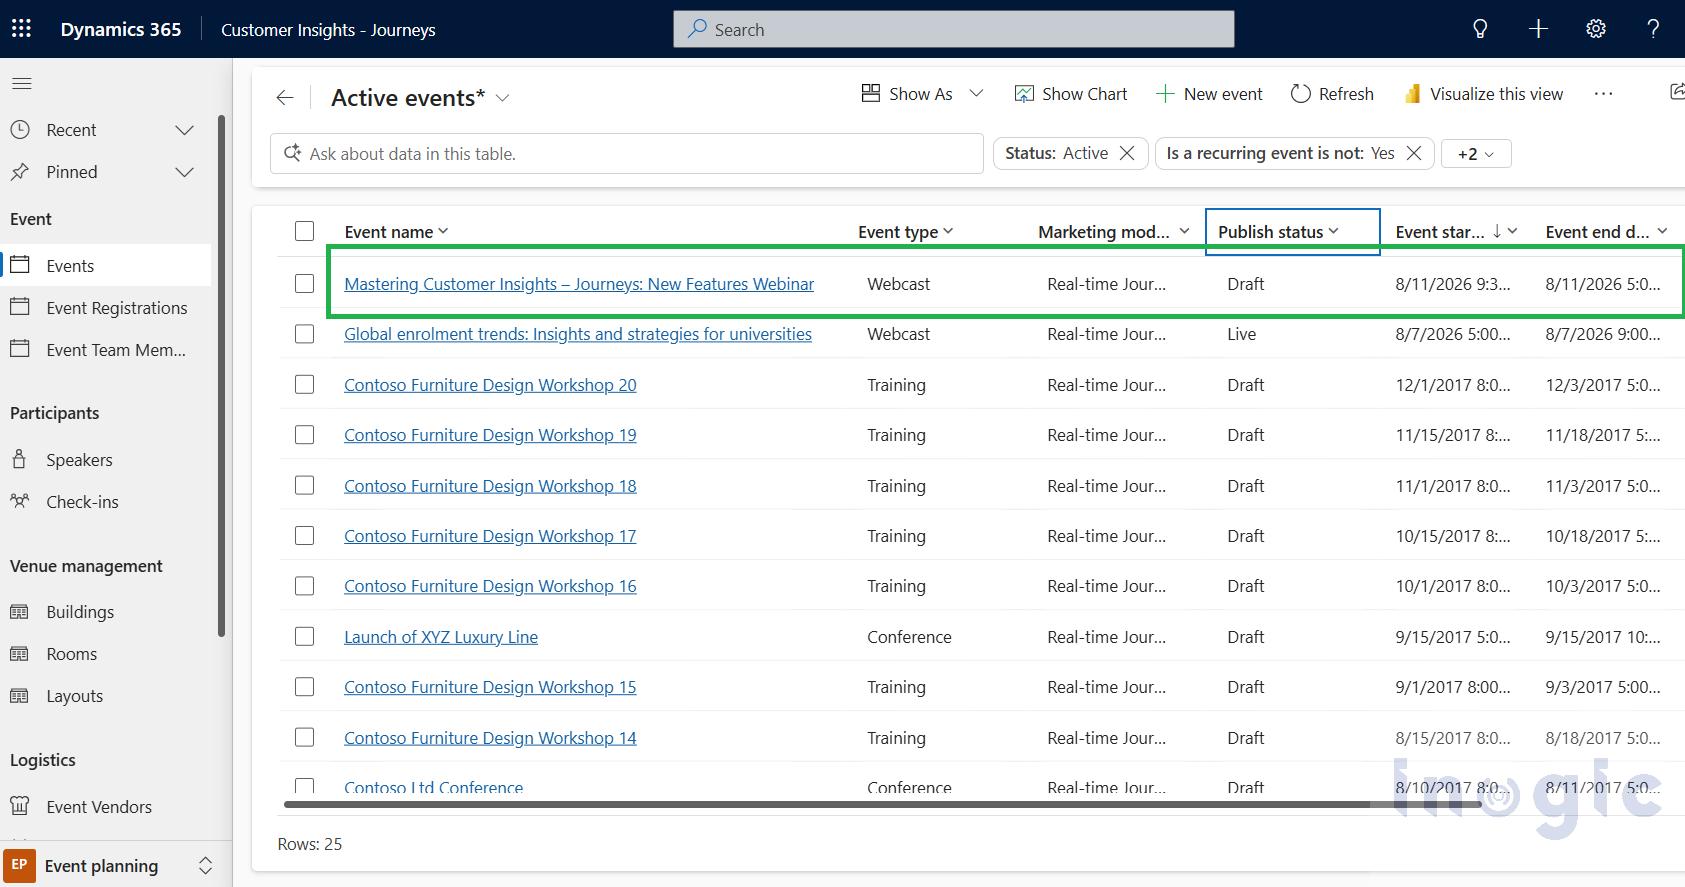
  1. In the Customer Insights Journeys app > under Event Planning > Open the Event work area and go to Events > Open your webinar event (As I am setting it up, its publish status = Draft initially, and when done with set up, we can make it Live).Setting Up Event Waitlists in Dynamics 365 Customer Insights - Journeys
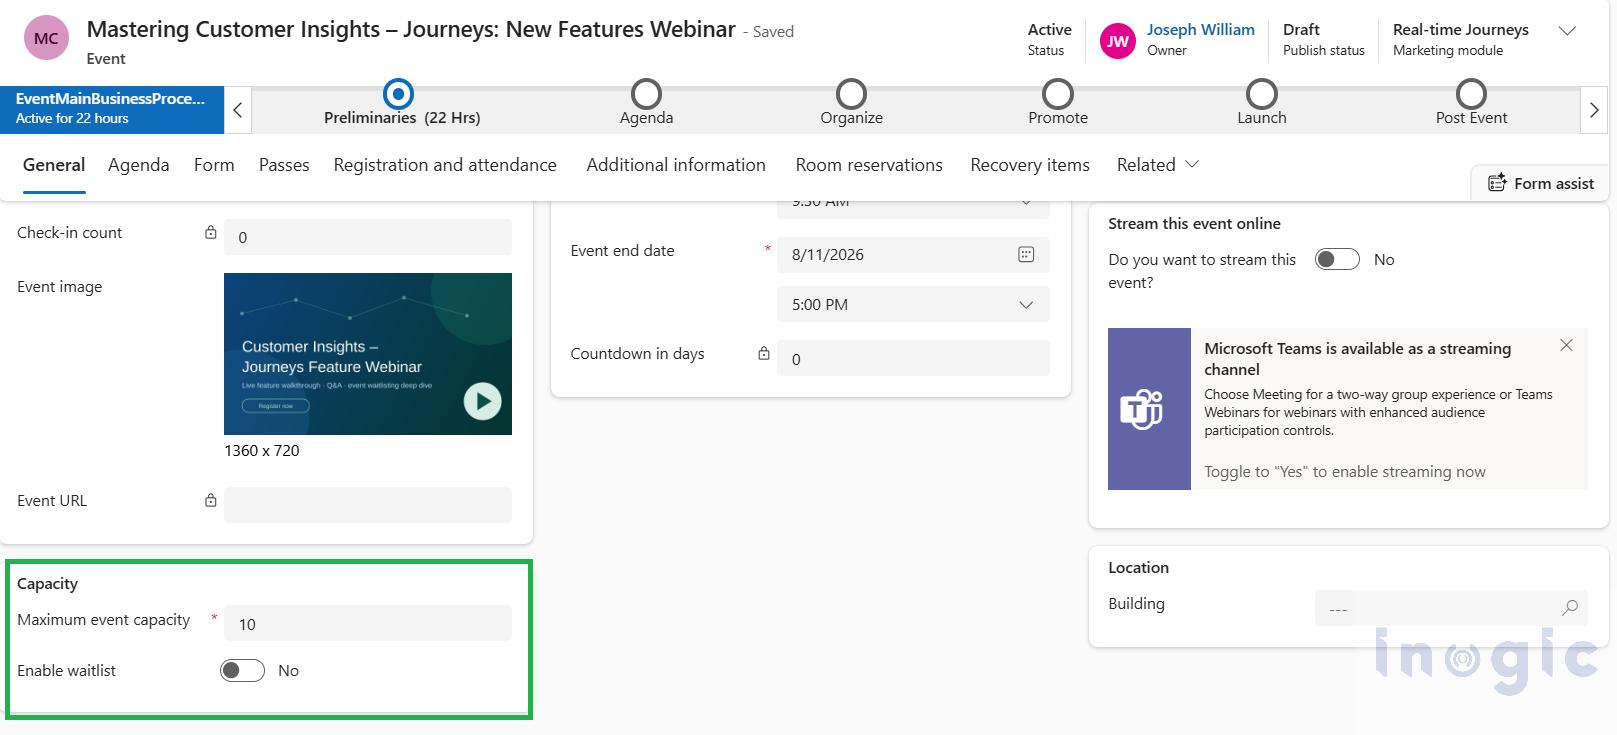
  2. On the General tab, under the Capacity area. Set the maximum event capacity to the number of attendees your webinar platform can support.

Setting Up Event Waitlists in Dynamics 365 Customer Insights - Journeys

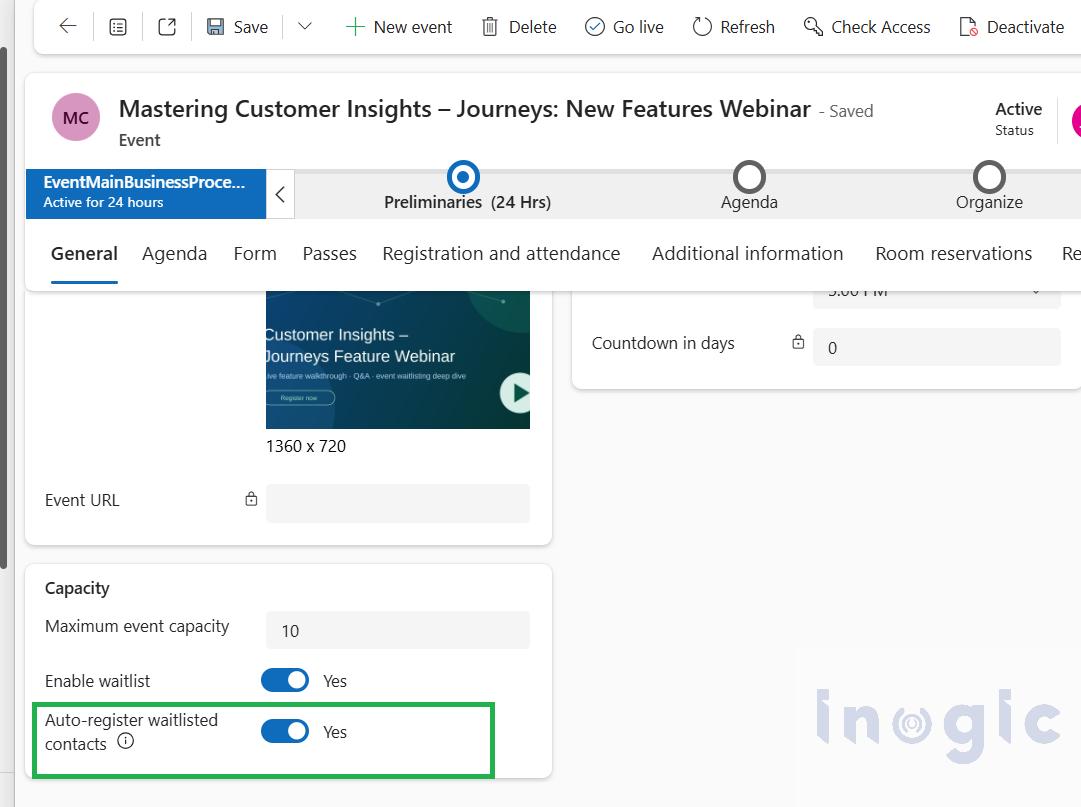
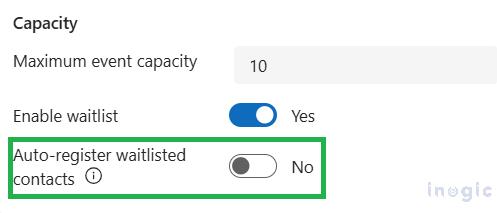
  1. Set the Waitlist for this event to Yes by changing the toggle “Enable waitlist” = yes
  2. Once toggle is set to Yes, the “Auto-register waitlisted contacts” field gets visible, which is set to No by default.

Setting Up Event Waitlists in Dynamics 365 Customer Insights - Journeys

Depending on the “Auto-register waitlisted contacts” setting on the event, the Auto-register waitlisted contacts behave as follows:

  • If it’s set to Yes, the system generates a registration for that contact automatically and flips their status reason to Registered.

With auto-register turned on, there’s no manual step at all — the system changes the status reason from Waitlisted to Registered on its own the moment a seat frees up.

  • If it’s set to No, the contact isn’t registered automatically. Instead, they need to be invited to confirm they still want the seat, typically via a segment and journey that targets people whose registration is waitlisted and flagged as invited.

Unlike the above option, someone must manually change their status reason from ‘Waitlisted’ to ‘Registered’ using the segment or journey automation.

Let’s keep the “Auto-register waitlisted contacts” toggle to yes as below:

Setting Up Event Waitlists in Dynamics 365 Customer Insights - JourneysOnce setup is finished, clicking on the Go Live button publishes the event and makes it available to registrants.
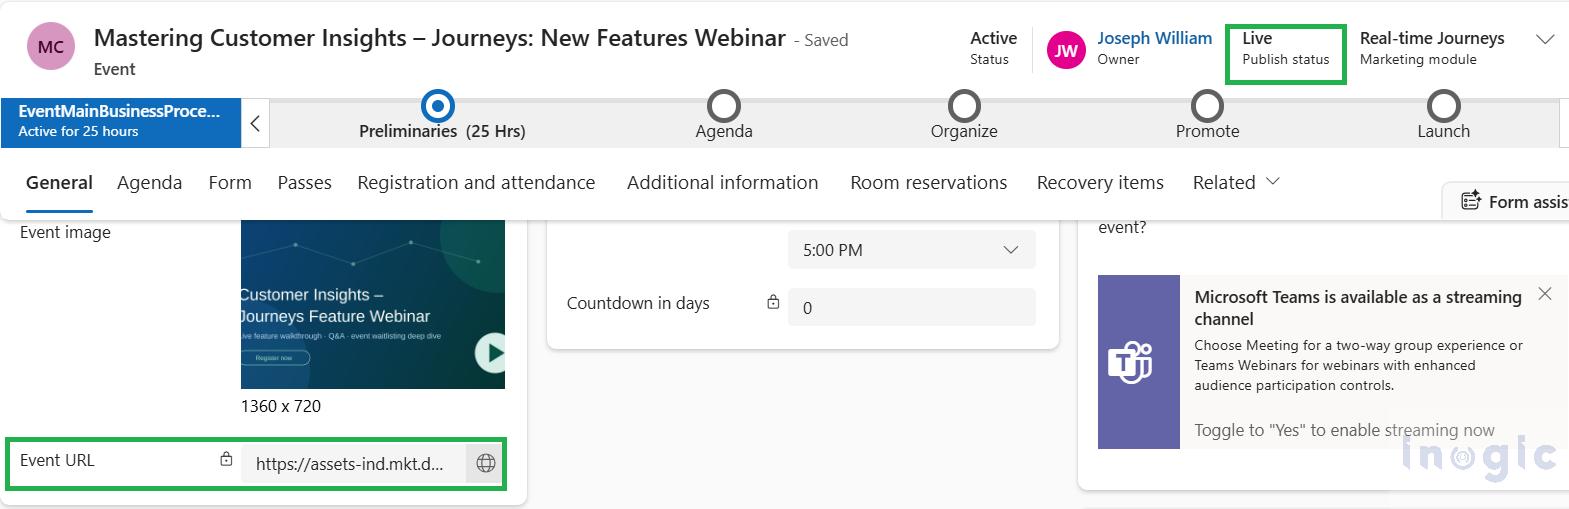
Setting Up Event Waitlists in Dynamics 365 Customer Insights - Journeys

Once the event is live, the auto-generated Event URL can be dropped into an email and distributed through a customer journey to a targeted segment for registration.

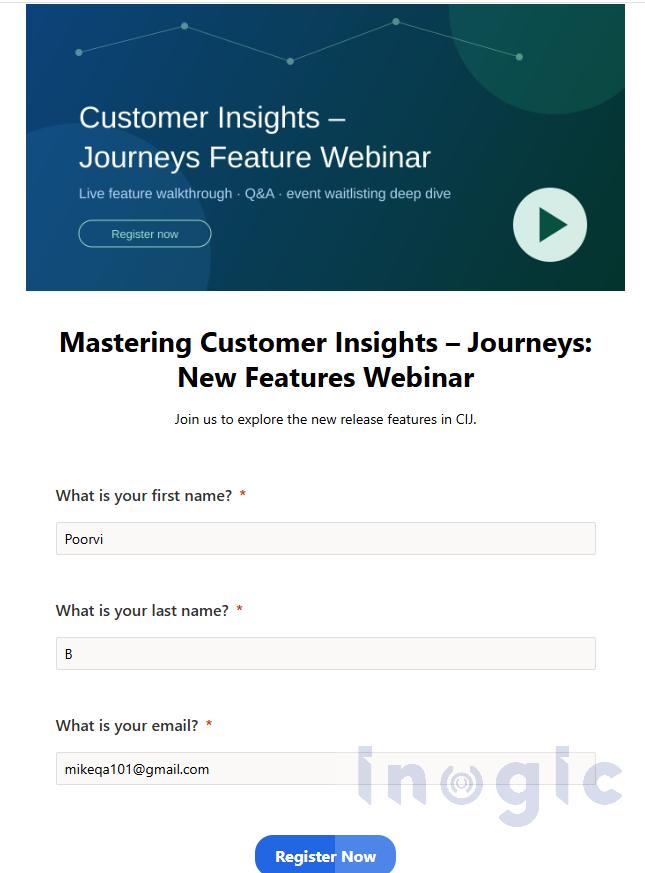
The event registration form that I have created and sent for registration is as follows:

Setting Up Event Waitlists in Dynamics 365 Customer Insights - Journeys

When the user clicks on the “Register Now” button, the “Event Registration” record will be created automatically.

You can refer to the MS doc for more details about Marketing forms. Let’s now look at the Journey side, which triggers are available.

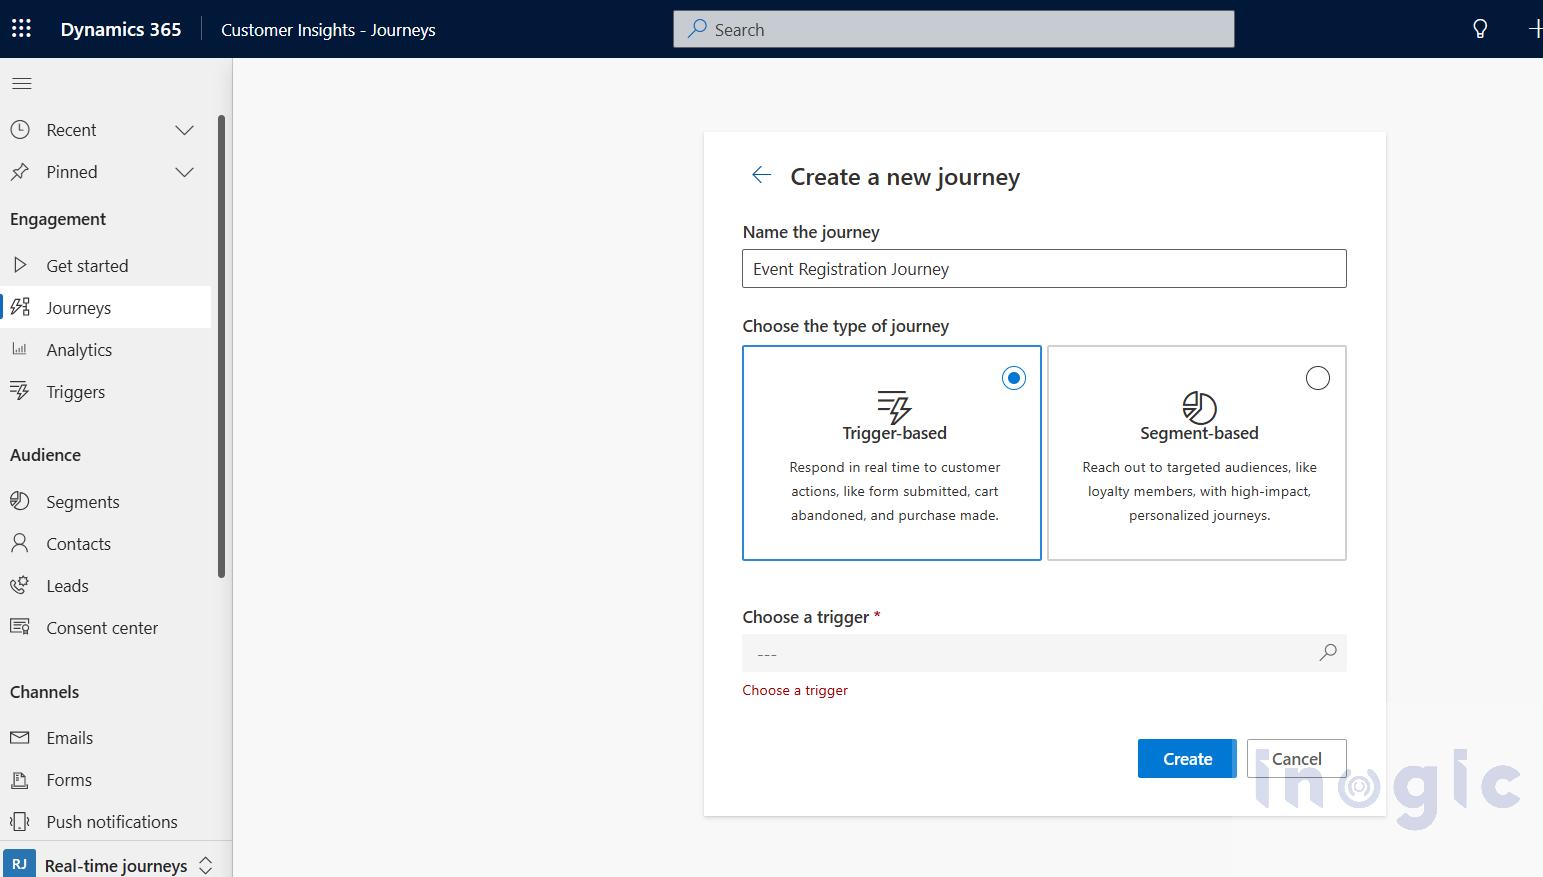
In Customer Insights – Journey app > under Real-time journeys > Journeys> create a new Journey record:

Setting Up Event Waitlists in Dynamics 365 Customer Insights - Journeys

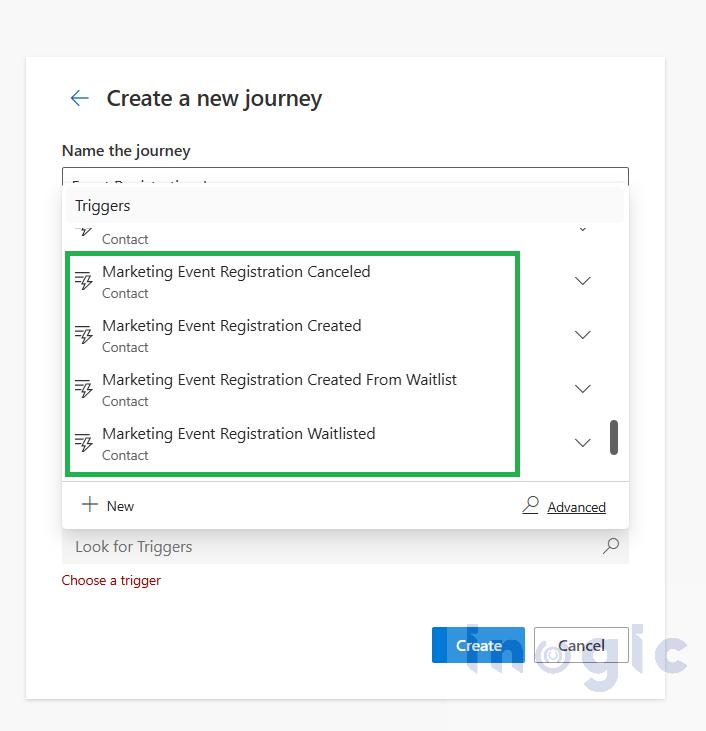
The available triggers are as follows:

Setting Up Event Waitlists in Dynamics 365 Customer Insights - Journeys

The two waitlist triggers

Two journey triggers ship with the feature, and they cover the two moments in the waitlist lifecycle you’re most likely to want to message around:

  • Marketing event registration created — fires when a new waitlist registration is created, useful for an immediate “you’re on the list” confirmation.
  • Marketing registration created from waitlist — fires when a registration’s status reason flips from Waitlisted to Registered, useful for the “a seat opened up — you’re confirmed” moment

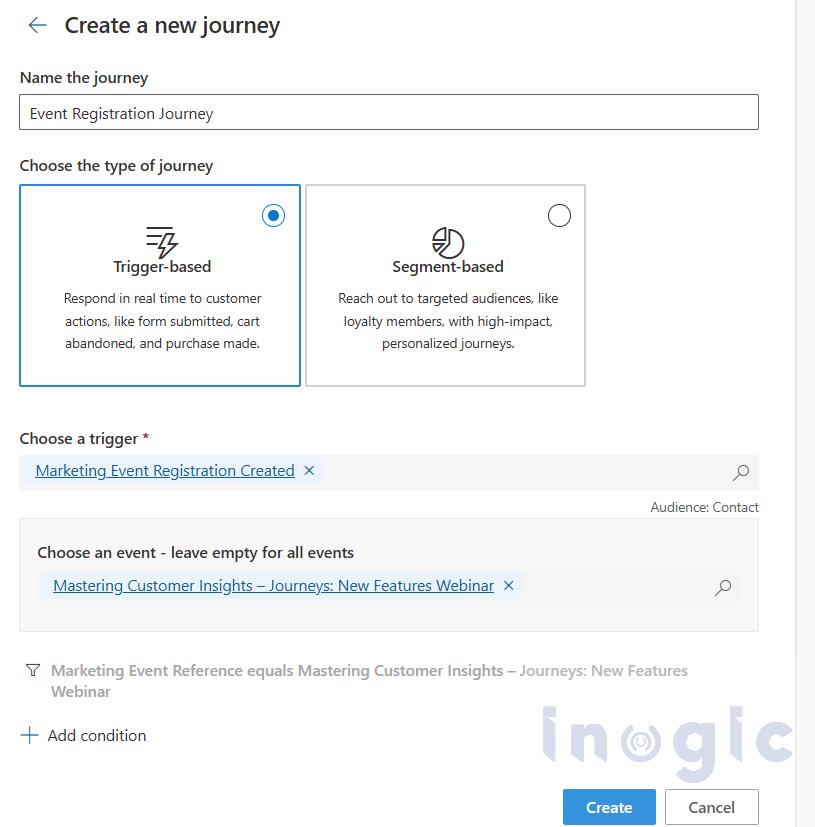
Select the appropriate trigger and choose your event record as below:

Setting Up Event Waitlists in Dynamics 365 Customer Insights - Journeys

For this blog, let’s keep the Journey very simple. When the Event Registration record is created, the Registration confirmation email should be sent. In reality, it can be complex with follow-up steps, and you can use the custom trigger when the status reason of the event registration record is updated. You can refer to the MS doc for more details about the custom trigger.

How It Works

The mechanics are simpler than they might sound, and they hinge entirely on the status reason attached to each event registration record.

Every registration that comes in after capacity is reached is saved with a status reason of Waitlisted, rather than Registered.

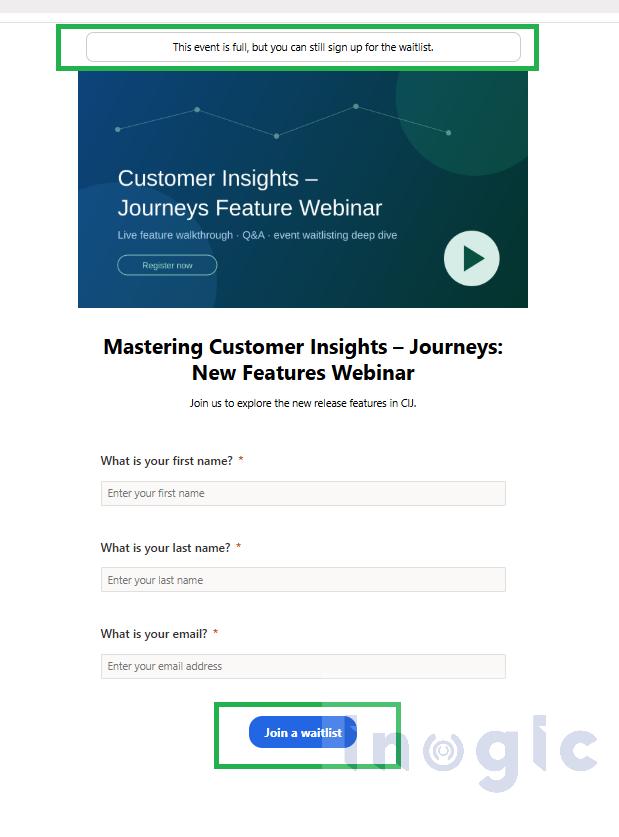
In our example, when the 11th attendee (as the capacity is set as 10) tries to register for the webinar, they will experience the waitlist form instead of the simple registration. Now they will click on the “Join a waitlist” button as displayed below:

Setting Up Event Waitlists in Dynamics 365 Customer Insights - Journeys

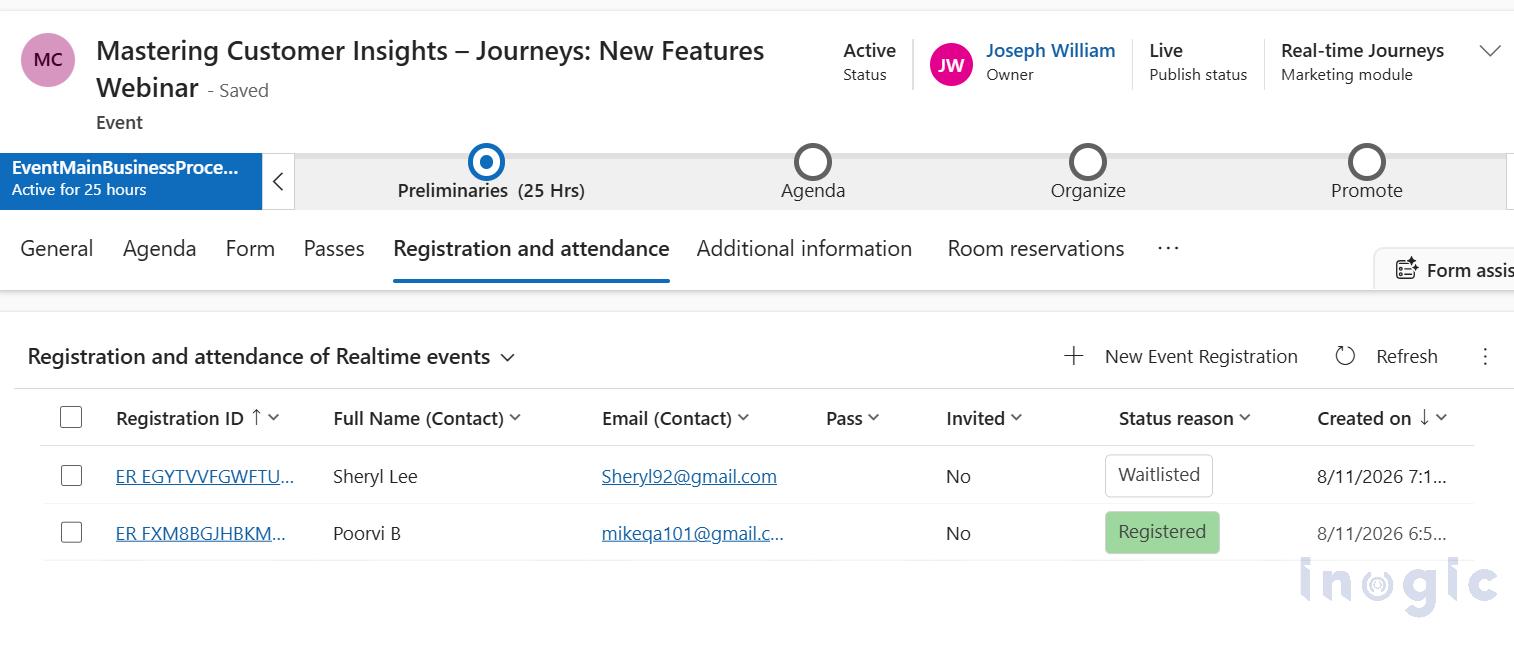
Event registration record still created with status reason as Waitlisted, shown below:

Setting Up Event Waitlists in Dynamics 365 Customer Insights - Journeys

When an existing registrant cancels (freeing up a seat), the system revisits the waitlist and identifies the oldest record — the contact who has been waiting longest, based on registration date and time.

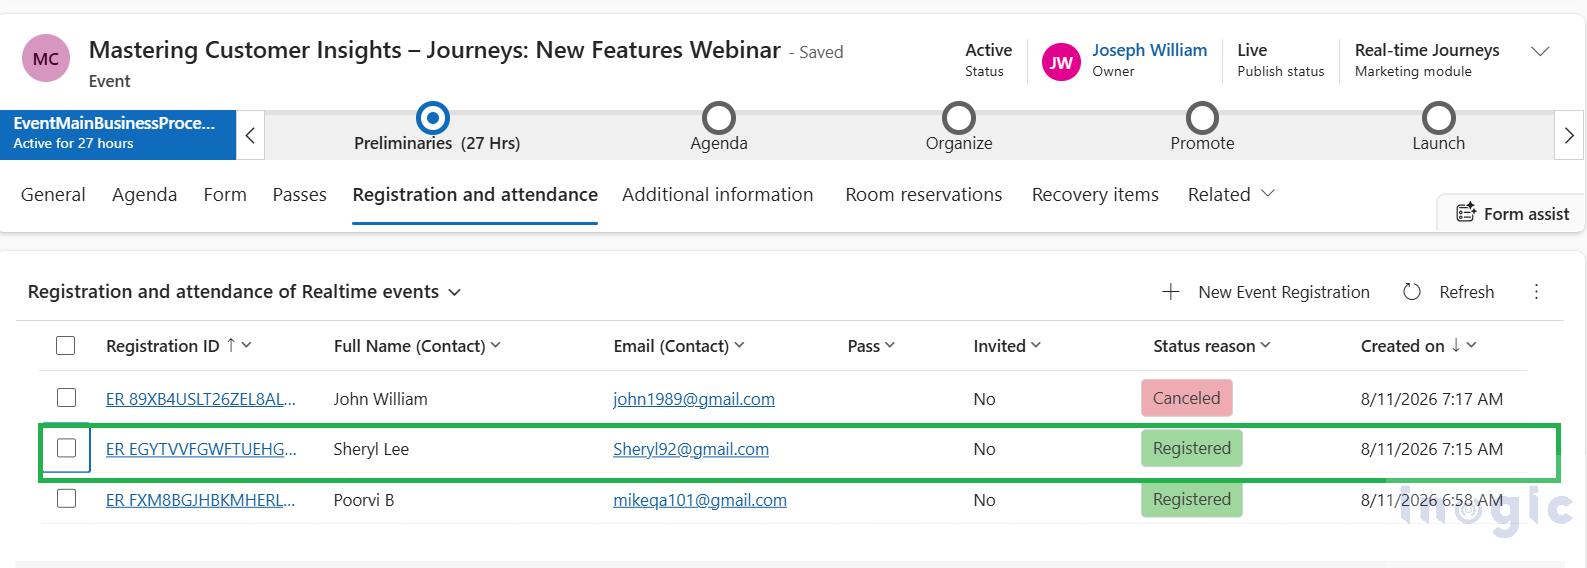
As the “Auto-register waitlisted contacts” setting is set to Yes in our scenario, the system will auto-change the “Waitlisted” status reason to “Registered” — no manual step is required.

Setting Up Event Waitlists in Dynamics 365 Customer Insights - Journeys

The status reason field is really the backbone of the whole feature — it’s what a segment or a journey trigger reads to know whether someone is holding a confirmed seat or still in the queue.

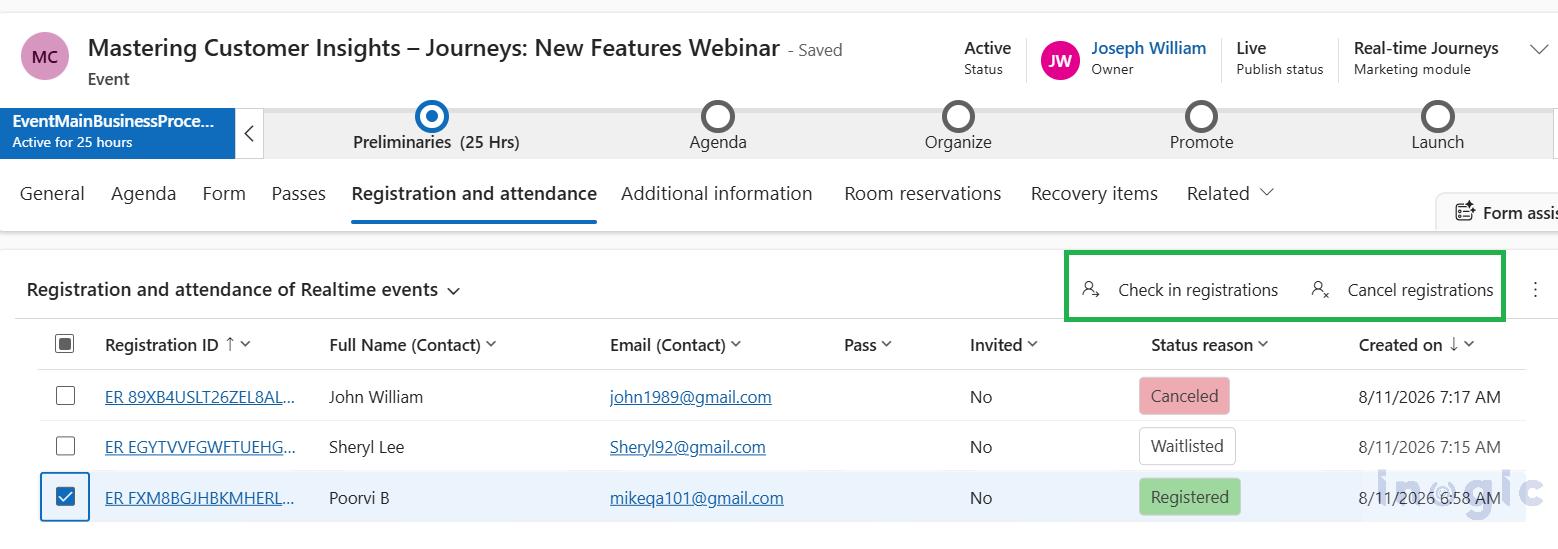
You can select a particular “Event Registration” record and can cancel the registration manually if needed, the 2 buttons available on selection of the record are Check in and Cancel Registration as shown below:

Setting Up Event Waitlists in Dynamics 365 Customer Insights - Journeys

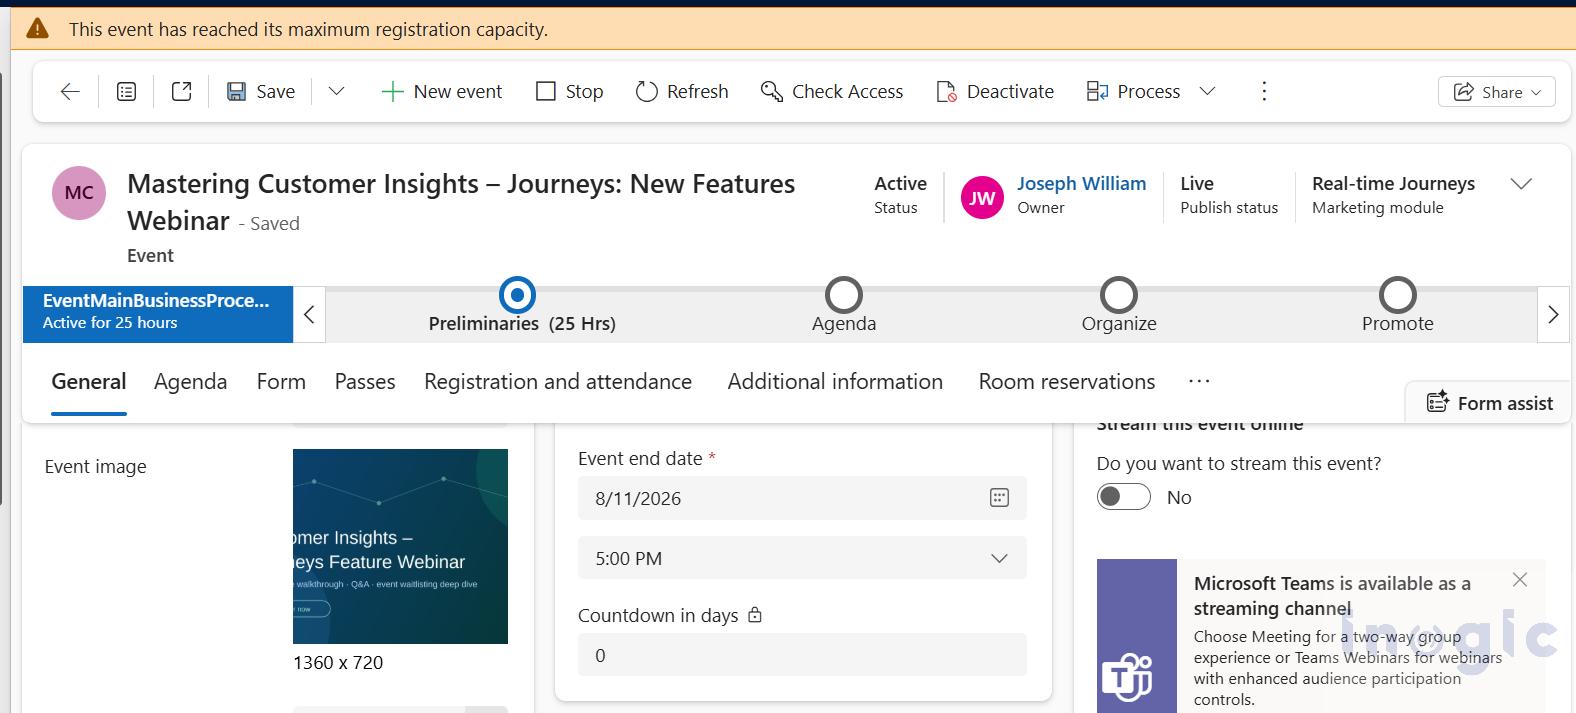
You will observe the warning on the event record itself that the event has reached its maximum registration capacity. For more details, refer to the MS doc.

Setting Up Event Waitlists in Dynamics 365 Customer Insights - Journeys

With waitlisting configured for this webinar, here’s what happens end-to-end:

  • Maximum event capacity is set to 10, Waitlist this event is set to Yes, and Auto-register waitlisted contacts is set to Yes.
  • The Marketing event registration created trigger fires the moment someone lands on the waitlist, so they can immediately receive a “you’re on the waitlist, we’ll notify you if a slot opens” email rather than being left wondering through Journey.
  • The Marketing registration created from the waitlist trigger fires the moment they’re promoted, sending a follow-up confirmation with the standard join link and calendar invite through Journey.

Conclusion

With event waitlisting, Customer Insights Journeys can automatically manage registrations as seats become available, while journey triggers keep registrants informed at each stage.

Looking to extend your Dynamics 365 capabilities? Explore Inogic for more Dynamics 365 solutions.

Have questions? Email us at crm@inogic.com

FAQs

1. How do I enable a waitlist in Dynamics 365 Customer Insights Journeys?

Open the event, go to the Capacity area, set the maximum event capacity, and enable the Waitlist option. You can then choose whether waitlisted contacts should be automatically registered when a seat becomes available.

2. What happens when a Dynamics 365 event reaches its maximum capacity?

New registrants are added to the waitlist instead of being registered directly. Their event registration record is created with the Waitlisted status reason.

3. Can Dynamics 365 automatically register contacts from an event waitlist?

Yes. Enable Auto-register waitlisted contacts on the event. When a registered attendee cancels and a seat becomes available, the longest-waiting contact can be automatically moved from Waitlisted to Registered.

4. What journey triggers are available for event waitlists?

Customer Insights Journeys provides two relevant triggers: Marketing event registration created, which can be used when a waitlist registration is created, and Marketing registration created from waitlist, which can be used when a waitlisted contact is moved to a confirmed registration.

5. Can I manually manage waitlisted registrations in Dynamics 365?

Yes. Waitlisted registrations can be reviewed and managed from the Event Registration records. You can also manually cancel registrations when required and use journeys or other automation to manage communication with waitlisted contacts.

The post Setting Up Event Waitlists in Dynamics 365 Customer Insights – Journeys first appeared on Microsoft Dynamics 365 CRM Tips and Tricks.

  •  

How to Add an Agent Node to an Agent Flow in Microsoft Copilot Studio

How to Add an Agent Node to an Agent Flow in Microsoft Copilot Studio

Modern Dynamics 365 applications often require intelligent automation to reduce manual effort and improve customer experience. Agent Nodes in Copilot Studio Agent Flows allow an existing AI agent to be invoked as part of a workflow. The flow can pass information to the agent, receive a structured response, and use that response in subsequent actions. In this example, a customer support email is analyzed by an agent, and the result is used to create a Dynamics 365 Case.

Key Takeaways

  • Add an AI agent to Copilot Studio Agent Flows using the Run an agent
  • Pass dynamic email subject and body to the agent at runtime.
  • Use Text + JSON to return structured AI outputs.
  • Automatically classify customer emails by category and priority.
  • Use AI-generated results to create Dynamics 365 Cases.
  • Replace manual triggers with automated email or business-event triggers in production.

Business Scenario

A customer support team receives requests that need to be classified before a Case is created. The requirement is to automatically analyze the incoming request and determine the appropriate routing information.

  • Identify the case category, such as Billing, Technical, Sales, or General.
  • Determine the priority: Low, Medium, High, or Critical.
  • Generate a short summary of the customer’s issue.
  • Use the AI-generated information while creating a Dynamics 365 Case.

Step 1: Create an Agent Flow

Navigate to: Copilot Studio → Flows → New Flow

Choose the Manually trigger a flow trigger.

Create the following trigger inputs:

Input Type (Text) – Email Subject (emailSubject), Email Body (emailBody)

How to Add an Agent Node to an Agent Flow in Microsoft Copilot Studio

This trigger is used only for demonstration purposes. In production, these values can come directly from Outlook, Dynamics 365, or another connector.

Step 2: Add the Agent Node

Click the + icon below the trigger and select: Run an agent

If prompted, sign in using your Microsoft account.

Select your published agent from the Agent dropdown.

Note: If the agent is not visible, verify that it has been published. Unpublished agents are not listed in the dropdown.

How to Add an Agent Node to an Agent Flow in Microsoft Copilot Studio

Step 3: Configure the Runtime Message

The Message field is the runtime input sent to the agent. Insert the trigger’s emailSubject and emailBody using dynamic content; do not hardcode the values in the flow.

Example message:
Analyze the following customer support email and identify the information required for case routing in Dynamics 365.

Email Subject:
[dynamic emailSubject]
Email Body:
[dynamic emailBody]
Based on the email, determine:
– Category (Billing, Technical, Sales, or General)
– Priority (Low, Medium, High, or Critical)
– A concise one-line summary of the issue.

Return the response using the JSON schema provided. Do not include any additional text, explanations, or markdown.

How to Add an Agent Node to an Agent Flow in Microsoft Copilot Studio

Step 4: Configure the Agent Response

Under Agent response as shown in the above screenshot, select Text + JSON. In the JSON section, define the expected structure so the flow can use each result as a separate output.

{
 “type”: “object”,
 “properties”: {
 “category”: { “type”: “string” },
 “priority”: { “type”: “string” },
 “summary”: { “type”: “string” }
 },
 “required”: [“category”, “priority”, “summary”],
 “additionalProperties”: false
}

This produces structured outputs such as category, priority, and summary that can be selected as dynamic content in later actions.

Step 5: Test the Agent

To test the Agent Flow, use a real customer email as the input for the manual trigger.

  1. Run the flow using the Test
  2. In the Email Subject field, enter the subject of a received customer email.
  3. In the Email Body field, copy and paste the corresponding content of the email.
  4. Execute the flow.

The email subject and body are passed dynamically to the Run an agent node. The agent analyzes the provided content according to its configured instructions and JSON schema.

After the flow completes, review the Run history to see the Agent Node’s response. The structured output will contain the properties configured in the response schema, such as:

{
  “category”: “Billing”,
  “priority”: “High”,
  “summary”: “Customer reports being charged twice for an invoice and requests investigation and refund.”
}

The actual values will vary depending on the email used for testing. These structured outputs can then be used by subsequent actions in the flow, such as creating or updating a Dynamics 365 Case.

Note: The manual trigger is used here only to simulate the receipt of a customer email. In a production implementation, the trigger can be replaced with an appropriate automated trigger so that the email content is passed to the Agent Node without requiring manual input.

How to Add an Agent Node to an Agent Flow in Microsoft Copilot Studio

Step 6: Use the Agent Output in Dynamics 365

The structured output from the Agent Node can now be used in a Dataverse action such as Add a new row to create a Case.

In this implementation:

  • Title was mapped to the AI-generated Summary.
  • Description was mapped to the Email Body.
  • Customer was mapped by binding an existing Account through its OData ID.

Note: The Customer field on the Case table is a lookup field. It requires a valid Account or Contact reference (OData ID). Providing only the account name will result in an error.

Result

After running the flow successfully:

  • The customer email was analyzed by the AI agent.
  • The issue was classified automatically.
  • Priority and summary were generated.
  • A Dynamics 365 Case was created using the structured output returned by the agent.

This demonstrates how an Agent Node can intelligently process business data before it is consumed by Dynamics 365.

Conclusion

The Run an agent node makes it easy to integrate AI into Dynamics 365 workflows. By passing real-time data to an agent and using its structured output, tasks such as email analysis, case classification, and case creation can be automated efficiently.

FAQs

1. What is an Agent Node in Microsoft Copilot Studio?

An Agent Node, available through the Run an agent action in Copilot Studio Agent Flows, allows a workflow to invoke a published AI agent. The flow can pass dynamic information to the agent, receive a structured response, and use that output in subsequent actions such as creating a Dynamics 365 Case.

2. How do I add an Agent Node to an Agent Flow in Copilot Studio?

Create an Agent Flow in Copilot Studio, add a trigger, and select Run an agent from the available actions. Choose the required published agent, configure the runtime message, and define the expected response format. The agent can then process information passed from the flow.

The post How to Add an Agent Node to an Agent Flow in Microsoft Copilot Studio first appeared on Microsoft Dynamics 365 CRM Tips and Tricks.

  •  

Configuring the Sales Opportunity Agent in Dynamics 365

Configuring the Sales Opportunity Agent in Dynamics 365Every sales pipeline eventually faces the challenge of managing increasing deal volume and complexity. As opportunities grow, sellers spend more time reviewing emails, updating notes, tracking interactions, and gathering information from different sources. Opportunities can also lose momentum when key contacts become unresponsive, decision-makers change, or competitors enter the discussion. Without a structured process for tracking these changes, such opportunities may not receive timely attention until a forecast or pipeline review.
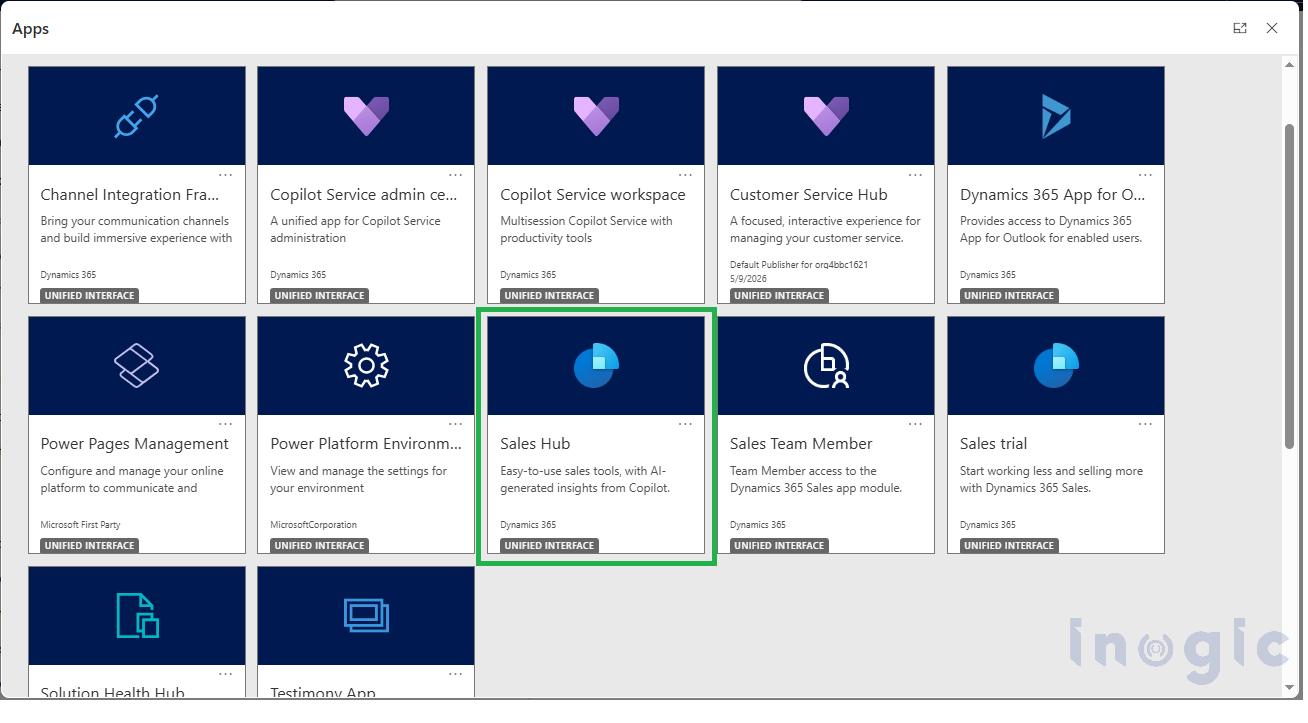
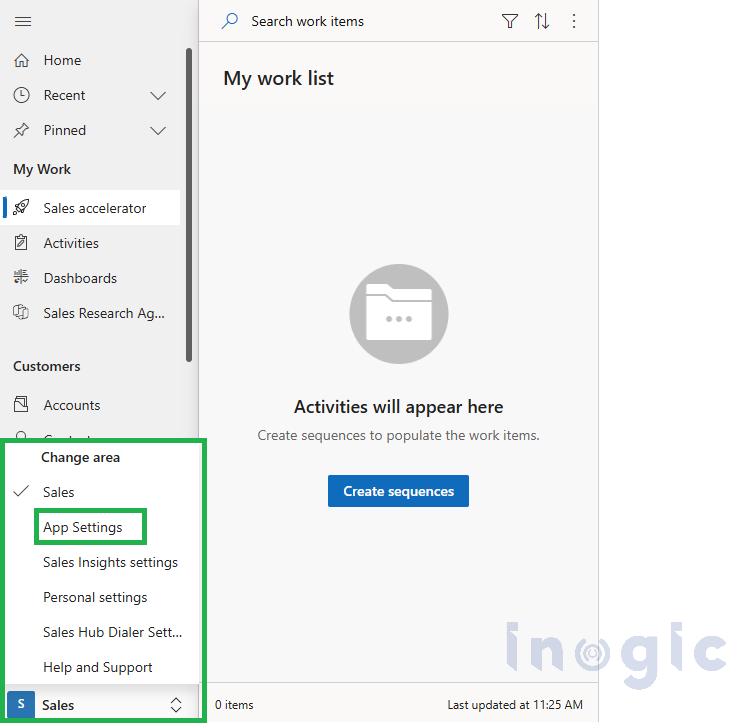
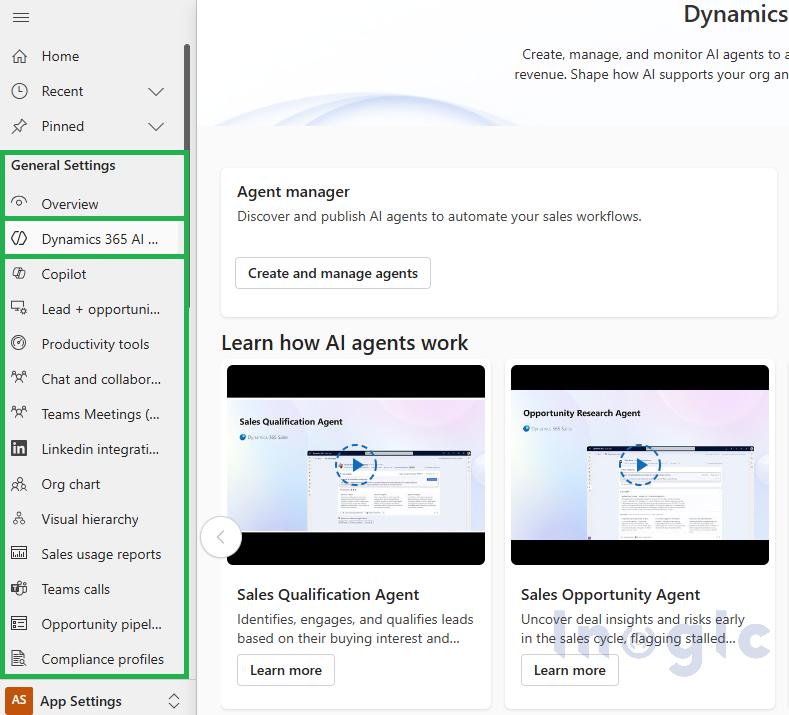
The Sales Opportunity Agent in Dynamics 365 Sales helps streamline opportunity management by supporting sellers with opportunity research, prioritization, and risk identification. Instead of relying solely on manual reviews and dashboards, it can help surface relevant information and potential issues associated with open opportunities.

For CRM administrators and RevOps teams, implementing the agent requires appropriate configuration and preparation. This guide covers the key capabilities of the Sales Opportunity Agent, the benefits of configuring it, the prerequisites to consider, the main configuration steps, and how to validate the setup before making it available to sales users.

What is a Sales Opportunity Agent?

At a high level, the Sales Opportunity Agent in Dynamics 365 Sales helps sales teams monitor and manage open opportunities based on criteria defined by the administrator. It supports opportunity prioritization, risk identification, account research, and recommended actions, helping sellers focus on opportunities that may require attention.

The agent can be configured from the Dynamics 365 Sales AI Hub, with administrators defining which opportunities are included. Once configured, it can support the following activities:

  1. Opportunity prioritization: Categorizes opportunities based on factors such as deal value, account information, and historical sales data.
  2. Risk assessment: Reviews information available in CRM, including related activities and email interactions, to identify potential risks or areas requiring attention.
  3. Opportunity research: Organizes relevant information about stakeholders, competitors, account details, business challenges, and other opportunity-related factors, with references to the available sources.
  4. Recommended actions: Provides suggested next steps on the opportunity record based on the information and risks identified.
  5. Scheduled updates: Runs according to the configured schedule, allowing opportunity information and related activities to be reviewed periodically.

This provides sellers with a more structured view of opportunity status, potential risks, and recommended follow-up actions without requiring them to manually review every source of information.

The agent can also use the predictive opportunity scoring model available in Dynamics 365 Sales as part of its risk assessment. If the required predictive scoring model is not already configured, the necessary setup may be initiated when the agent runs.

It is important to understand the scope of the Sales Opportunity Agent. Its primary purpose is to research, assess, and provide recommendations for opportunities. It does not independently contact customers or perform outbound sales activities. Customer outreach is handled through other Dynamics 365 Sales capabilities, such as the Sales Close Agent.

For administrators, clearly defining opportunity selection criteria and understanding how different sales capabilities interact is important when configuring the agent.

Why the Setup Effort Is Worth It?

For sales operations teams, configuring the Sales Opportunity Agent can provide several practical benefits across the sales process:

  • Reduces manual research: Opportunity information, account details, stakeholder information, and competitive data can be organized within the opportunity, reducing the need for sellers to gather information manually from multiple sources.
  • Identifies risks earlier: Changes in stakeholder engagement, missing key information, or other opportunity gaps can be highlighted earlier, allowing sellers and managers to address potential issues before they affect the deal.
  • Creates consistent prioritization: Opportunities can be evaluated using consistent criteria, giving sales teams a more structured approach to determining which opportunities require attention.
  • Improves pipeline visibility: Sales managers can review opportunities using consistent information and risk indicators, making pipeline reviews more structured and data-driven.
  • Supports higher sales volumes: As the number of opportunities increases, standardized research and assessment processes can help reduce the additional administrative effort required from sellers.

Overall, the configuration helps establish a more consistent process for reviewing, prioritizing, and managing sales opportunities, while reducing the amount of manual effort required from sales teams.

Prerequisites

Before configuring the Sales Opportunity Agent, make sure your Dynamics 365 Sales environment, licenses, and user permissions meet the required prerequisites. These requirements can be grouped into general Sales agent requirements and prerequisites specific to the Sales Opportunity Agent.

General Requirements

  • Administrator access: You should have the appropriate administrator permissions in the Dynamics 365 Sales environment to configure the agent.
  • Copilot Studio license: A Copilot Studio license is required because the agent is configured and operates through Copilot Studio.
  • Modern UI enabled: The modern user interface should be enabled for the Sales Hub app. Some agent configuration options and related views may not be available without it.
  • Access to Dynamics 365 AI Hub: The administrator should be able to access General Settings > Dynamics 365 AI Hub. If this option is unavailable, review the user’s security roles and permissions.

Sales Opportunity Agent-Specific Requirements

  • Required license or service access: At least one supported license or service should be available, such as a Microsoft 365/Office 365 license, Power Automate Premium, or Dynamics 365 Sales Enterprise/Premium Edition. This is required for accessing the opportunity owner’s email information and related insights.
  • Email access configuration: Determine how email information will be accessed. The agent can use server-side synchronization to work with email data synchronized to Dynamics 365 Sales or direct Microsoft 365 Services access. Both options can also be enabled when required.
  • Bing Search configuration: If the agent needs to use public information about accounts and competitors, ensure the required Bing Search terms are accepted and configured in the Power Platform admin center.
  • Security roles: Confirm that sales users have the required permissions to view the agent’s information and recommendations. Standard Salesperson and Sales Manager roles provide the necessary access. If your organization uses custom security roles, verify that equivalent permissions have been assigned.

Completing these prerequisites before configuration helps avoid issues with agent visibility, email access, data availability, and user permissions during implementation.

Step-by-Step Configuration

Below is the click-by-click path to stand up a brand-new instance of the agent.

Step 1: Open the Sales Hub App

  • Sign in to Dynamics 365 and launch Sales Hub from your app list.

Configuring the Sales Opportunity Agent in Dynamics 365

Step 2: Get to the AI Hub

  • In the bottom-left corner of the screen, open the Change area menu — by default it’ll say “Sales.”
  • Choose App Settings from the menu that pops up.Configuring the Sales Opportunity Agent in Dynamics 365
  • In the left navigation pane, scroll down until you see General Settings, then click Dynamics 365 AI Hub.

Configuring the Sales Opportunity Agent in Dynamics 365

Step 3: Kick Off Agent Creation

  • Under the Agent manager section, choose Create and manage agents.
    • First time here? You’ll hit a Prerequisites page — read through it and accept before moving on. Configuring the Sales Opportunity Agent in Dynamics 365
  • Hit Create, then pick Sales Opportunity Agent from the list of agent types.Configuring the Sales Opportunity Agent in Dynamics 365

Configuring the Sales Opportunity Agent in Dynamics 365

  • Give it a name that actually means something later — “High-Value Enterprise Deals” will save you confusion down the road; “Test” will not.

Step 4: Fill in Profile and Company Details

  • Click into the General tab.
  • Fill out the Agent profile section — this is metadata the app uses internally.Configuring the Sales Opportunity Agent in Dynamics 365
  • Complete the Company info section. This is what the agent references when it’s putting together competitor comparisons and account-level research, so it’s worth getting right. Configuring the Sales Opportunity Agent in Dynamics 365

Step 5: Set Your Selection Criteria

This is the step that decides which records actually get worked on. Spend real time here — sloppy criteria means the agent burns cycles researching deals that were never going anywhere.

  • Head to the Selection criteria section.
  • Build out conditions using AND logic. A reasonable starting baseline:
    • Field: Status | Operator: Equals | Value: Open
    • Field: Status Reason | Operator: Equals | Value: In Progress
    • Field: Estimated revenue | Operator: Is greater than | Value: [your target amount] Configuring the Sales Opportunity Agent in Dynamics 365
  • Optional: turn on the “Consider opportunities created in the last [N] days” toggle if you’d rather scope the agent to a rolling window instead of pointing it at your entire historical pipeline.

Step 6: Configure Advanced Settings

  • Open the Advanced section to fine-tune how the engine behaves.
    • Refresh frequency: how often the agent re-runs the full research pass — 3, 7, or 14 days are the typic Configuring the Sales Opportunity Agent in Dynamics 365
    • Opportunity assessment: the logic that decides how deal importance gets weighted. Configuring the Sales Opportunity Agent in Dynamics 365
    • Risk & Importance criteria: the specific thresholds that trigger each label. Configuring the Sales Opportunity Agent in Dynamics 365Configuring the Sales Opportunity Agent in Dynamics 365

Step 7: Save It and Turn It On

  • Click Apply changes to save the configuration.
  • Flip the agent’s toggle to On.
  • Check the status indicator near the top of the page to confirm it’s actually running. You can come back to this same screen and click Stop agent any time you need to pause it.Configuring the Sales Opportunity Agent in Dynamics 365

Pro Tip: Running Multiple Agent Instances

Dynamics 365 Sales supports up to 10 active Sales Opportunity Agent instances per environment. Instead of using one instance with broad selection criteria, administrators can create separate instances based on business requirements, product lines, opportunity types, or deal segments.

For example, an organization could configure:

  • One instance for large enterprise opportunities with a longer refresh interval.
  • Another instance for smaller manually created opportunities that may not meet the primary instance’s selection criteria.

This approach allows each instance to have more focused selection criteria and refresh settings, making it easier to manage different types of opportunities.

Testing and Validation

Before enabling the agent across the entire sales pipeline, validate the configuration with a controlled set of opportunities. This helps identify selection, data, and permission issues before users start relying on the results.

1. Review the Preview

Use the Preview panel on the Selection criteria page to review a sample of opportunities that match the configured criteria.

The preview is intended as a representative sample and should not be treated as a guaranteed lookup for a specific opportunity. If you need to verify whether a particular opportunity meets the criteria, use an Opportunities view, Advanced Find, or a saved view with the same conditions.

2. Test with Known Opportunities

Start with a small number of opportunities that the sales team already understands well. Review whether the generated research, importance classification, and risk information are consistent with the information already available in Dynamics 365.

This provides a practical way to identify configuration or data issues before expanding the agent to the full pipeline.

3. Review the Generated Views

After the agent completes at least one processing cycle, review the associated views to confirm that opportunities are being categorized correctly:

  • My top opportunities from AI agent – Review high- and medium-importance opportunities.
  • Opportunities researched by AI agent – Review opportunities that have been researched.
  • Deals at risk (AI agent) – Review opportunities where a risk has been identified.

If expected opportunities are missing, review the selection criteria and related configuration.

4. Apply Configuration Changes and Allow for Refresh

Changes to the selection criteria do not take effect until you select Apply changes. Also, the agent processes opportunities according to its configured refresh schedule rather than immediately after every record update.

After making changes, allow a complete processing cycle before concluding that an opportunity has not been picked up.

5. Review the Actual Research Results

Don’t limit validation to checking how many records were processed. Open several researched opportunities and review the information provided about:

  • Stakeholders
  • Competitors
  • Account information
  • Opportunity risks
  • Recommended actions

Compare the results with information already known by the sales team. This can help identify issues with data availability, configuration, or external search results before the agent is made widely available.

A structured testing process ensures that the agent’s selection criteria, generated information, views, and refresh behavior are working as expected before it is introduced into the wider sales process.

Conclusion

The Sales Opportunity Agent helps teams research, assess, and prioritize opportunities in Dynamics 365 Sales while reducing manual effort.

A successful setup requires the right licensing, security roles, selection criteria, and data access. Start with a small set of opportunities, validate the results, and expand gradually.

With proper configuration, the agent can provide consistent opportunity insights, earlier risk identification, and better pipeline management.

FAQs

Q: Will the Sales Opportunity Agent contact my customers directly?

No. The Sales Opportunity Agent is designed for research and analysis and does not initiate outbound customer communication. Customer outreach is handled separately through the Sales Close Agent’s engage function, which can be configured and scoped independently. If both agents are running in the same environment, make sure their selection criteria do not overlap to avoid duplicate processing or, in some cases, conflicting risk labels on the same opportunity.

Q: Can I run more than one Sales Opportunity Agent instance at the same time?

Yes. You can have up to 10 active Sales Opportunity Agent instances per environment. This can be useful for organizations with different product lines or deal segments that require different thresholds, refresh frequencies, or knowledge sources. Instead of using one broad set of criteria, you can create separate instances to address specific business requirements.

Q: What happens to opportunities that fall below the revenue threshold?

A Sales Opportunity Agent instance only processes opportunities that meet its configured selection criteria. If an opportunity falls below the defined revenue threshold, that instance will not research it. If you need to cover lower-value opportunities as well, you can create a separate instance with criteria and a refresh cycle suited to that segment.

Q: Can I change the selection criteria after configuring the Sales Opportunity Agent?

Yes. You can update the selection criteria as your business requirements change. After making changes, select Apply changes for the updated criteria to take effect. The agent will then process opportunities according to its configured refresh schedule.

Q: How can I verify that the Sales Opportunity Agent is working correctly?

You can validate the configuration by reviewing the Preview panel, testing the agent with known opportunities, and checking the generated views after the agent completes a processing cycle. You can also review the generated research, risk information, and recommended actions to confirm that the results align with the information already available to your sales team.

The post Configuring the Sales Opportunity Agent in Dynamics 365 first appeared on Microsoft Dynamics 365 CRM Tips and Tricks.

  •